Managing Stress and Strain to Get the Best Performance in High Precision Tilt/Angle Sensing
Managing Stress and Strain to Get the Best Performance in High Precision Tilt/Angle Sensing
Oct 1 2020
Introduction
Accelerometers are marvelous sensors that enable the sensing of static and dynamic accelerations as varied as the orientation with respect to gravity to the subtle motions of bridges beginning to fail. These sensors range from cell phone-grade devices that change the orientation of your display when you tilt them to export-controlled, tactical-grade devices that help to navigate military vehicles or spacecraft.1 However, as with most sensors, it’s one thing for the sensor to perform well in the lab or benchtop. It’s quite another to get that performance at the system level in the face of environmental and temperature stresses that are wild and uncontrolled. When accelerometers, like humans, experience unprecedented stress in their lifetime, the system may react and fail due to effects from these stresses.
High accuracy tilt sensing systems are generally calibrated to achieve tilt accuracies better than 1°. Utilizing market-leading ultralow noise and highly stable accelerometers, such as the ADXL354or ADXL355, one can achieve tilt accuracy of 0.005° with proper calibration of observable error sources.2 However, this level of accuracy can only be achieved if stresses are properly mitigated. For instance, compressive/tensile stresses on the sensor can cause offsets as large as 20 mg, and thus tilt inaccuracies over 1°.
This article reviews the performance metrics of a high precision angle/tilt sensing system using accelerometers. It will start with an understanding of the sensor design itself at the microscopic level in order to better understand the effects of stresses and strains down to the micron level. It will show some surprising results that can happen if a holistic mechanical and physical design approach is not followed. Finally, it will close with tangible steps designers can take to maximize performance in the most demanding applications.
ADXL35x Sensor Design
MEMS-based accelerometers can run the gamut in price and performance from consumer products to military sensing. The best performing low noise accelerom-eters in the Analog Devices portfolio are the ADXL354 and ADXL355, which enable applications like precision tilt sensing, seismic imaging, and many emerging applications in robotics and platform stabilization. The ADXL355 has market-leading features that makes it unique in high precision tilt/angle sensing applications, such as excellent noise, offset, repeatability, and temperature-related offsets, as well as its second-order effects like vibration rectification and cross-axis sensitivity. This specific sensor will be explored in detail as an example of a high precision accelerometer; however, the principles discussed in this section apply to the vast majority of 3-axis MEMS accelerometers.
To better understand the design considerations for the ADXL355 to perform optimally, it is educative to first review the internal structure of the sensor, which will clarify the reason the three axes produce different responses to environmental parameters (for example, out-of-plane stress). In many cases, this out-of-plane stress is caused by a temperature gradient across the z-axis of the sensor.
The ADXL35x family of accelerometers consists of a spring mass system, similar to many other MEMS accelerometers. The mass moves in response to an external acceleration (static acceleration like gravity or dynamic acceleration like velocity changes) and its physical displacement is sensed by a transduction mechanism. The most common transduction mechanisms in MEMS sensors are capacitive, piezoresistive, piezoelectric, or magnetic. ADXL355 utilizes a capacitive transduction mechanism, in that a movement is sensed by a change in capacitance that, through a readout circuit, is converted to voltage or current output. Although the ADXL355 utilizes the capacitive transduction mechanism for all three axes sensors on a silicon die, X/Y sensors and Z sensors have two fundamentally different capacitive sensing architectures. X/Y sensors are based on differential in-plane fingers, while a Z sensor is an out-of-plane, parallel plate capacitive sensor, as shown in Figure 1.
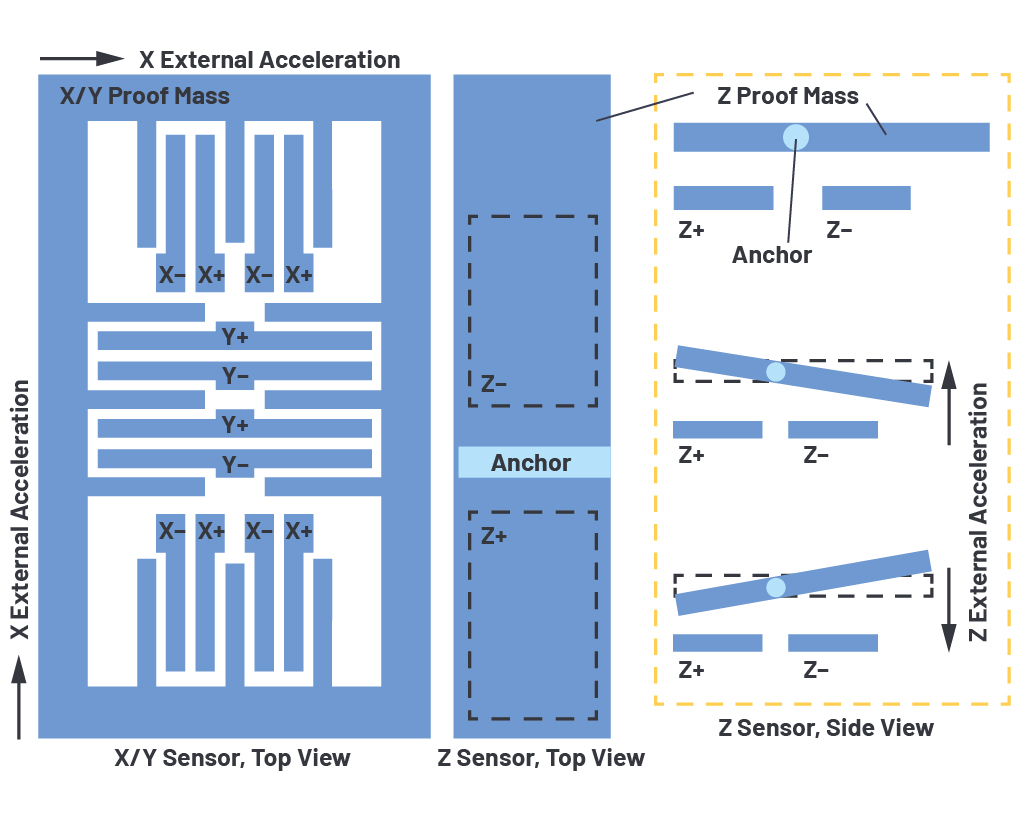
Figure 1. Sensor architecture of the ADXL355. For the X/Y sensor, as the proof mass moves, the capacitance between the anchored fingers and the fingers attached to the proof mass changes. The imbalance of mass on the z-axis sensor allows for out-of-plane sensing of z-axis acceleration.
If there is either compressive or tensile stress on the sensor, the MEMS die warps. Since the proof mass is suspended over the substrate with springs, it does not warp in tandem with the substrate, and, therefore, there will be a change in the gap between the mass and the substrate. For X/Y sensors, the gap is not in the direction of capacitive sensitivity, as the in-plane displacement has the largest impact on the capacitance change for the fingers. This is due to the compensating effect of the fringe electric field. For the Z sensor, however, the gap between the substrate and the proof mass is indeed the sense gap. Therefore, it has direct impact on the Z sensor since it effectively changes the sensing gap for the Z sensor. Another exacerbating effect is that the Z sensor is located in the center of the die, where the warpage is maximized for any given stress on the die.
In addition to the physical stresses, temperature gradient across the z-axis sensor is common due to the heat transfer asymmetry in the z-axis in most applications. In a typical application, the sensor is soldered to a printed circuit board (PCB) and the entire system is within a package. The X and Y heat transfer is dominated by conduction through the solder joints in the perimeter of the package and to the PCB, which is symmetric. In z-direction, however, the heat transfer is through conduction at the bottom due to solder and convection on top of the die as heat moves through the air and out of the package. Due to this mismatch, there will be a residual differential temperature gradient across the z-axis. Just as with the physical compressive/tensile stress, this will yield an offset in the z-axis that is not induced by acceleration.
Data Review with Environmental Stresses
While the ADXL354 (analog output) accelerometer could connect to any analog data acquisition system for data analysis, the ADXL355 evaluation boards were optimized to be placed directly into customer systems for ease of prototyping with existing embedded systems. For the purpose of this article, the small form factor evaluation board EVAL-ADXL35x was used. For data logging and analysis, EVAL-ADXL35x was connected to an SDP-K1 microcontroller board and programmed using the Mbed® environment. Mbed is an open-source and free development environment for ARM® microcontroller boards. It has an online compiler and lets you get started quickly. The SDP-K1 board, when connected to the PC, shows up as an external drive. To program the board, simply drag and drop the binary file generated by the compiler into the SDP-K1 drive.3, 4
Once the Mbed system is logging data through the UART, we now have a basic test environment for trying out ADXL355 experiments and streaming the output to a simple terminal for data logging and further analysis. It’s important to note that regardless of the output data rate of the accelerometer, the Mbed code is only logging registers at 2 Hz. Logging faster than this is possible in Mbed, but is outside the scope of this article.
A good starting dataset helps to establish baseline performance and validate what sort of noise levels to expect in most of our subsequent data analyses. Using a PanaVise articulated vise arm5 that has a suction cup mount allows a reasonably stable work surface in a bench setup as it sticks to the glass work surface. The ADXL355 board (held from the side) is as stable as the lab benchtop in this configuration. More advanced power users may note that this vise mount would have some risk of tipping motion, but it is a simple and cost-effective method that allows changing orientation with respect to gravity. With the ADXL355 board placed in the mount as shown in Figure 2, a set of data for 60 seconds is captured for a first analysis.
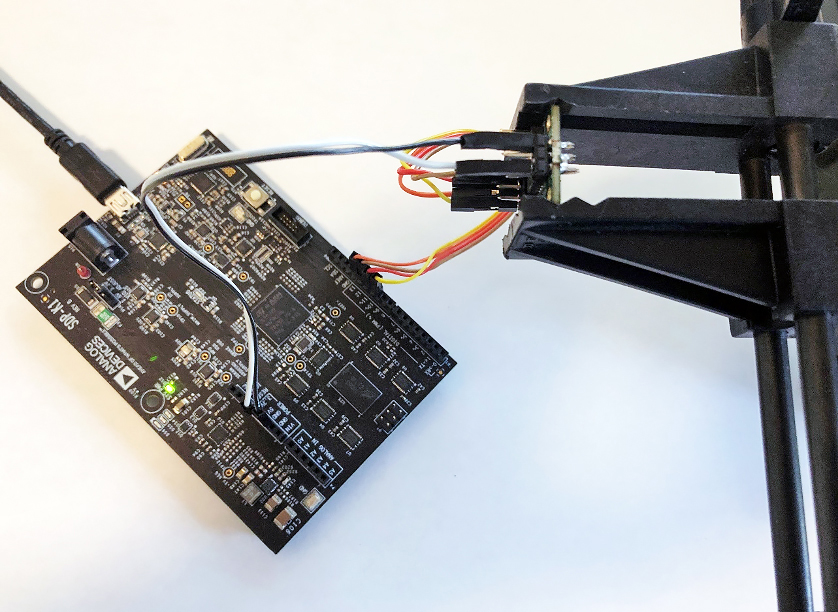
Figure 2. Test setup using an EVAL-ADXL35x, SDP-K1, and PanaVise mount.
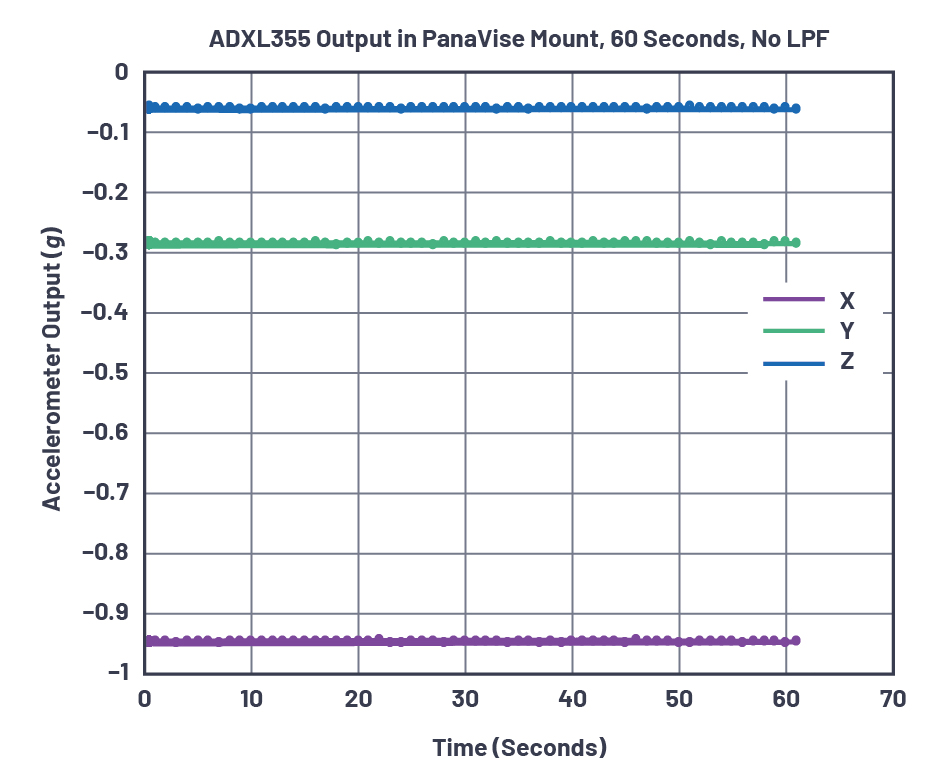
Figure 3. ADXL355 data with no low-pass filter (register 0x28=0x00), taken over 1 minute.
Taking the 120 data points and measuring a standard deviation shows noise in the range of 800 μg to 1.1 mg. From the ADXL355 typical performance specifications in the data sheet, we see the noise density listed as 25 μg/√Hz. With default low-pass filter (LPF) settings, the accelerometer has a bandwidth of about 1000 Hz. Noise would then be expected to be 25 μg/√Hz × √1000 Hz = 791 μg rms, assuming a brick-wall filter. This first dataset passes the first sniff test. To be accurate, the conversion from noise spectral density to rms noise should have a factor to represent the fact that the digital LPF does not have an infinite roll-off (that is, a brick-wall filter). Some use a 1.6× coefficient for a simple RC single-pole 20 dB/decade roll-off, but the ADXL355 digital low-pass filter is not a single-pole RC filter. In any case, assuming a coefficient between 1 and 1.6 at least gets us into the right approximation for noise expectations.
For many precision sensing applications, 1000 Hz is far too wide bandwidth for the signals being measured. In order to help optimize the trade space between bandwidth and noise, the ADXL355 has an on-board digital low-pass filter. For the next test, we set the LPF to be 4 Hz, which should have a net reduction of noise by a factor of √1000/√4 ≈ 16. This is done simply in the Mbed environment using the simple structure shown in Figure 4, while the data is shown in Figure 5.6 After filtering, the noise dropped demonstrably as expected. This is shown in Table 1.

Figure 4. Mbed code for configuring a register.
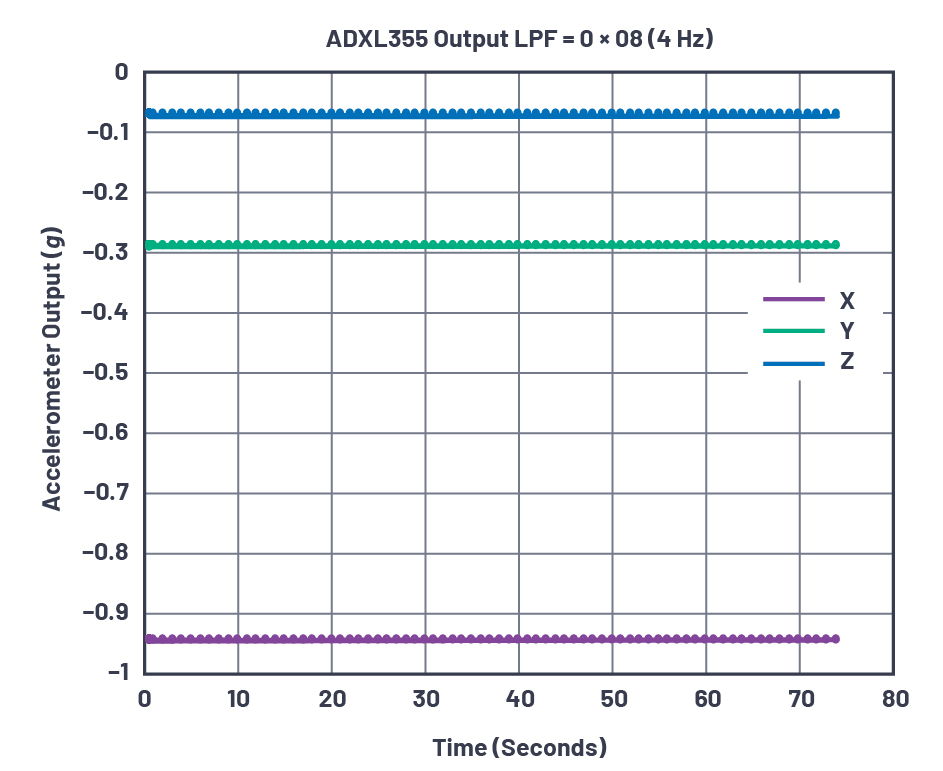
Figure 5. ADXL355 data with the LPF set to 4 Hz (register 0x28=0x08), taken over 1 minute.
| Noise | X | Y | Z | |||
| Theoretical (μg) | Measured (μg) | Theoretical (μg) | Measured (μg) | Theoretical (μg) | Measured (μg) | |
| No Filter | 791 | 923 | 791 | 1139 | 791 | 805 |
| 4 Hz Filter | 50 | 58 | 50 | 185 | 50 | 63 |
Table 1 shows that noise in the y-axis with the present setup is higher than expected by theory. After investigating the probable causes, we noticed that additional laptop and other lab equipment fan vibration likely manifests itself in the y-axis as noise. To test this, the vise was rotated to place the x-axis into the position where the y-axis was for this testing and the higher noise axis did move to the x-axis. The noise difference between the axes then appears to be instrumentation noise and not an intrinsic difference in the noise levels across the axes of the accelerometer. This type of testing is effectively the “Hello World” test for a low noise accelerometer, so it gives confidence in further testing.
In order to get a sense of how much effect a thermal shock would have on the ADXL355, we took a hot air gun7 and put it into cooler air mode (practically a few degrees above room temperature) in order to apply thermal stresses to the accelerometer. The temperature is also logged using the ADXL355’s on-board temperature sensor. The experiment used the vise to place the ADXL355 vertically so that an air gun can blow air at the top of the package. The expected outcome of this experiment is that the temperature coefficient of the offset would show up as the die heats up, but any differential thermal stresses would appear almost instantly. In other words, if the individual axis of sensing is sensitive to differential thermal stress, one expects to see a bump in the accelerometer output. Removing the average value from the data when it was quiet allows an easy comparison of all three axes at the same time. The results are shown in Figure 6.
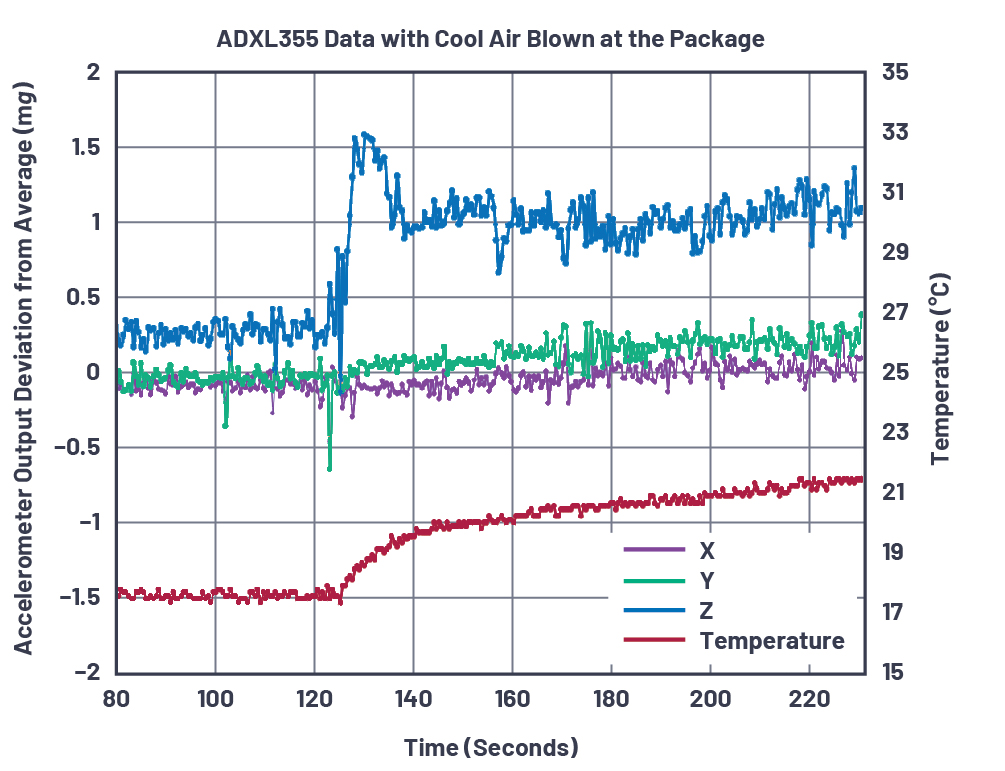
Figure 6. ADXL355 thermal shock data using a hot air gun on cool setting.
As can be seen in Figure 6, the air gun was blowing slightly warmer air onto the ceramic package, which is hermetically sealed to the environment. This results in a ~1500 μg shift in the z-axis, a much smaller amount of shift in the y-axis (maybe ~100 μg), and virtually no shift in the x-axis. While many end customer products have some enclosure on top of the PCB that distributes differential thermal stresses, it is important to consider these types of fast transient stresses, which can manifest themselves in an offset error as seen in this simple test.
Figure 7 shows the opposite polarity effect as the hot air gun is shut off.
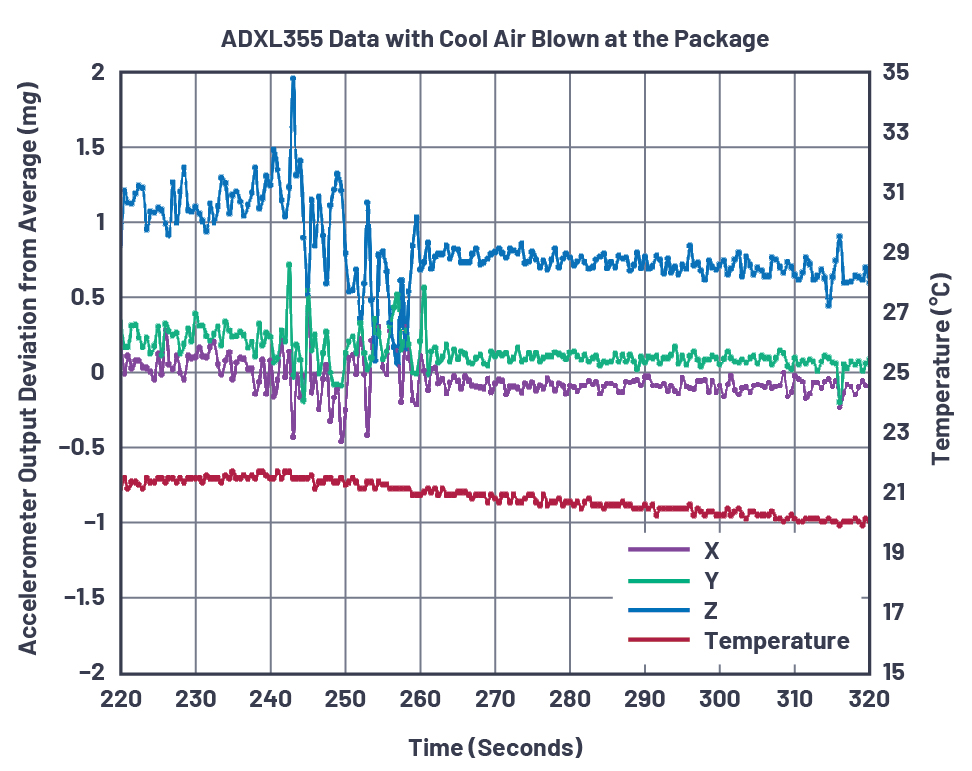
Figure 7. ADXL355 thermal shock with an air gun shutting off at t = 240 seconds.
This effect is even more pronounced when the air gun is used in the heated setting; that is, when the temperature shock is larger in magnitude. The output from the Weller air gun is on the order of ~400°C, so it’s important to apply it at a distance to prevent damage from overheating or thermal shock. In this testing, the hot air was blown at approximately 15 cm from the ADXL355, which resulted in an almost instantaneous temperature shock of ~40°C, as shown in Figure 8.
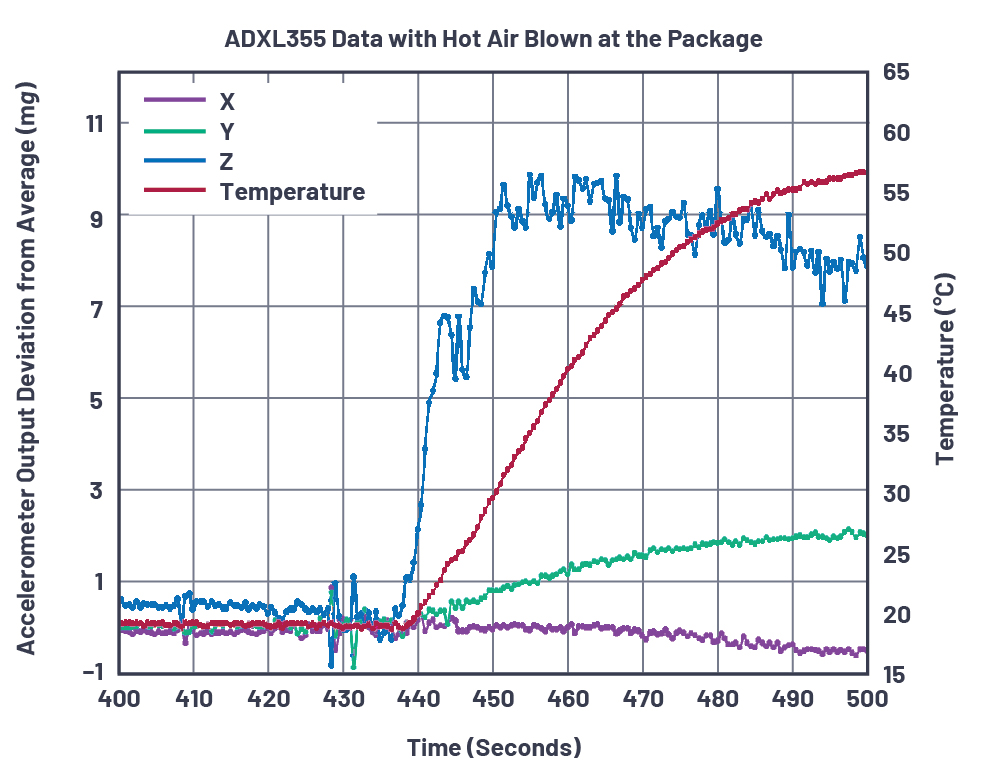
Figure 8. ADXL355 thermal shock with a hot air gun.
Even though the amount of thermal shock is quite strong, it is still striking to see how much faster the z-axis responds in this experiment than the x and y axes. Using offset temperature coefficient from the data sheet, and with a 40°C shift in temperature, one would expect to observe about 100 μg/°C × 40 °C = 4 mg shift, which the x and y axes do eventually begin to show. However, noting an almost instant 10 mg shift in the z-axis shows that this is a different effect that is being dealt with rather than offset shift due to temperature. This is a result of differential thermal stress/strain on the sensor and is most obviously seen in the z-axis due to this sensor being more sensitive to differential stresses than the x and y, as described earlier in this article.
The typical temperature coefficient of the offset of the ADXL355 (offset tempco) is specified at ±100 μg/°C in the data sheet. It is important to understand the test methodology used here as the offset tempco is measured with the accelerometers in an oven. The oven is slowly ramped through the temperature range of the sensor, and the slopes of the offsets are measured. A typical example is shown in Figure 9.
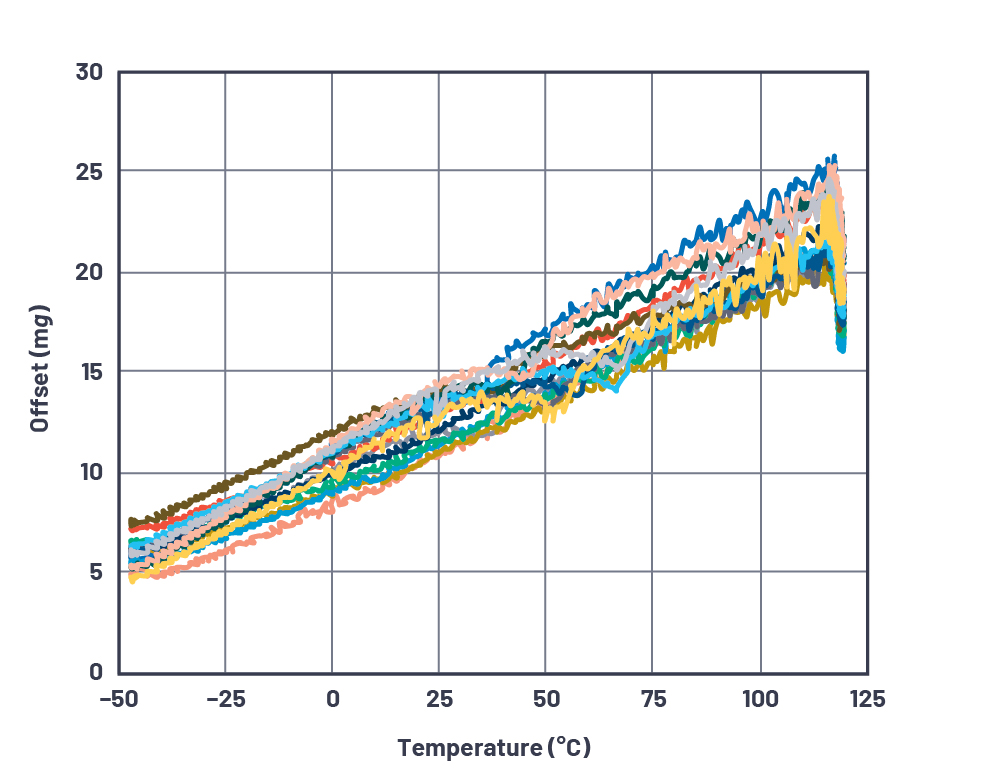
Figure 9. Oven-based temperature characterization of the ADXL355.
There are two effects at play in this plot. One is the offset tempco as characterized and documented in the data sheet. This can be interpreted as the mean value of many parts from –45°C to +120°C as the oven ramps up the temperature at 5°C/min but without any soak time. This would be derived from plots similar to Figure 9 and would call out about 18 mg over 165°C, or about 109 μg/°C, which sits slightly outside the typical value of 100 μg/°C, but within the minimum and maximum range as specified in the data sheet. However, consider the right side of Figure 9 as the devices continue to soak at 120°C for about 15 minutes. As the devices sit at a hot temperature, the actual amount of offset shift drops and improves. In this case, the mean value is close to 10 mg over 165°C or about 60 μg/°C offset tempco. The second effect at play then is the differential thermal stress as the sensor proof mass stabilizes in temperature across the entire silicon device and the stress is then reduced. This is the effect that is seen in the air gun testing shown in Figure 6 through Figure 8 and it is important to understand this effect operates on a faster time scale than the longer-term offset tempcos as listed in the data sheet. This could be valuable for many systems, which, due to their overall thermal dynamics, will likely have much slower ramp than 5°C/min.
Other Factors Affecting ADXL355 Stability
Once thermal stresses in the design are well understood, another important aspect of inertial sensors is their long-term stability, or repeatability. Repeatability is defined as the accuracy of successive measurement under the same condition over a long period of time. For instance, taking two measurements of a gravity field in the same orientation with respect to gravity at the same temperature over an extended period and seeing how well they match. Repeatability for offset and sensitivity are of paramount importance when assessing the long-term stability of a sensor in applications that are unable to accommodate regular maintenance calibration. Many sensor manufacturers do not characterize or specify long-term stability in their data sheets. In ADI’s ADXL355 data sheet, repeatability is predicted for a 10 year life and includes measured shifts due to the high temperature operating life test (HTOL)(TA = 150°C, VSUPPLY = 3.6 V, and 1000 hours), measured temperature cycling (−55°C to +125°C and 1000 cycles), velocity random walk, broadband noise, and temperature hysteresis. The ADXL35x family has excellent repeatability as shown in the data sheet with ADXL355 having ±2 mg and ±3 mg for X/Y and Z sensors, respectively.
Repeatability under stable mechanical, environmental, and inertial conditions follows the square root law as it relates to time measured. For example, to obtain offset repeatability of the x-axis for 2.5 years (possibly a shorter mission profile for an end product), use the following equation: ±2 mg × √(2.5 years/10 years) = ±1 mg. Figure 10 shows an example HTOL test result of 0 g offset drift of 32 devices over 23 days. The square root law is clearly observable in this figure. It should also be highlighted that each part behaves differently—some perform better than others—due to process variation in fabrication of the MEMS sensors.
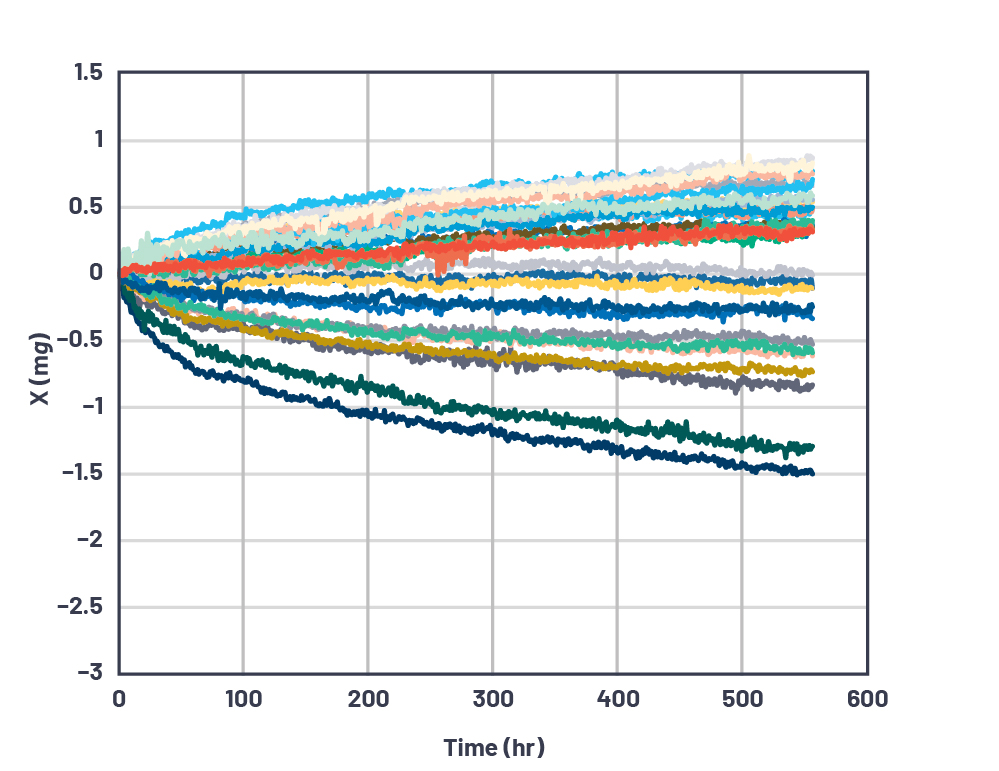
Figure 10. 500 hour long-term stability of the ADXL355.
Mechanical System Design Recommendations
Armed with the knowledge from the previous discussion, it is clear that mechanical mounting interfaces and enclosure design will contribute to the overall performance of the ADXL355 sensor as it will affect the physical stresses propagated to the sensor. In general, the mechanical mounting, enclosure, and the sensor form a second-order (or higher) system; therefore, its response varies between resonance or overdamped. Mechanical support systems have modes that represent these second-order systems (defined by resonant frequency and quality factor). In most cases, the objective is to understand these factors and minimize their impacts on the sensing system. Thus, geometry of any enclosure that the sensor will be packaged in, and all interfaces and materials, should be chosen to avoid mechanical attenuation (due to overdamping) or amplification (due to resonance) within the bandwidth of the ADXL355 application. The details of such design considerations are out of the scope of this article; however, some practical items are briefly listed:
PCB, Mounting, and Enclosure
- Securely attach the PCB to a rigid body substrate. The use of multiple mounting screws in combination with adhesive on the backside of the PCB offers the best support.
- Place the sensor close to a mounting screw or a fastener. If the PCB geometry is large (a few inches), use multiple mounting screws in the middle of the board to avoid low frequency vibration of the PCB, which will couple to the accelerometer and be measured.
- If PCBs are only supported mechanically by a groove/tongue structure, use a thicker PCB (greater than 2 mm thick is recommended). In the case of PCBs with larger geometry, increase the thickness to maintain stiffness of the system. Use finite element analysis, like ANSYS or similar, for the optimum PCB geometry and thickness for a specific design.
- For applications such as structural health monitoring where sensors are measured for a long period of time, the long-term stability of the sensors is critical. Packaging, PCB, and adhesive materials should be chosen to minimize degradation or change in mechanical properties over time, which could contribute to additional stresses on the sensor, and, hence, offsets.
- Avoid making assumptions about the natural frequencies of the enclosure. Calculation of natural vibration modes in the case of simple enclosures and finite element analysis in the case of more complex enclosure designs will be useful.
- Stress buildup from soldering the ADXL355 to a board has been shown to cause offset shift of up to a few mg. To alleviate this effect, symmetry in PCB landing pattern, thermal pads, and conduction paths through copper trace on PCB are recommended. Closely follow the soldering guide provided in the ADXL355 data sheet. It is also observed that, in some cases, solder annealing or thermal cycling prior to any calibration are helpful to relieve the stress buildup and to manage longer term stability issues.
Potting Compounds
Potting compounds are widely used to secure electronics inside an enclosure. If the sensor package is an overmold plastic, such as land grid array (LGA), use of potting compounds is highly discouraged due to their temperature coefficient (TC) mismatch with the enclosure material resulting in pressure being exerted directly on the sensor and then offset. The ADXL355, however, has a hermetically sealed ceramic package that significantly protects the sensor from the TC effect. But potting compounds can still contribute to stress buildup on the PCB as a result of material degradation over time, potentially causing strain on the sensor through small warpages to the silicon die. It is generally recommended to avoid potting the sensors in applications in which high stability over time is required. Low stress conformal coatings such as parylene C could provide some form of moisture barrier as a substitute for potting.8
Air Flow, Heat Transfer, and Thermal Balance
To achieve the best sensor performance, it is important to design, locate, and utilize the sensing system in a setting where temperature stability is optimized. As this article shows, even small changes in temperature can show unexpected results due to differential thermal stresses on the sensor die. Here are some tips:
- The sensor should be positioned on the PCB so that thermal gradients across the sensor are minimal. For example, linear regulators can generate significant amounts of heat; therefore, their vicinity to the sensor can cause temperature gradients across the MEMS that may vary with current outputs over time in the regulator.
- If possible, the sensor module should be deployed in areas away from air flows (for example, HVAC) to avoid frequent temperature fluctuation. If not possible, thermal isolation outside or inside the package are helpful and can be achieved with thermal insulation. Note that both conduction and convection thermal paths need to be considered.
- It is recommended to choose the thermal mass of the enclosure such that it damps environmental thermal fluctuations in applications where environmental thermal changes are inevitable.
Conclusion
This article has shown how the high precision ADXL355 accelerometer can be degraded without adequate consideration to environmental and mechanical effects. Through holistic design practices and a focus at a system level, discerning engineers can achieve excellent performance for their sensor system. As many of us are experiencing unprecedented stresses in our lives, it is useful to realize that, similar to accelerometers, it is never the stress that kills us—it is our reaction to it!
About the Authors
Paul Perrault is a senior staff field applications engineer based in Calgary, Canada. His experience over the past 20 years at Analog Devices varies from designing 100+ amp power supplies for CPUs to designing nA-level sen...
Mahdi Sadeghi is a MEMS product application engineer in the AIN Technology Group at Analog Devices. He received his Ph.D. in electrical engineering from the University of Michigan, Ann Arbor, in 2014. His Ph.D. thesis and ...


