概要
設計リソース
設計/統合ファイル
設計ファイルのダウンロード 3.32 M使用されている製品
参考資料
-
CN0602: ADMT4000 TSSOP Industrial Reference Design (Rev. 0)2025/08/20PDF505K
回路機能とその特長
This reference design provides a highly integrated development platform for the ADMT4000 true power‑on multiturn sensor in its thin shrink small outline package (TSSOP) package. Designed for easy prototyping and rapid evaluation, the board combines functionality, diagnostics, and modularity—eliminating the need for early-stage custom PCB layout. It allows designers to validate the ADMT4000 in conditions that closely mimic final production, including accurate pin mapping, signal integrity, thermal behavior, and packaging nuances. The board includes a plug‑and‑play interface featuring SPI connectivity and magnetic reset capability.
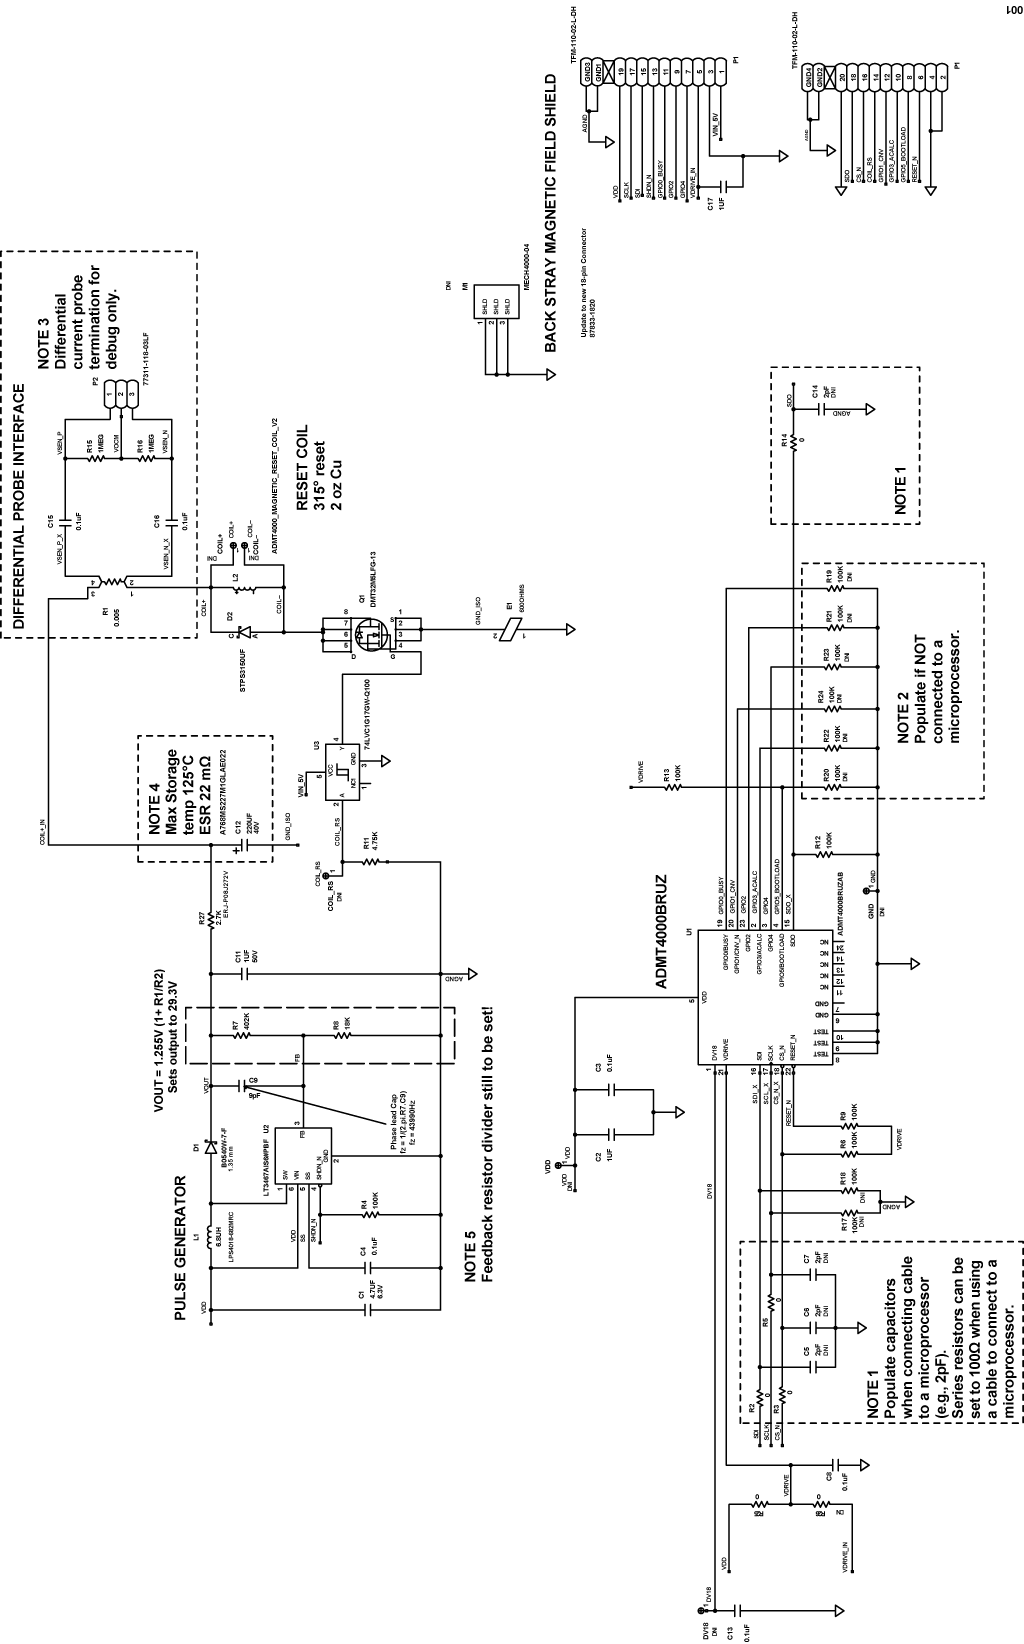
The turn count sensor in the ADMT4000 is comprised of a spiral of giant magneto resistance (GMR) resistors, by which the magnetization pattern in these resistors is used to determine the turn count and the absolute position of a system. If the maximum allowed magnetic field (BMAX) is exceeded, the GMR spiral may be corrupted. This scenario does not damage the device, but a reset of the spiral will be required. The reset can be achieved by rotating the system magnet more than 46 turns in the clockwise direction, or by applying a magnetic field greater than 60 mT in the 315° direction. Implementing the reset circuit with the specified components will ensure that the reset coil is energized sufficiently to generate the required magnetic field to reset the GMR turn count sensor. The circuit shown in Figure 1 provides an in-built coil and a pulse generator which is used, in combination with the system magnet, to reset the GMR sensor.
The circuit consists of the following key blocks:
- ADMT4000 Configuration
- Pulse Generator for the GMR Magnetic Reset Coil
回路説明
SPI INTERFACE
The ADMT4000 has an SPI interface, which can be used to control all the functions of the part and obtain the absolute position of a system on power-up. The general-purpose input/output (GPIO) pins are multifunctional pins and can be configured by setting a register to a specific function. For example, GPIO1 can be configured as an input, output, or convert start (CNV) pin.
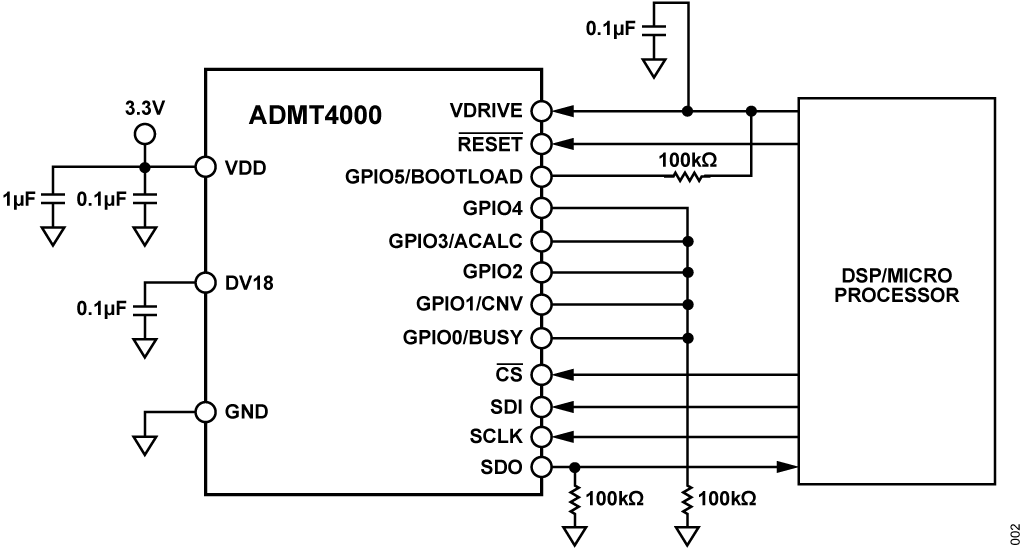
Figure 2 shows the configuration when none of the GPIO pins are required. If the GPIO pins are not used, they should be tied to ground via a 100 kΩ resistor, except for GPIO5, which should be tied to VDRIVE via a 100 kΩ resistor.
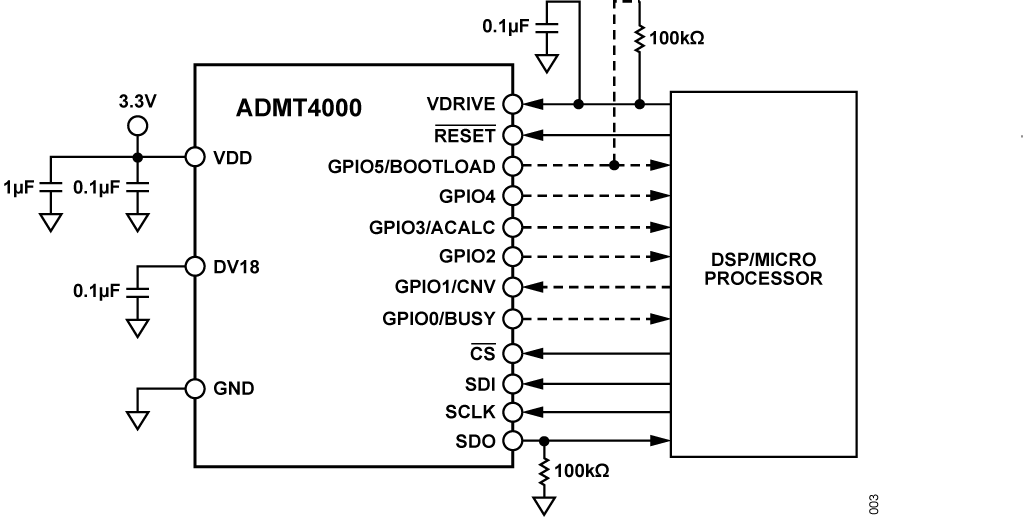
As depicted in Figure 3, pull-down resistors are not needed when the GPIOs are connected to a microprocessor.
The circuit shown in Figure 1 can be configured with any combination of GPIOs being used or not. In most cases, the SPI interface should be connected directly to a microprocessor located on the same PCB. While it is possible to drive the SPI interface through a cable, different cable characteristics may necessitate an RC filter. This circuit note does not specify the values required to drive the SPI interface over a cable, but does provide the footprints on the PCB to add the resistors and capacitors.
During normal operation, the ADMT4000 is typically connected directly to a microprocessor via the SPI interface. In this configuration, the resistors and capacitors identified by Note 1 on Figure 1 are not required. However, if the ADMT4000 is controlled by an off-board microprocessor, an RC filter may be necessary—depending on the characteristics of the connecting cable—to ensure reliable SPI communication. Additionally, the GPIO ports should be terminated in accordance with the guidelines provided in the ADMT4000 data sheet.
PULSE GENERATOR
The pulse generator circuit for the reset coil is split into six key sections:
- Voltage Boost Circuit
The voltage boost circuit based around the LT3467 step-up DC/DC converter is configured to boost the 5 V supply to 29.3 V. The converter charges the low ESR capacitor C12 to 29.3 V. - Current Limiting
Resistor R27 is used to control the inrush current to C12. If a power supply with a higher current rating is available, R27 can be reduced to shorten the capacitor's charge time. - Current Sensing
While not required in the final application, a sense resistor R1 is included to allow measurement of the current pulse through the reset coil using a differential probe. - Reset Coil Configuration
The reset coil, L2, is a planar coil integrated into the PCB, see AN-2610 Application Note for further details of the coil layout. A reverse-biased diode, D2, is used across the integrated coil to provide a path for the inductive kickback from the coil. - Pulse Discharge Path
The capacitor C12 is discharged through L2 via the n-channel MOSFET Q1. The MOSFET is selected for a low on-resistance (Ron) with a low gate-source voltage (VGS). Although the chosen MOSFET should be fully switched on at 3.3 V, it was found necessary to drive VGS at 5 V to give a reliable reset pulse. - Ground Noise Mitigation
To minimize ground noise during capacitor discharge, a ferrite bead E1 was used to separate the coil reset ground from the rest of the circuit
バリエーション回路
Depending on the available supply voltages, the DC-DC converter used to charge the capacitor in the reset pulse generator may be modified. The CN0602 circuit uses an electrolytic capacitor with an ESR of 22 mΩ at 100 kHz. This capacitor can be replaced with a tantalum capacitor, provided its ESR remains within the same range.
回路の評価とテスト
The GMR turn count sensor can be reset by applying an external magnetic field with a field strength greater than 60 mT at the 315° orientation. A common method for generating this field is through the use of an electromagnet. In the CN0602 reference design, this is implemented using a wire coil positioned close to the sensor and embedded within the circuit board. A capacitor is used to charge and discharge through the coil, thereby producing the necessary magnetic field to reset the sensor.
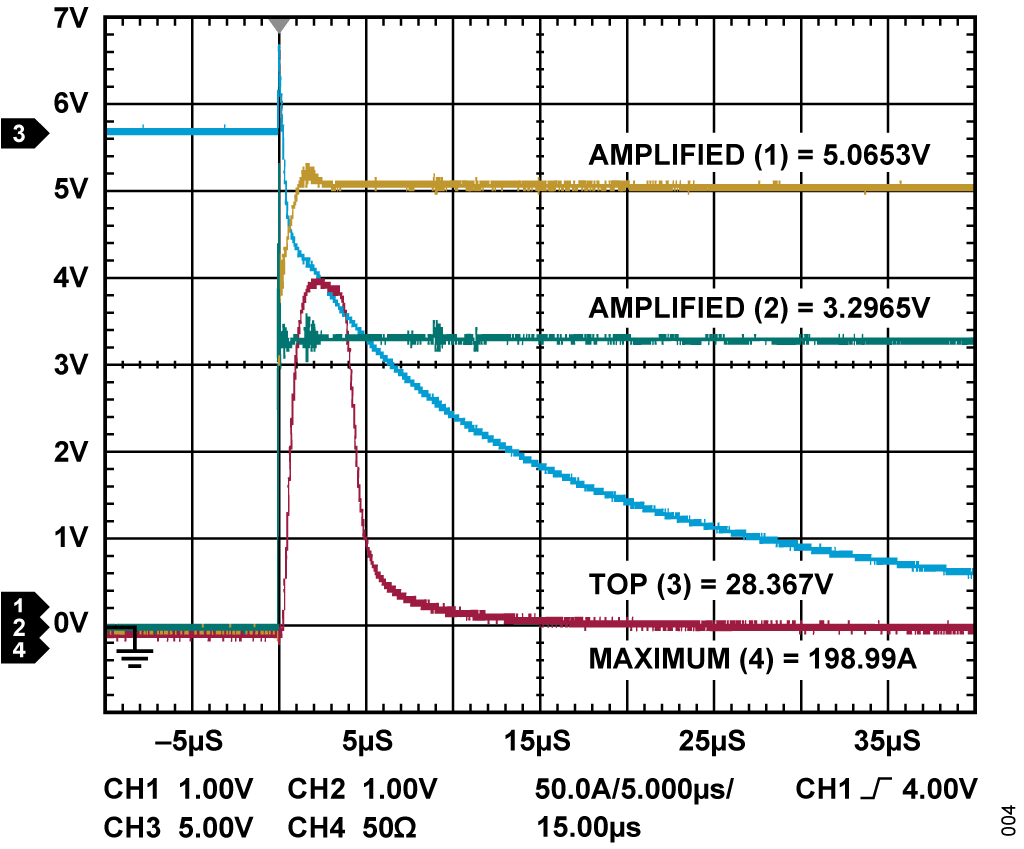
Figure 4 presents oscilloscope plots of key signals involved in achieving a successful reset of the GMR turn count sensor:
- Channel 1 displays the level-shifted 5 V coil reset signal.
- Channel 2 shows the original 3.3 V coil reset signal prior to buffering.
- Channel 3 illustrates the discharge of capacitor C12 through the coil to generate a strong magnetic field.
- Channel 4 captures the coil current, which peaks at nearly 200A. This current produces a magnetic field exceeding 60 mT at a 315° orientation, sufficient to reset the GMR sensor.


