Overview
Design Resources
Design & Integration File
- Schematic
- Bill of Materials
- Gerber Files
- PAD Files
- Assembly Drawing
Evaluation Hardware
Part Numbers with "Z" indicate RoHS Compliance. Boards checked are needed to evaluate this circuit.
- EVAL-CFTL-6V-PWRZ ($20.01) Wall Power Supply for Eval Board
- EVAL-CN0178-SDPZ ($58.85) Software-Calibrated, 50 MHz to 9 GHz, RF Power Measurement System
- EVAL-SDP-CB1Z ($116.52) Controller board needed to evaluate the this circuit. Please see "Circuit Evaluation & Test" section for connection information.
Device Drivers
Software such as C code and/or FPGA code, used to communicate with component's digital interface.
AD5790 - Microcontroller No-OS Driver
Features & Benefits
- Wideband frequency range from 50MHz to 9GHz
- 65 dB dynamic range
- Calculates crest factor, RMS, and peak signal levels
Product Categories
Markets and Technologies
Parts Used
Documentation & Resources
-
CN0178 Software User Guide10/18/2018WIKI
-
High Frequency Log Amps2/14/2015PDF144 kB
-
MT-073: High Speed Variable Gain Amplifiers2/14/2015PDF177 kB
-
Design and Operation of Automatic Gain Control Loops for Receivers in Modern Communication Systems10/10/2003PDF129 kB
-
CN-0178: Software-Calibrated, 50 MHz to 9 GHz, RF Power Measurement System11/16/2010PDF179 kB
Circuit Function & Benefits
This circuit uses the ADL5902 TruPwr™ detector to measure the rms signal strength of RF signals with varying crest factors (peak-to-average ratio) over a dynamic range of approximately 65 dB and operates at frequencies from 50 MHz up to 9 GHz.
The measurement result is provided as serial data at the output of a 12-bit ADC (AD7466). A simple 4-point system calibration at ambient temperature is performed in the digital domain.
The interface between the RF detector and the ADC is straightforward, consisting of two signal scaling resistors and no active components. In addition, the ADL5902 internal 2.3 V reference voltage provides the supply and reference voltage for the micropower ADC. The AD7466 has no pipeline delay and is operated as a read-only SAR ADC.
The overall circuit achieves temperature stability of approximately ±0.5 dB.
Data is shown for the two devices operating over a −40°C to +85°C temperature range.

Circuit Description
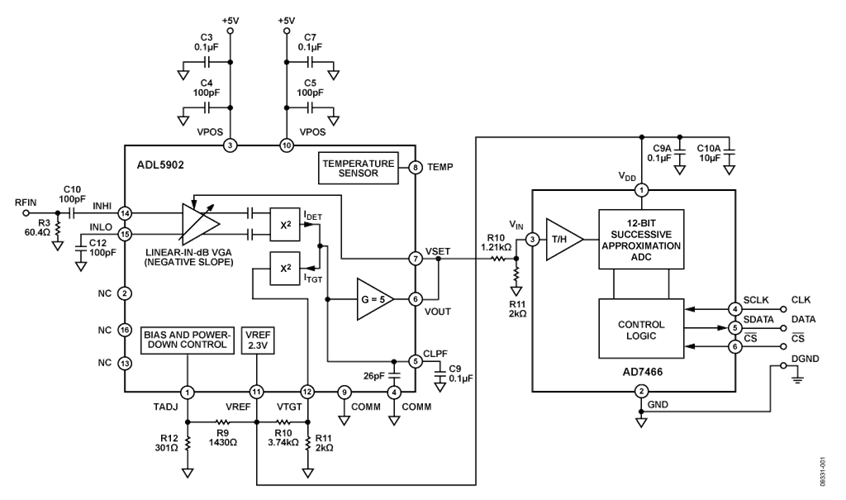
The RF signal being measured is applied to the input of the ADL5902, a linear-in-dB rms-responding rms detector. The external 60.4 Ω resistor, R3, combined with the relatively high input impedance of the ADL5902 ensures a broadband 50 Ω match to the RF input. The ADL5902 is configured in its so-called “measurement mode,” with the VSET and VOUT pins connected together. In this mode the output voltage is proportional to the logarithm of the rms value of the input. In other words, the reading is presented directly in decibels and is scaled to 1.06 V per decade, or 53 mV/dB.
The power supply voltage and reference voltage for the AD7466 12-bit ADC are provided by the ADL5902 internal 2.3 V reference. Because the AD7466 consumes so little current (16 μA when sampling at 10 kSPS), the ADL5902’s reference voltage output can supply the ADC, as well as the temperature compensating and rms accuracy-scaling network consisting of R9, R10, R11, and R12.
The ADC full-scale voltage is equal to 2.3 V. The maximum detector output voltage (when operating in its linear input range) is approximately 3.5 V (see ADL5902 data sheet figures 6, 7, 8, 12, 13, and 14) and must, therefore, be scaled down by a factor of 0.657 before driving the AD7466. This scaling is implemented using a simple resistor divider R10 and R11 (1.21 kΩ and 2.0 kΩ). These values provide an actual scaling factor of 0.623, which ensures that the ADL5902 RF detector does not overdrive the ADC by building in some room for resistor tolerance.
A typical plot of detector output voltage vs. input power is shown in Figure 2 (without output scaling).

The transfer function of the detector can be approximated by the equation:
VOUT = SLOPE_DETECTOR × (PIN − INTERCEPT)
where SLOPE_DETECTOR is in mV/dB; INTERCEPT is the x-axis intercept with a unit of dBm; PIN is the input power in dBm.
At the output of the ADC, VOUT is replaced by the ADC’s output code, and the equation can be rewritten as:
CODE = SLOPE × (PIN − INTERCEPT)
where SLOPE is the combined slope of the detector, the scaling resistors, and the ADC, and has the unit of counts/dB; PIN and INTERCEPT still have the unit of dBm.
Figure 3 shows a typical detector power sweep in terms of input power and observed ADC output codes for a 700 MHz input signal.

Overall SLOPE and INTERCEPT will vary from system to system. This variation is caused by part to part variations in the transfer function of the RF detector, the scaling resistors, and the ADC. As a result, a system level calibration is required to determine the complete system SLOPE and INTERCEPT. In this application, a 4-point calibration is used to correct for some nonlinearity in the RF detector’s transfer function, particularly at the low end. This 4-point calibration scheme yields three SLOPE and three INTERCEPT calibration coefficients, which should be stored in nonvolatile RAM (NVM) after calibration.
The calibration is performed by applying four known signal levels to the ADL5902 and measuring the corresponding output codes from the ADC. The calibration points chosen should be within the linear operating range of the device. In this example, calibration points at 0 dBm, −20 dBm, −45 dBm, and −58 dBm were used.
The SLOPE and INTERCEPT calibration coefficients are calculated using the equations:
SLOPE1 = (CODE _1 – CODE_2)/(PIN_1 − PIN_2)
INTERCEPT1= CODE_1/(SLOPE_ADC × PIN_1)
This calculation is then repeated using CODE_2/CODE_3 and CODE_3/CODE_4 to calculate SLOPE2/INTERCEPT2 and SLOPE3/INTERCEPT3, respectively. The six calibration coefficients should then be stored in NVM along with CODE_1, CODE_2, CODE_3, and CODE_4.
When the circuit is in operation in the field, these calibration coefficients are used to calculate an unknown input power level, PIN, using the equation:
PIN = (CODE/SLOPE) + INTERCEPT
In order to retrieve the appropriate SLOPE and INTERCEPT calibration coefficients during circuit operation, the observed CODE from the ADC must be compared to CODE_1, CODE_2, CODE_3, and CODE_4. For example if the CODE from the ADC is between CODE_1 and CODE_2, then the SLOPE1 and INTERCEPT1 should be used. This step can also be used to provide an underrange or overrange warning. For example, if the CODE from the ADC is greater than CODE_1 or less than CODE_4, it indicates that the measured power is outside of the calibration range.
Figure 3 also shows the transfer function variation of the circuit vs. the above straight line equations. This error function is caused by bending at the edges of the transfer function, small ripple in the linear operating range, and drift over temperature. The error is expressed in dB using the equation:
Error (dB) = Calculated RF Power − True Input Power
= (CODE/SLOPE) + INTERCEPT – PIN_TRUE
Figure 3 also includes plots of error vs. temperature. In this case the measured ADC codes at +85°C and −40°C are compared to the straight line equations at ambient. This is consistent with a real world system where system calibration is generally only practical at ambient temperature.
Figure 4 and Figure 5 show the performance of the circuit at 1 GHz and 2.2 GHz, respectively.


The performance of this or any high speed circuit is highly dependent on proper PCB layout. This includes, but is not limited to, power supply bypassing, controlled impedance lines (where required), component placement, signal routing, and power and ground planes. (See MT-031 Tutorial, MT-101 Tutorial, and article, A Practical Guide to High-Speed Printed-Circuit-Board Layout, for more detailed information regarding PCB layout.)
Common Variations
For applications that require less RF detection range, the AD8363 rms detector can be used. The AD8363 has a detection range of 50 dB and operates at frequencies up to 6 GHz. For non-rms detection applications, the AD8317/AD8318/AD8319 or ADL5513 can be used. These devices offer varying detection ranges and have varying input frequency ranges up to 10 GHz (see CN-0150 for more details).
The AD7466 is a single channel, 12-bit ADC with SPI interface. If the end application requires a multichannel ADC, the dual 12-bit AD7887 can be used. In multichannel applications that require multiple ADC and DAC channels, the AD7294 can be used. In addition to providing four 12-bit DAC outputs, this subsystem chip includes four uncommitted ADC channels, two high-side current sense inputs, and three temperature sensors. Current and temperature measurements are digitally converted and available to read over the I2C-compatible interface.
Circuit Evaluation & Test
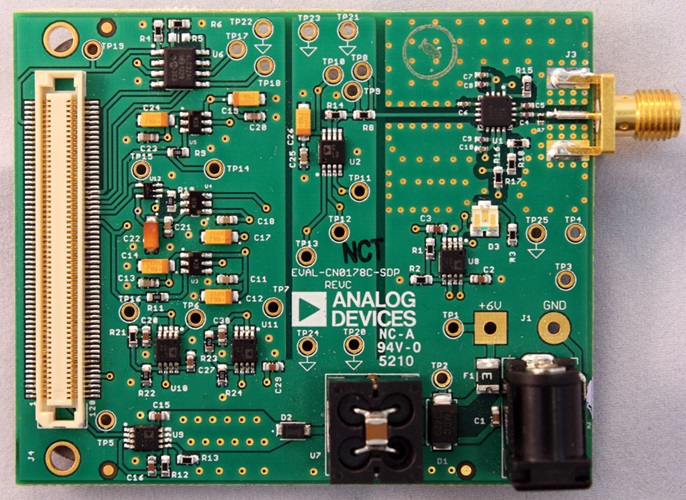
This circuit uses the EVAL-CN0178-SDPZ circuit board and the EVAL-SDP-CB1Z System Demonstration Platform (SDP) evaluation board. The two boards have 120-pin mating connectors, allowing for the quick setup and evaluation of the circuit’s performance. The EVAL-CN0178-SDPZ board contains the circuit to be evaluated, as described in this note, and the SDP evaluation board is used with the CN0178 evaluation software to capture the data from the EVAL-CN0178-SDPZ circuit board.
Equipment Needed
- PC with a USB port and Windows® XP or Windows Vista® (32-bit), or Windows® 7 (32-bit)
- EVAL-CN0178-SDPZ Circuit Evaluation Board
- EVAL-SDP-CB1Z SDP Evaluation Board
- CN0178 Evaluation Software
- Power supply: +6 V, or +6 V “wall wart”
- Environmental chamber
- RF signal source
- Coaxial RF cable with SMA connectors
Getting Started
Load the evaluation software by placing the CN0178 Evaluation Software disc in the CD drive of the PC. Using "My Computer," locate the drive that contains the evaluation software disc and open the Readme file. Follow the instructions contained in the Readme file for installing and using the evaluation software.
Functional Block Diagram
See Figure 1 of this circuit note for the circuit block diagram, and the file “EVAL-CN0178-SDPZ-SCH-Rev0.pdf” for the circuit schematics. This file is contained in the CN0178 Design Support Package.
Setup
Connect the 120-pin connector on the EVAL-CN0178-SDPZ circuit board to the connector marked “CON A” on the EVAL-SDP-CB1Z evaluation (SDP) board. Nylon hardware should be used to firmly secure the two boards, using the holes provided at the ends of the 120-pin connectors. Using an appropriate RF cable, connect the RF signal source to the EVAL-CN0178-SDPZ board via the SMA RF input connector. With power to the supply off, connect a +6 V power supply to the pins marked “+6 V” and “GND” on the board. If available, a +6 V "wall wart" can be connected to the barrel connector on the board and used in place of the +6 V power supply. Connect the USB cable supplied with the SDP board to the USB port on the PC. Note: Do not connect the USB cable to the mini USB connector on the SDP board at this time.
Test
Apply power to the +6 V supply (or “wall wart”) connected to EVAL-CN0178-SDPZ circuit board. Launch the Evaluation software, and connect the USB cable from the PC to the USB mini-connector on the SDP board.
Once USB communications are established, the SDP board can now be used to send, receive, and capture serial data from the EVAL-CN0178-SDPZ board.
The data in this circuit note were generated using a Rohde & Schwarz SMT-03 RF signal source, and an Agilent E3631A power supply. The signal source was set to the frequencies indicated in the graphs, and the input power was stepped and data recorded in 1 dB increments.
Temperature testing was performed using a Test Equity Model 107 environmental chamber. The CN0178-SDPZ evaluation board was placed in the chamber via a slot in the test chamber door, with the SDP evaluation board extending outside.
Information and details regarding how to use the evaluation software for data capture can be found in the CN0178 Evaluation Software ReadMe file.
Information regarding the SDP board can be found in the SDP User Guide.


