AN-2630: TMC9660 Addon Reference Guide
Using Addons With the TMC9660 and Ubltools Software
This application note explains how to load an addon onto the TMC9660 and TMC9660 evaluation kit(s) using the UblTools software package. It covers different update pathways: through the Landungsbrücke, TMCL-IDE, UART connection to the PC, and direct SPI connection from an application controller. It also provides change descriptions for available addons.
Required Hardware and Software
- UblTools, v1.2.0 or higher:
- ublcli.exe
- ubl_evalsystem_wrapper.py
- Available at https://www.analog.com/en/products/tmc9660.html
- Addon file:
- TMC9660_addon_xxx.hex
- Available at https://www.analog.com/en/products/tmc9660.html
- TMCL-IDE:
- TMC9660 Evaluation Kit:
Ubltools Command Reference
The UblTools package simplifies bootloader configuration by using TOML configuration files and is used for the addon update.
It provides a Python wrapper for communicating with the evaluation board through the Landungsbrücke. The provided code generator converts the addon hex file into a C array and helper function, allowing the application controller to upload the addon directly to the TMC9660.
This section contains a reference for available UblTools addon commands. UblTools usage is explained in more detail in AN-2601.
Valid for UblTools version: 1.2.0 or higher
Command: inspect addon
This command reads out basic information about the runtime addon status (“Addon installed” or “no Addons installed”) from the connected chip. If an addon is detected, the addon ID and version are reported.
Example:
Run: ublcli.exe COMX inspect addon
Response: Addon installed Addon ID: 9660 Addon Version: 1.0.0
Command: codegen addon
Generates a C format suitable for use with the TMC-API from the addon hex file.
Positional argument:
addon_file Addon hex file to turn into C array.Options:
--use-fault-pin, --no-use-fault-pin
Whether to use the FAULTN pin to detect the addon installation completion. If disabled, a fixed delay is used instead.
--omit-fault-pin-init, --no-omit-fault-pin-initSpecifies whether the FAULTN pin initialization section is generated for the example code. If disabled, ensure the application initializes the FAULTN pin before using this generated code!
Example:
Run: ublcli.exe codegen addon TMC9660_addon.hex
Command: write RAM addon
This command writes an addon to the TMC9660 RAM.
Positional argument:
addon_file Addon hex file to upload
Options:
--verify-upload, --no-verify-upload
Verifies the uploaded addon by reading it back from the TMC9660 after the upload process. This option provides an additional integrity check and helps detect transfer errors. Default: False
--start-addon, --no-start-addon
Automatically starts the uploaded addon after the upload operation has completed successfully. If disabled, the addon remains stopped until explicitly started. Default: True
Example:
Run: ublcli.exe COMX write RAM addon --start-addon TMC9660_addon_xxx.hex
Sub-Command: write SPI addon
Writes an addon to a partitioned external SPI memory flash.
Positional argument:
addon_file Addon hex file to upload
Options:
--verify-upload, --no-verify-upload
Verifies the uploaded addon by reading it back from the TMC9660 after the upload process. This option provides an additional integrity check and helps detect transfer errors. Default: True
--start-addon, --no-start-addon
Automatically starts the uploaded addon after the upload operation has completed successfully. If disabled, the addon remains stopped until explicitly started. Default: False
Sub-Command: write I2C addon
Writes an addon to a partitioned external I2C memory EEPROM.
Positional argument:
addon_file Addon hex file to upload
Options:
--verify-upload, --no-verify-upload
Verifies the uploaded addon by reading it back from the TMC9660 after the upload process. This option provides an additional integrity check and helps detect transfer errors. Default: True
--start-addon, --no-start-addon Automatically starts the uploaded addon after the upload operation has completed successfully. If disabled, the addon remains stopped until explicitly started. Default: False
Addon Update
Overview
Addons are loaded into the RAM and do not overwrite parts of the firmware code. The addon extends the ROM functionality (without modifying the ROM code) by loading additional code into the RAM. Addons are checksummed both in transit during the upload and upon the execution of the bootloader. If the addon is running, the integrity checks performed during the upload and bootloader execution have passed. An addon is uniquely identified through an ID (GetInfo, Type 204) and a version (GetInfo, Type 205).
Addons can be updated through SPI or UART. They are loaded and executed in the TMC9660 RAM. Addons can also be stored in the external flash or EEPROM memory and loaded to the RAM during boot. The firmware and addon versions can be checked through SPI/UART.
The application MCU can directly upload addons into the TMC9660 RAM by communicating with the TMC9660 bootloader without the need of external flash. The application MCU code can then include the addon binary data directly.
If no special file management is needed; it is possible to link the addon binary data into the MCU binary. This approach also ensures that discrepancies between an external flash containing the addon code and the MCU code do not arise.
| Method | Interface | Storage | Typical Use |
| TMCL-IDE through Landungsbrücke | USB/Landungsbrücke | RAM or external memory | Evaluation |
| UblTools through Landungsbrücke | USB/Landungsbrücke | RAM or external memory | Scripted evaluation |
| UART to PC | UART | RAM or external memory | Direct chip access |
| MCU firmware through SPI/UART | SPI/UART | RAM | Embedded product integration |
| SPI flash | SPI | SPI flash | Embedded product integration |
Update TMC9660 Evaluation Kit Through Landungsbrücke With TMCL-IDE
This section describes how to load an addon to the TMC9660 evaluation board through the Landungsbrücke with the TMCL-IDE. The TMCL-IDE integrates the UblTools software to load the addon to the TMC9660 evaluation board.
- Connect the TMC9660 evaluation kit to the PC through the USB. Then, power on the evaluation board.
- Open the TMCL-IDE and select the Ubl Bootstrapping tool.
- Inspect the chip and apply the evaluation board configuration.
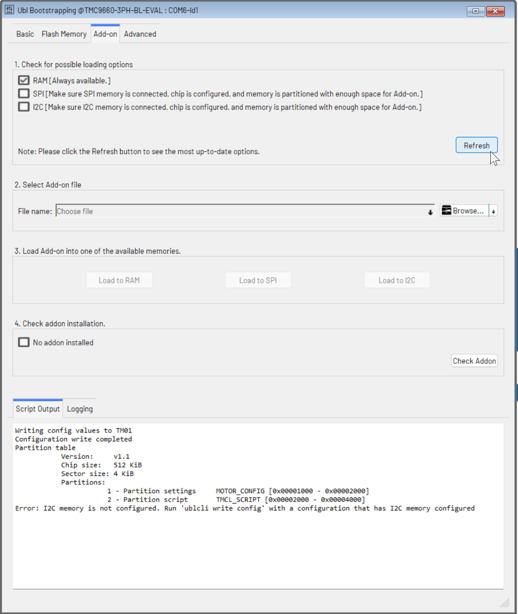
- Select the Addon tab and click Refresh to update the detected TMC9660 status
- Select the addon hex file and load it to the TMC9660 RAM. Alternatively, as non-volatile options, the addoncan be loaded to the external EEPROM (Load to I2C) or flash (Load to SPI). In this case, the externalmemory must be partitioned first.
- Verify the addon is installed by clicking Check Addon.
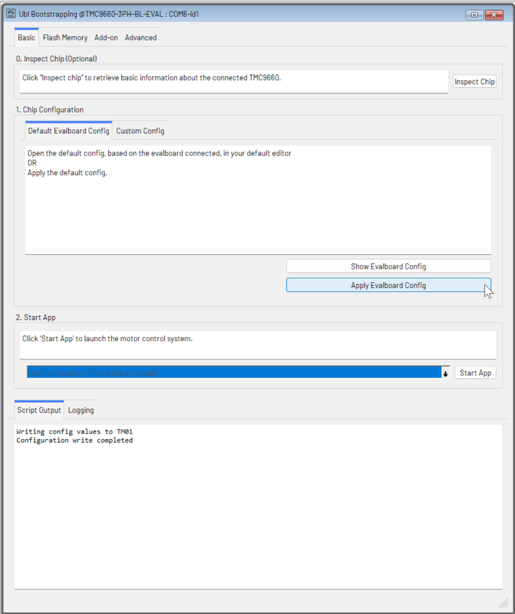
- Start the application (Start App).

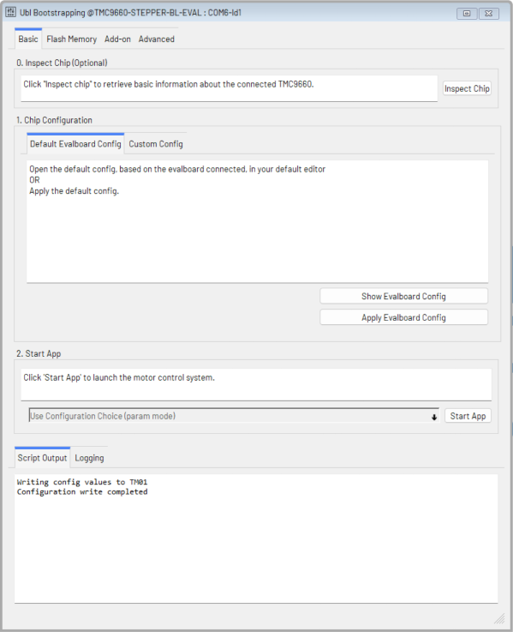
Figure 5. Start Application The TMC9660 is now in the parameter mode. The parameter mode allows access to TMCL commands and parameters.
- In the TMCL-IDE, use the Direct Mode tool to verify the addon ID and version with the TMCL command GetInfo (157).
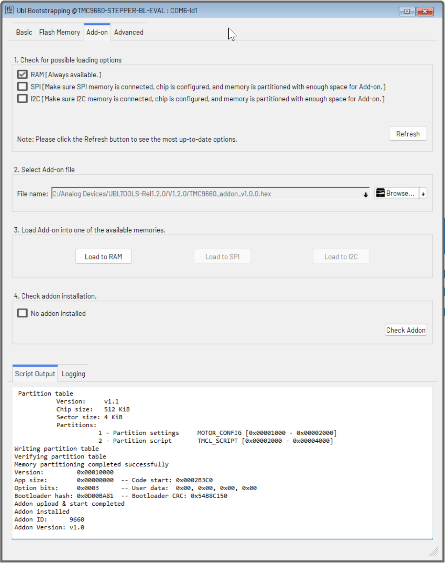
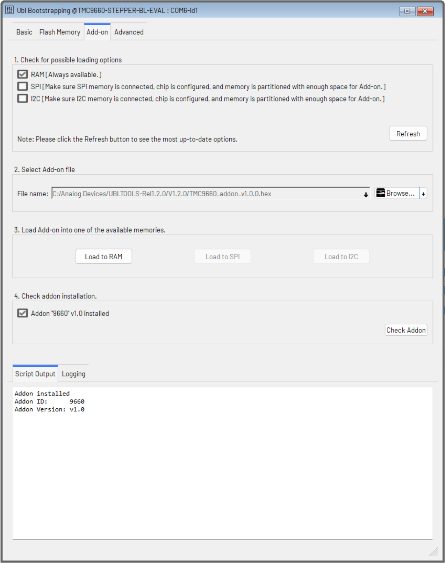
- Type 204 returns the addon ID → Example: 0x39 36 36 30 („9660“ in ASCII).
- Type 205 returns the addon Version → Example: 0x01 00 00 (“v1.0”).
Update TMC9660 Evaluation Kit Through Landungsbrücke With UBLTools
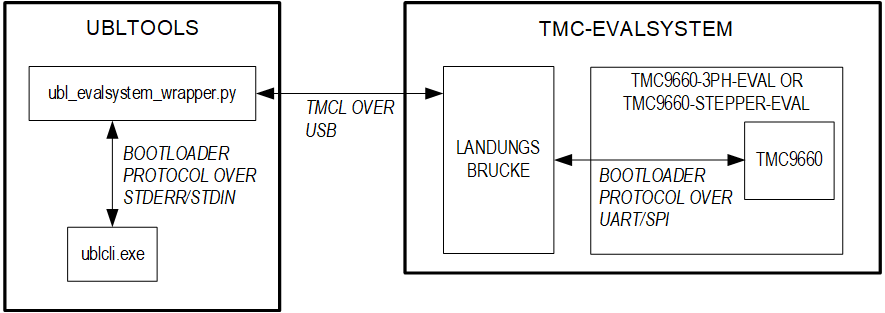
This section describes how to load an addon to the TMC9660 evaluation board through the Landungsbrücke without the TMCL-IDE, using only the UblTools. To connect through the Landungsbrücke, execute the Python helper script ubl_evalsystem_wrapper.py (for details, refer to AN-2601). To use ubl_evalsystem_wrapper.py, make sure the Python package pytrinamic is installed.
- Hardware Setup
Connect the TMC9660 evaluation kit to the PC through the USB. Then, power on the evaluation board. - Check the UblTools version
Run: python ubl_evalsystem_wrapper.py COMX --version
Response: ublcli.exe v1.2.0 - Inspect TMC9660
Run: python ubl_evalsystem_wrapper.py COMX inspect chip
Response: Chip: TMC9660 Bootloader Version 1.0 - Configure TMC9660
Run: python ubl_evalsystem_wrapper.py COMX write config ioconfig_tmc9660-stepper-eval.toml - Inspect the addon status of the TMC9660
Run: python ubl_evalsystem_wrapper.py COMX inspect addon
Response: No addons installed - Load the addon to the TMC9660
Run: python ubl_evalsystem_wrapper.py COMX write RAM addon --start-addon TMC9660_addon_xxx.hex → memory can be RAM (volatile), SPI (non-volatile), I2C (non-volatile). See the Non-volatile Memory section. - Check the addon status of the TMC9660
Run: python ubl_evalsystem_wrapper.py COMX inspect addon
Response: Addon installed Addon ID: 9660 Addon Version: v1.0 - Start the motor control configuration
Run: python ubl_evalsystem_wrapper.py COMX start motor_control
Response: Started motor control system Evalsystem wrapper: Triggering ID redetections - TMCL-IDE
Open the TMCL-IDE, upload the configuration file ioconfig_tmc9660-stepper-eval.toml, and start the application.
Non-Volatile Memory
When uploading the addon, the target memory can be RAM (volatile), SPI flash (non-volatile), or I2C EEPROM (non-volatile). For non-volatile memory, the same procedure as above applies, with the following adaptations:
- Update and Upload the Partition File
Update the Partition File
The TMCL-IDE provides the partition file partition_tmc9660-eval_with_addon.toml. Use this partition file orupdate the partition file to include the following entry for the addon.


Figure 7.Example Partition File Upload the Partition File
Load the partition file after step 4. Configure the TMC9660.
Upload the partition file to the TMC9660 and inspect the external memory.
Example SPI flash:
Run: ublcli.exe --port COMX write SPI partition my_partition.toml
Response: Writing partition table Verifying partition table Memory partitioning completed successfully
Run: ublcli.exe --port COMX inspect SPI
For a detailed description of the partition, refer to AN-2601. - Bootstrapping
When using the non-volatile memory, the addon is stored in the external SPI flash or I2C EEPROM. Duringstart-up, the bootloader must load the addon from the external memory into the TMC9660 RAM before the addon can run. This occurs automatically if the bootstrap bits are burned into the OTP configuration or can be triggered manually as follows.
Adapt step 6 Load addon to the TMC9660 of the previous section.
Run: python ubl_evalsystem_wrapper.py COMX writeaddon --start-addonTMC9660_addon_xxx.hex - Prepare configuration file (.toml) for addon
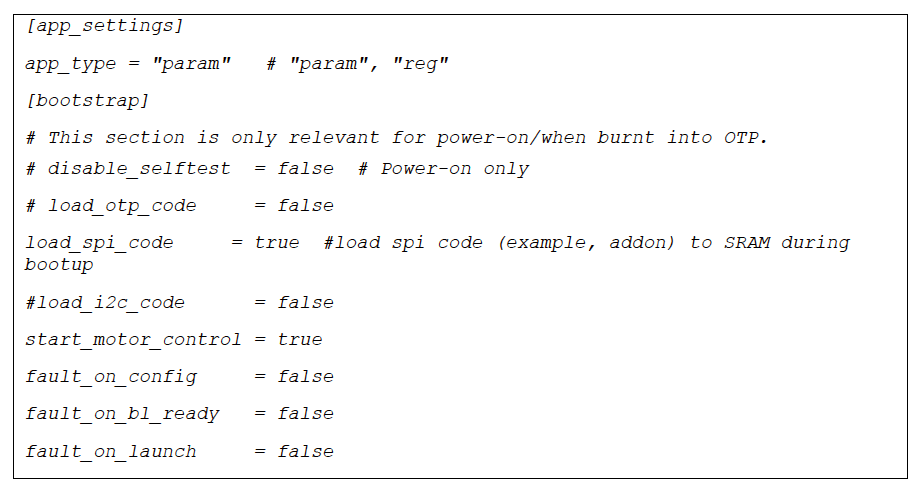
To load the addon from the external memory after a power cycle, the configuration file (.toml) must beconfigured. In the bootstrap section, enable either load_spi_code for SPI flash or load_i2c_code for I2CEEPROM.
Update TMC9660 Without Landungsbrücke Through UART
This section describes how to connect to the TMC9660 through a direct serial universal asynchronous receivertransmitter (UART) connection. In this setup, the Landungsbrücke is not used. So, the Python wrapper is not required. Instead, ublcli.exe communicates directly with the TMC9660 over the selected COM port. For details on the setup and use of ublcli.exe, refer to AN-2601.
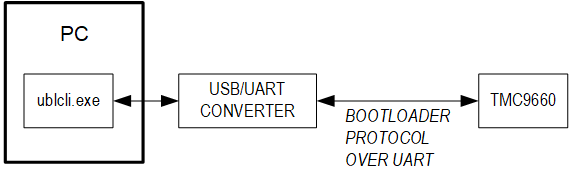
Example:
Load an addon to the TMC9660-EVAL RAM:
Run: ublcli.exe --port COMX write RAM addon --start-addon TMC9660_addon_vXXX.hex
Adapt the remaining commands in the same way and follow the procedure described in Update TMC9660 Evaluation Kit through Landungsbrücke with UblTools.
Non-volatile Memory
To load an addon to the non-volatile memory on the TMC9660-EVAL (without OTP burn), prepare the configuration files:
- Adapt ioconfig_tmc9660-3ph-eval_addon.toml, as described in the previous section (refer to step 3, prepare configuration file (.toml) for addon).
- Adapt partition_tmc9660-eval_addon.toml, as described in previous section (refer to step 1, update partition file).
Example of loading the addon to the TMC9660-EVAL external SPI memory:
ublcli.exe --port COMX --version
ublcli.exe --port COMX inspect chip
ublcli.exe --port COMX write config ioconfig_tmc9660-3ph-eval_addon.toml --no-boot
ublcli.exe --port COMX write SPI erase
ublcli.exe --port COMX write SPI partition partition_tmc9660-eval_addon.toml
ublcli.exe --port COMX write config ioconfig_tmc9660-3ph-eval_addon.toml --no-boot
ublcli.exe --port COMX inspect addon
ublcli.exe --port COMX write SPI addon --start-addon TMC9660_addon_vXXX.hex
ublcli.exe --port COMX inspect addon
ublcli.exe --port COMX start motor_control
Power-cycle the board.
Ublcli.exe –port COMX write config ioconfig_tmc9660-3ph-eval_addon.toml --boot
Open the TMCL-IDE and connect to the IC on the evaluation board directly.
Update TMC9660 Through SPI From MCU Firmware
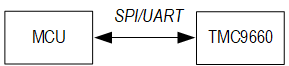
This section describes how to integrate the addon to the MCU firmware and update the TMC9660 through the SPI. The addon is loaded to the TMC9660 RAM during power-up. AN-2629 provies a detailed description of the update process.
- TMC-API integration
Integrate the TMC9660 API for the SPI communication into the firmware project, as described in the API documentation (https://github.com/analogdevicesinc/TMC-API/). - Load the addon to the TMC9660.
- Use UblTools to convert the addon binary files into a C array. Additionally, the tmc9660_bl_installAddon_9660 function is provided.
Run: ublcli.exe codegen addon TMC9660_addon_vXXX.hex - Integrate the generated addon array and the tmc9660_bl_installAddon_9660 function into the firmware project.
- Call the tmc9660_bl_installAddon_9660 function to write the addon to the TMC9660.
- Use UblTools to convert the addon binary files into a C array. Additionally, the tmc9660_bl_installAddon_9660 function is provided.
- Load the bootstrap configuration to the TMC9660.
- Adapt the configuration file to use the TMC9660 SPI.
- Generate the TMC9660 bootstrap configuration with the UblTools.
Run: ublcli.exe codegen config –boot ioconfig_tmc9660-stepper-eval_noLB.toml Note: The configuration file ioconfig_tmc9660-stepper-eval_noLB.toml is the adapted configuration file from step 1. - Integrate the generated bootstrap configuration code to the project.
- Load the bootstrap configuration to the TMC9660 (tmc9660_loadBootConfig).
- Generate the “Start Configuration Code” with the UblTools and integrate to the firmware project.
Run: ublcli.exe codegen start - Start the TMC9660 configuration and enter the parameter mode (tmc9660_bl_launchMotorControl()).
Update TMC9660 Through SPIFrom Mcu Firmware and SPI Flash
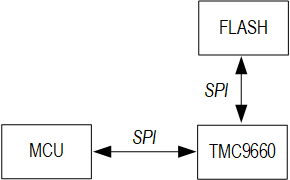
This section describes how to integrate the API into the MCU firmware and update the TMC9660 addon through the SPI flash. First, the addon is loaded to the SPI flash through the TMC9660. Then the addon is loaded from the SPI flash to the TMC9660 RAM during power-up. AN-2629 provides a detailed description of the update process.
- TMC-API integration
Integrate the TMC9660 API for the SPI communication into the firmware project, as described in the API documentation (https://github.com/analogdevicesinc/TMC-API/). - Load the bootstrap configuration to the TMC9660.
- Adapt the configuration file to add the SPI flash.
- Generate the TMC9660 bootstrap configuration with the UblTools.
Run: ublcli.exe codegen config –boot ioconfig_tmc9660-stepper-eval_noLB.toml Note: The configuration file ioconfig_tmc9660-stepper-eval_noLB.toml is the adapted configuration file from step 1. - Integrate the generated bootstrap configuration code into the project.
- Load the bootstrap configuration to the TMC9660 (tmc9660_loadBootConfig()).
- Generate the start configuration code with UblTools and integrate it into the firmware project. Run: ublcli.exe codegen start
- Start the TMC9660 configuration and enter parameter mode (tmc9660_bl_launchMotorControl()).
- Load the addon to the SPI flash through the TMC9660.
- Use UblTools to convert the addon hex files into a C array. Additionally, the tmc9660_blinstallAddon_9660 function is provided.
- Run: ublcli.exe codegen addon TMC9660_addon.hex
- Implement functions to write the addon array to the SPI flash.
- Erase the SPI flash with FLASH_SEND_COMMAND (No: 36).
- Partition the SPI flash.
- Write the addon array to SPI flash.
- Write the addon header (addon length, addon checksum with WRITE_CHECKSUM (No: 26).)
- Load the addon from SPI flash to the TMC9660 RAM.
The following options are available to load the addon from the SPI flash to RAM:
- Send the bootloader START_APP (No: 27) command.
- Update and load the TMC9660 configuration file.
- Include the bootstrap option for load_spi_code and start_motor_control.
- Update and save the TMC9660 configuration file to the TMC9660 OTP.
- Enter the parameter mode.
Call the tmc9660_bl_launchMotorControl() function to enter the parameter mode. If this option is already selected in the configuration file (start_motor_control = true), this step is redundant.
Addon Changelog
Addon V1.0.0
Changes applied by the addon are listed in the overview. For a detailed description, see the subsections. The changed settings for the TMC9660 are highlighted in this document using a green background.
Addon Version
Bootloader:
In bootloader mode, the addon status, and addon ID and version can be read:
- Addon status
Address = 0x00020C00
Return Value = 0x6B657921 (if an addon is loaded, same key for all addon versions). - Addon ID and version (if an addon is loaded).
Address = 0x0002BFF8
Return Value = ID → 0x30 36 36 39 („9660“ in ASCII, little-endian).
Address = 0x0002BFFC
Return Value = Version
Reply for Version v1.0.0 → 0x00 01 00 00
The TMC9660 API provides the function getAddonInfo() to read the addon status, ID, and version.
Parameter Mode:
Addon ID and version are available through TMCL command GetInfo (157):
- Type 204 returns the addon ID → 0x39 36 36 30 („9660“ in ASCII, big-endian).
- Type 205 returns the addon Version.
The addon version reply data is structured as vmajor.minor.0. The first two bytes denote the major version and the second two bytes the minor version. Reply for Version v1.0.0 → 0x00 01 00 00
Overview
Fix:
- Fix and change the SPI used for communication with application controller (Erratum PM-8: SPICommunication Anomaly).
- Fix GIO read through TMCL script (Erratum 1: TMCL Script GPIO input).
- Fix IIT (Erratum 2: IIT calculation).
- Fix TARGET_TORQUE (AP104) delay (Erratum 4: Control loop target delays).
- Fix SPI configuration (Erratum 5: SPI subordinate not being disabled).
- Fix SPI encoder to support any motor pole pair number. Previously, only pole pair of 2n were supported.
- Fix ABN encoder initialization with hall (USE_HALL).
New Feature:
- Add ABN encoder mode to skip initialization (SKIP_INIT).
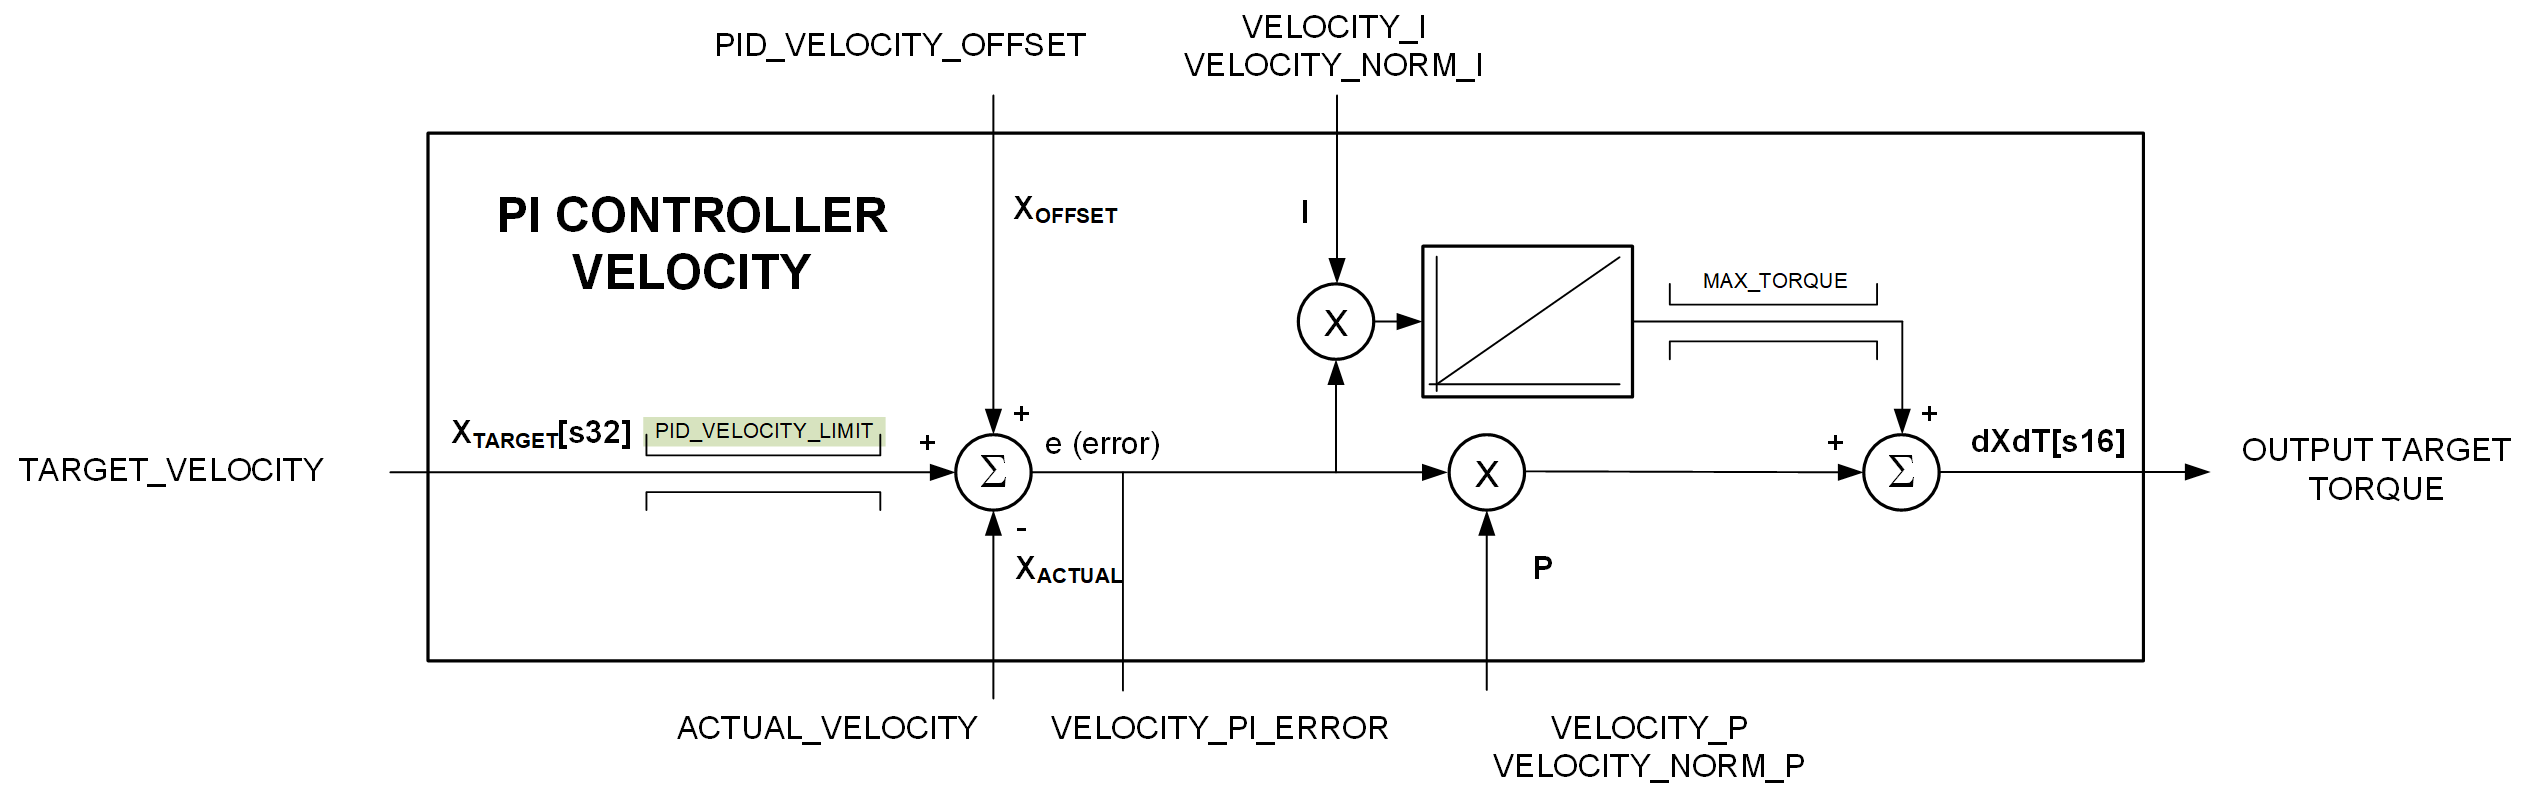
- Added parameter PID_VELOCITY_LIMIT AP (AP140) for ramper function block.
Compatibility
Firmware compatibility:
- SPI:
- The SPI protocol has changed and application controller software must be updated accordingly.The new addon version v1.0.0 is regarded as not fully firmware compatible with the version without addon.
Hardware compatibility:
- SPI:
- If the addon is loaded to the RAM, no hardware change is required
- If the addon is loaded from the external memory, the TMC9660 external memory (flash, EEPROM) is required.
Serial Peripheral Interface (SPI)
Changes from Data Sheet
The reworked SPI function deviates slightly from the protocol described in the public data sheet in the following ways:
- Modified SPI reply:
- The first reply byte is now 0xAD for a response, 0x00 if no response is available.
- Replies to requests with checksum errors that now also have a first byte of 0xAD. The checksum error is reported within the second byte (TMCL status) with a value of 1.
- Added NOP command:
- Sending a request with operation = 0xFF does not cause any response to be sent.This is intended for use as a way of retrieving a response without queuing another command. This is referred to as an “NOP command”.
- Added support for pipeline communication:
- When retrieving a reply, a new request can be sent at the same time.
- Modified behaviour for short SPI transactions (<8 bytes):
- Any datagram with less than eight bytes does not create a request – the TMC9660 ignores these.Reply data remains the same, until a datagram of at least 8 bytes is sent.
| BYTE | 0 | 1 | 2 | 3 | 4 | 5 | 6 | 7 |
| Bit | 0-7 | 8 to 15 | 16 to 23 | 24 to 55 | 56 to 63 | |||
| Desc. | SPI Status | TMCL Status | Operation | Data (big-endian) | Checksum | |||
Operation is Byte 0 of the request.
The SPI status codes are changed, as depicted in Table 2.
| Value | Status Code | Description |
| 0xAD | SPI_STATUS_OK | Indicates the operation is complete and a reply is available. |
| 0x00 | SPI_STATUS_NOT_READY | Indicates there is no reply available. Indicates if a command is sent before, it is still being processed. |
| 0x0C | SPI_STATUS_FIRST_CMD | Indicates the initial response after initialization. It is sent during the very first SPI transaction. |
ABN Encoder - Initialization with Hall
This addon implements the following changes:
- Corrected hall offset calculation when using ABN encoder initialization with hall. Affected parameter ABN_1_INIT_METHOD: USE_HALL
| NO. | Parameter/Description | Range | Default | R/W |
| 92 | ABN_1_INIT_METHOD Select an ABN encoder initialization method that fits best to the motor's sensors. 0: FORCED_PHI_E_ZERO_WITH_ACTIVE_SWING Forces the rotor into phi_e zero using the open loop current but actively swings the rotor. 1: FORCED_PHI_E_90_ZERO Forces the rotor into phi_e 90 degree position and then into zero position using the open loop current. 2: USE_HALL Turns the motor slightly in hall commutation mode until a hall signal change gives a new absolut position, which then the ABN phi_e is aligned to. 3: USE_N_CHANNEL_OFFSET Turns the motor slightly in open loop commutation mode until a N-channel is reached and gives an absolut position, which then the ABN phi_e is aligned to. 4: SKIP_INIT No encoder initialization is made, when commutation mode is changed. First initialization is required (using option 0...3). |
0, 1, 2, 3, 4 | 0 | RWE |
ABN Encoder - Skip Initialization
This addon implements the following changes:
Added SKIP_INIT option to parameter 92: ABN_1_INIT_METHOD
| NO. | Parameter/Description | Range | Default | R/W |
| 92 | ABN_1_INIT_METHOD Select an ABN encoder initialization method that fits best to the motor's sensors. 0: FORCED_PHI_E_ZERO_WITH_ACTIVE_SWING Forces the rotor into phi_e zero using the open loop current but actively swings the rotor. 1: FORCED_PHI_E_90_ZERO Forces the rotor into phi_e 90 degree position and then into zero position using the open loop current. 2: USE_HALL Turns the motor slightly in hall commutation mode until a hall signal change gives a new absolut position, which then the ABN phi_e is aligned to. 3: USE_N_CHANNEL_OFFSET Turns the motor slightly in open loop commutation mode until an N-channel is reached and gives an absolute position, which then the ABN phi_e is aligned to. 4: SKIP_INIT No encoder initialization is made, when commutation mode is changed. First initialization is required (using option 0…3). |
0, 1, 2, 3, 4 | 0 | RWE |
Note: In the TMCL-IDE, use the Direct Mode tool to set to SKIP_INIT.
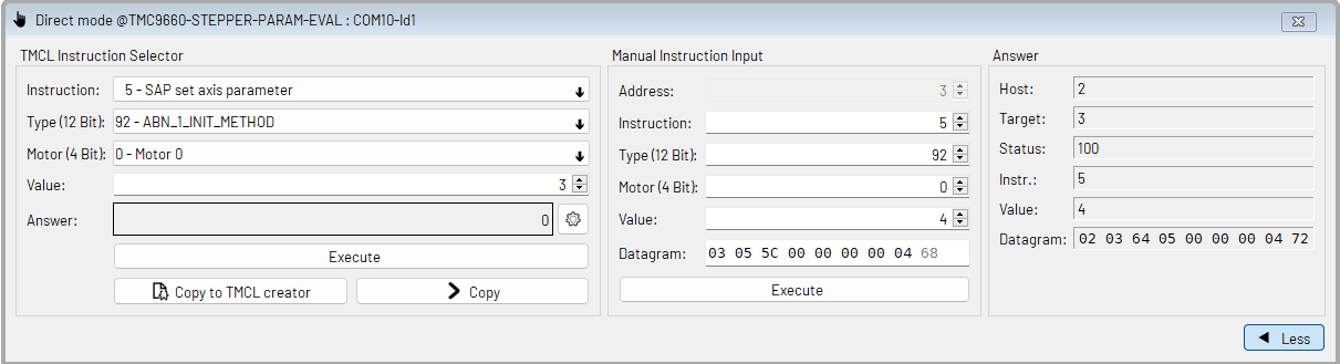
Add Parameter for Ramper Function Block
New axis parameter 140 PID velocity limit. Set maximum absolute velocity for velocity PI controller. Without the addon, the velocity limit is defined by RAMP_VMAX.
| NO. | PARAMETER/DESCRIPTION | RANGE | DEFAULT | R/W |
| 140 | PID_VELOCITY_LIMIT PID velocity limit. Limits the velocity target value from velocity target register and position controller output. |
0 ... 2147483647 |
134217727 |
RW
|