概览
参考资料
-
CN0536 User Guide2021/4/26WIKI
-
Solutions For Rapid Prototyping: Answering the Needs of Practicing Engineers2023/8/23PDF784 K
电路功能与优势
Radiation monitoring is an essential part of ensuring health and safety in and around nuclear energy production facilities, marine propulsion applications, contaminated environments, medical facilities, and other industrial settings where radioactive material may be present.
There are various passive and active methods of measuring instantaneous radiation intensity and total radiation dose. The simplicity, low cost, and reliability of the Geiger-Mueller counter make it a compelling choice as a primary radiation measurement device, or as a secondary measurement in conjunction with other methods.
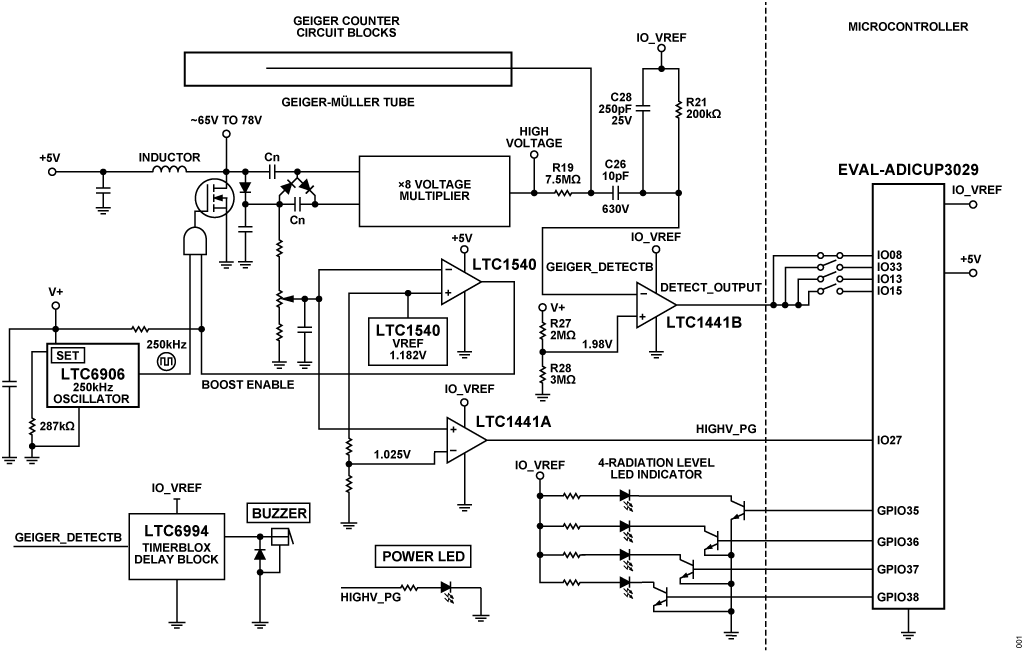
The circuit shown in Figure 1 is designed for use with Geiger counter radiation detectors (GM tube not included) is in an Arduino shield form factor compatible with 3 V and 5 V platform boards. The bias power supply is adjustable from 280 V to 500 V, allowing use with a wide range of Geiger-Mueller tubes; an SI-29BG tube is used as an example.
Audible and light emitting diode (LED) event indicators provide a qualitative measure of radiation intensity, and the conditioned event pulse is routed to an Arduino interrupt pin for quantitative measurement and long-term datalogging.
The solution is adaptable to a local physical display (liquid crystal display (LCD), organic LED (OLED), and so on) or wired data connection using the universal asynchronous receiver and transceiver (UART) interface of the platform board. Wireless connectivity via Bluetooth or WiFi provides electrical isolation and simplifies remote monitoring and applications that aggregate data from multiple sensors.
The high voltage power supply is a unique architecture centered around a micropower comparator with built in reference. Hysteretic regulation reduces the quiescent current consumption to microamps, and a second power-good comparator detects fault conditions, making this circuit ideal for battery-powered, long-term monitoring applications.
Figure 1. EVAL-CN0536-ARDZ Block Diagram
电路描述
Geiger-Mueller Tube Principles of Operation
The Geiger-Muller tube is an ionizing radiation detector that is sensitive to alpha, beta, gamma, and x-ray radiation. While it cannot discriminate between radiation types, its sensitivity, simplicity, and reliability make it a practical choice in a wide range of radiation monitoring applications, either alone or in conjunction with other sensors.
Geiger-Muller tubes are commonly biased to a voltage ranging from 250 V to 500 V with a near zero current drawn when no radiation events are taking place. Several typical Geiger-Muller tubes are shown in Figure 2.
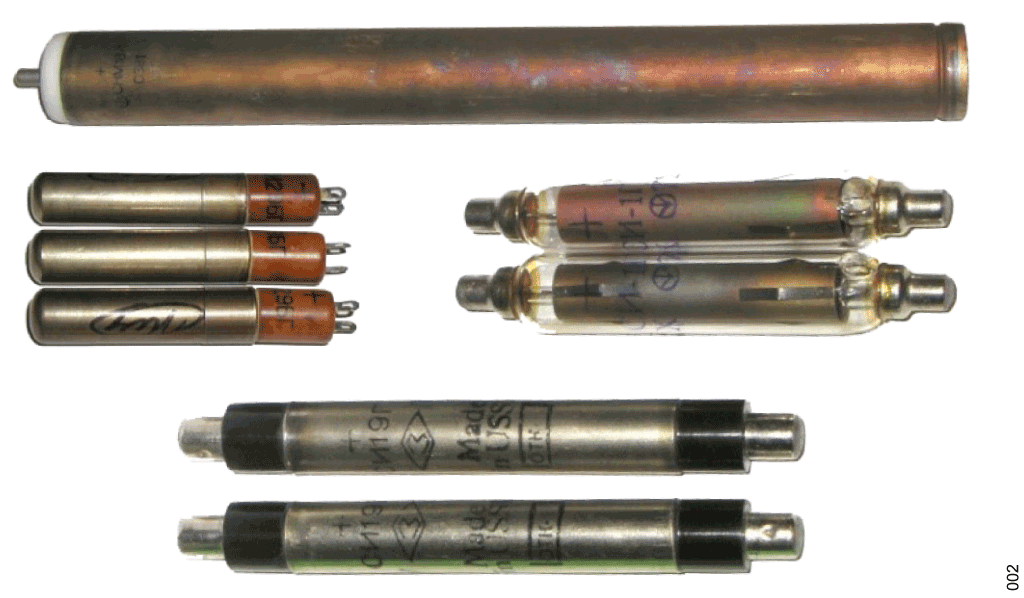
Figure 2. Geiger-Muller Sensor Tubes
When an ionized particle enters the tube, ion pairs consisting of a free electron and a positively charged gas molecule are created. Electrons accelerate toward the anode, creating additional ion pairs, causing an avalanche of additional electrons. Electrically, this effect produces a momentary low impedance path between the anode and the cathode that can be detected as a voltage pulse across an external resistance. The external resistance is also necessary to allow the anode to the cathode voltage to drop to a point where the avalanche stops (known as quenching).
The output signal can be measured at either the cathode (see Figure 3) or anode (see Figure 4).
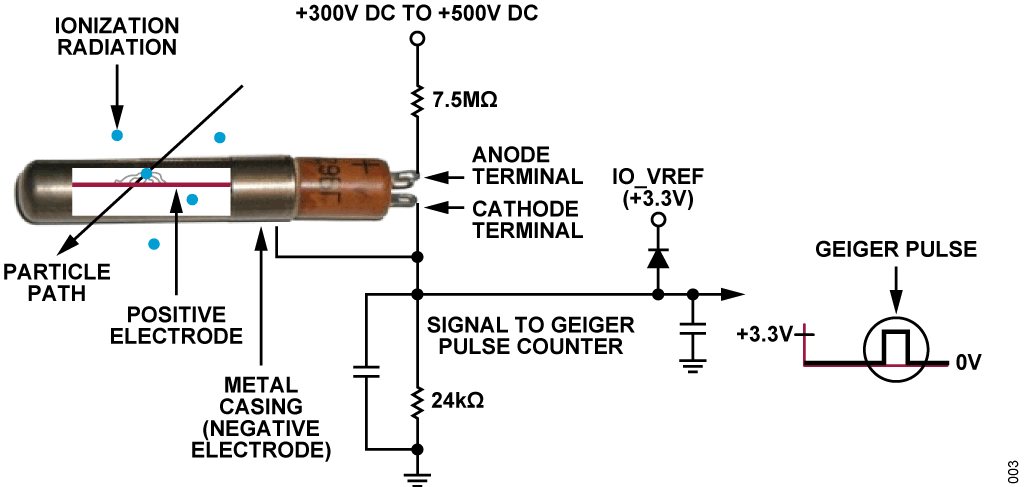
Figure 3. Geiger-Mueller Tube with Pulse Signal at Cathod
While taking the signal from the cathode avoids the need for a high voltage, level shifting capacitor, it is more sensitive to electrical noise because the cathode impedance to ground is relatively high. The CN-0536 takes the signal from the anode (see Figure 4) with the cathode grounded to minimize susceptibility to noise.
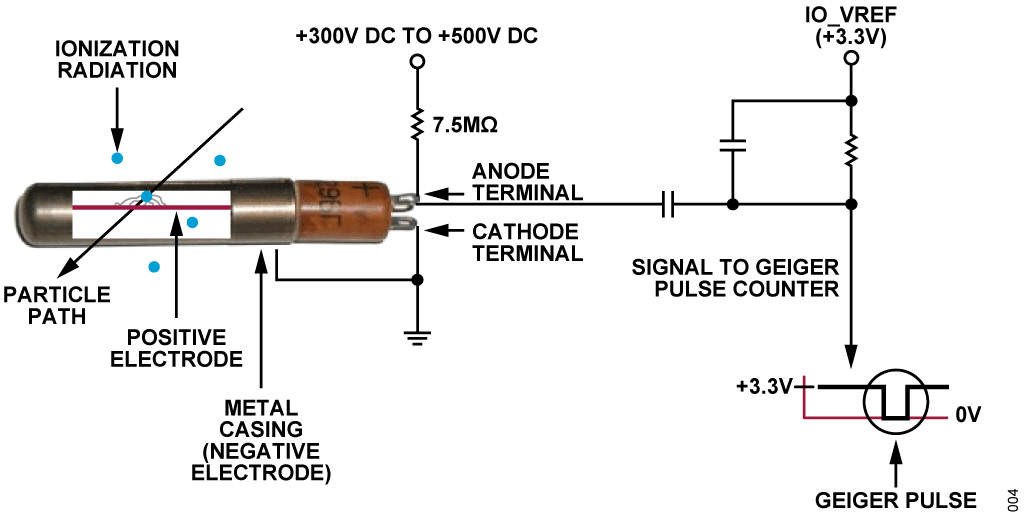
Figure 4. Geiger-Mueller Tube with Pulse Signal at Anode
Geiger Pulse Detection
Figure 5 shows the LTspice® schematic of the Geiger-Mueller pulse level shifting and detection circuitry.
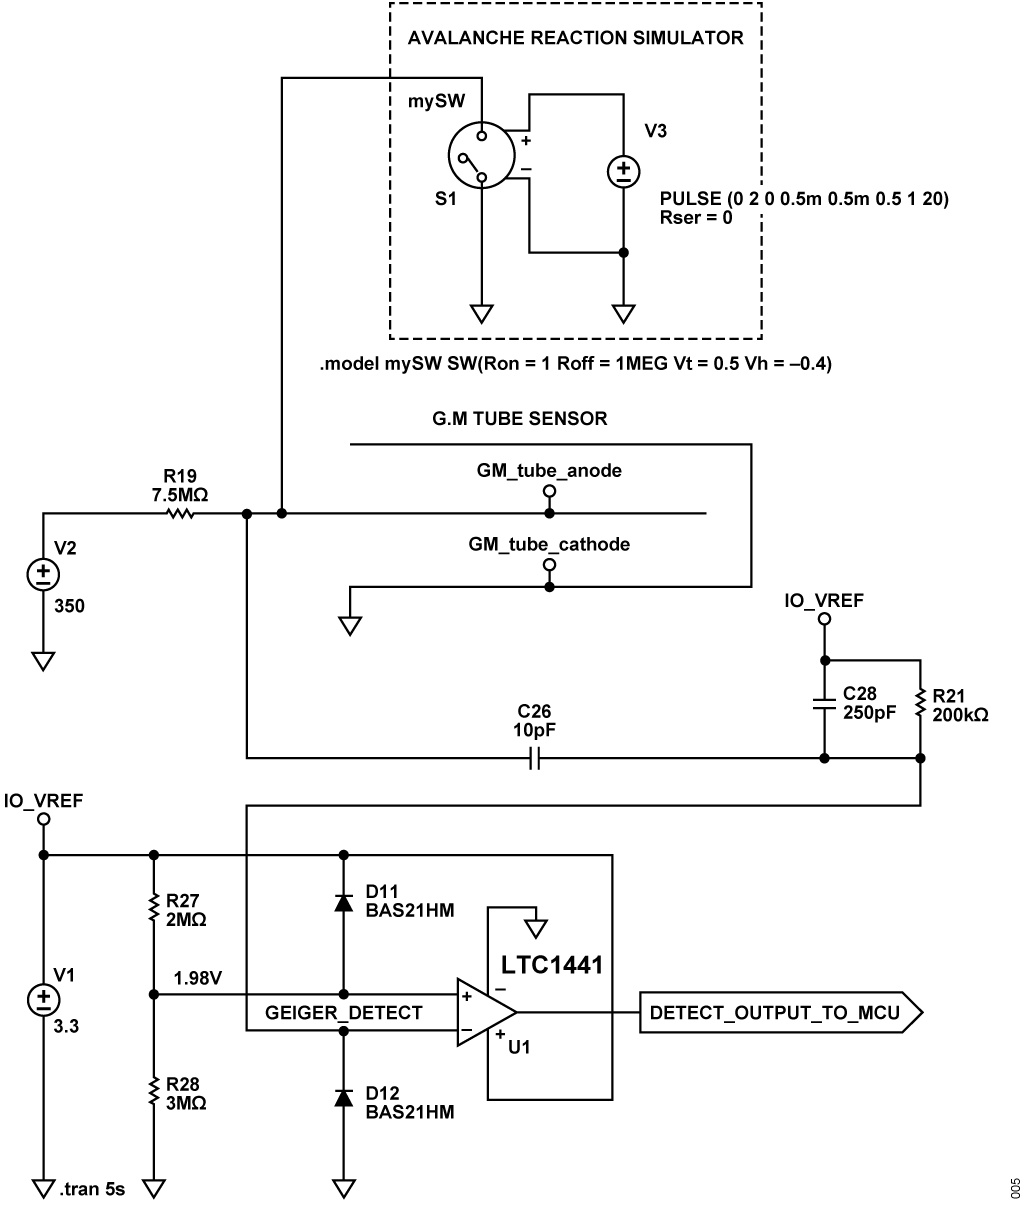
Figure 5. LTspice Schematic of the Geiger Pulse Shifting and Detection Circuitry
When no radiation events are occurring, the anode is biased at 400 V. C28 and C26 form a capacitive voltage divider, whose output is biased at IO_VREF through R21. When an event occurs, the anode is momentarily pulled toward ground potential, producing a 400 V negative going step. When the output of the attenuator drops to less than the 1.98 V threshold set by R27 and R28, the output of the LTC1441 comparator drives high. The comparator output is routed to an interrupt pin on the platform board, such that software can respond to the event. Figure 6 shows the attenuator and comparator outputs for a typical radiation event.
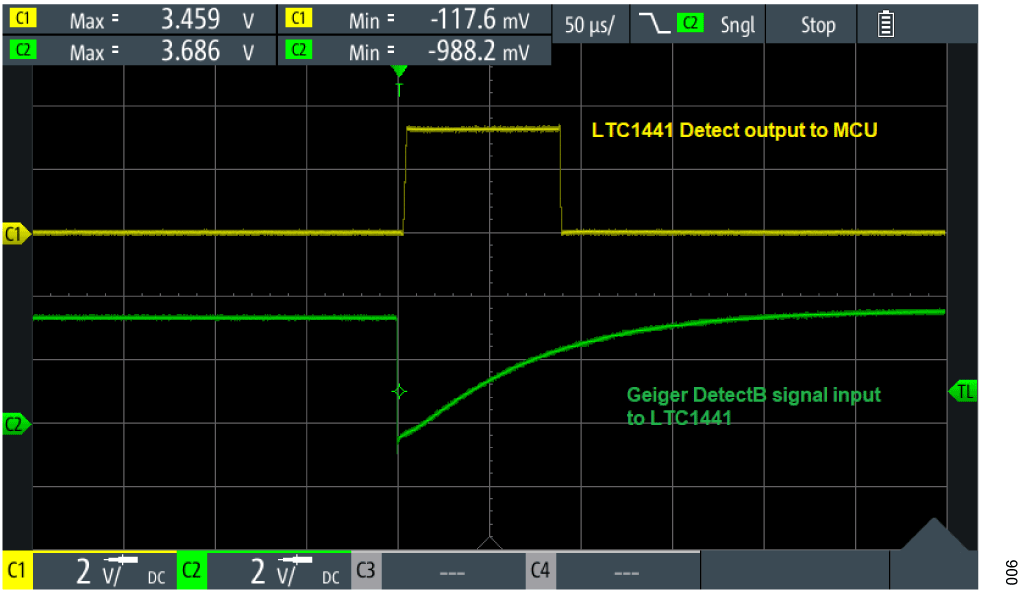
Figure 6. Geiger-Mueller Output Pulse Detection and LTC1441 Output Pulse
High Voltage Supply
The Geiger-Mueller bias is provided by the micropower, high voltage power supply shown in Figure 7. The circuit is a fixed frequency, fixed 50% duty cycle, nonsynchronous boost converter followed by a Cockroft-Walton multiplier, with hysteretic voltage mode control.
An LTC6906 resistor-programmable oscillator is configured to produce a 250 kHz, 50% duty cycle square wave. An AND gate buffers this clock signal and functions as a gate driver for the boost power metal-oxide semiconductor field effect transistor (MOSFET). Because the LTC6906 draws its full 12.5 μA supply current whenever power is applied, the converter is enabled and disabled by simply switching the V+ supply of the LTC6906 on and off. The AND gate ensures that the switching FET is either off or fully enhanced, even as the supply voltage of the LTC6906 is ramping up or down.
Voltage feedback is taken from the output of the first multiplier stage, which greatly reduces power dissipation in the feedback divider at the expense of a slight reduction in load regulation. Figure 7 is the LTspice schematic simulation of the high voltage power supply that is included in the design support package.
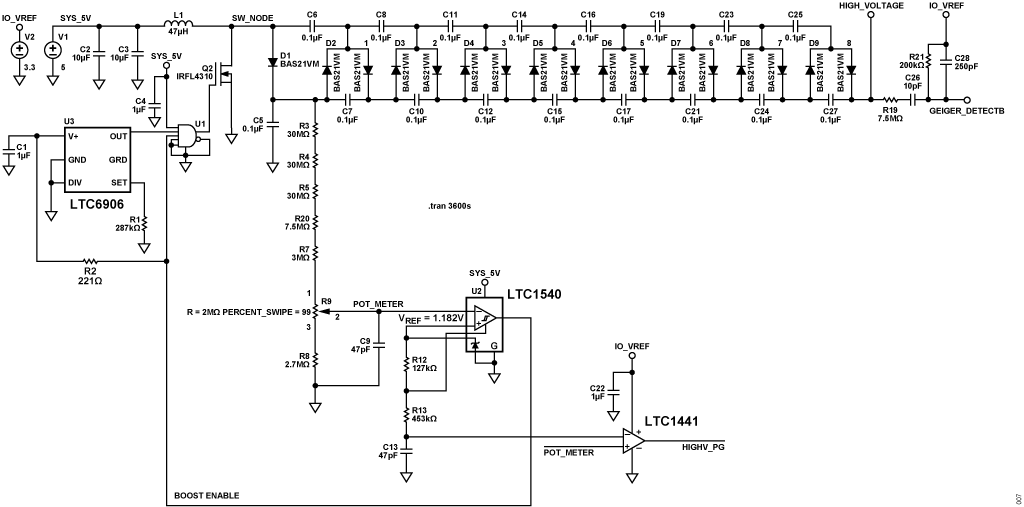
Figure 7. Micropower High Voltage Power Supply
High Voltage Generation (280 V to 500 V)
When power is first applied, the feedback voltage is at ground potential, driving the output of U1 high, which in turn powers up the LTC6906, and the boost stage begins switching at 350 kHz, 50% duty cycle. L1, Q2, D1, and C5 form a conventional nonsynchronous boost converter, and once the voltage at C5 rises to 64 V, U1 trips off. The output voltage slowly decays to 55 V, determined by the hysteresis of U2, and the cycle begins again. The initial turn-on transients are shown in Figure 8 and Figure 9.
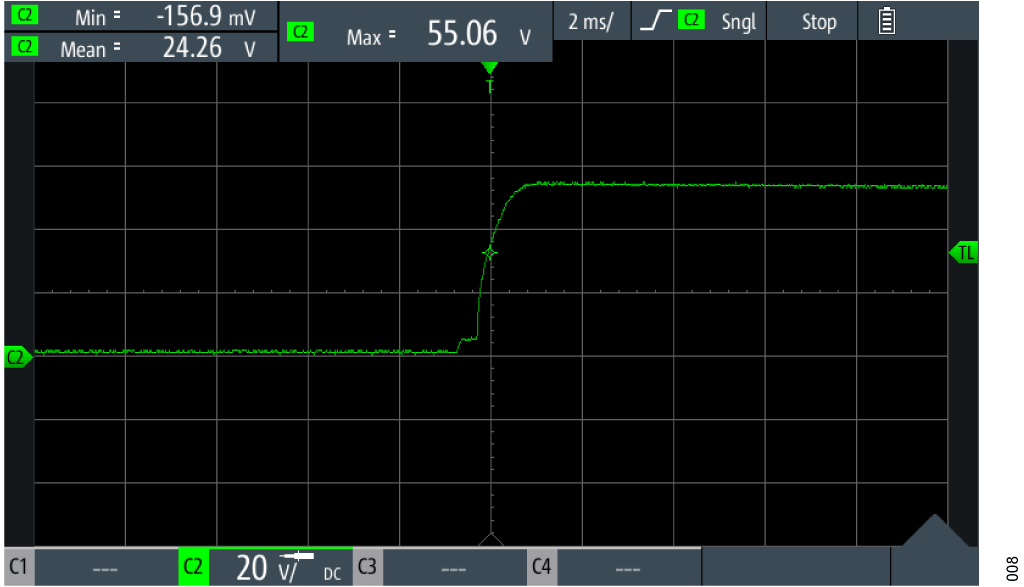
Figure 8. Turn-On Transient at a Time Scale of 2 ms
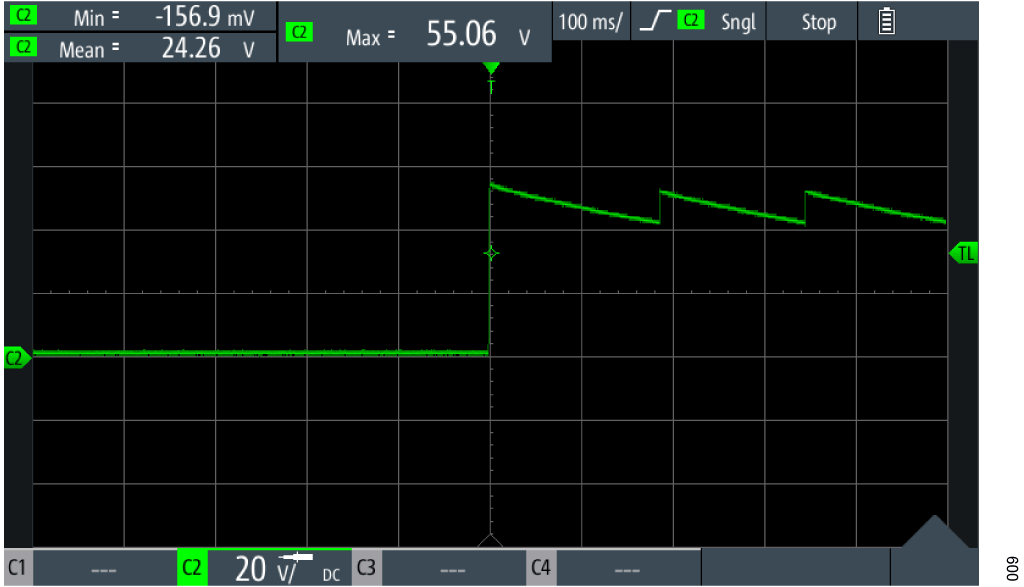
Figure 9. Turn-On Transient at a Time Scale of 100 ms
The output voltage is set to 400 V nominal and maintained between 390 V and 410 V. The duty cycle is low, approximately 0.1%, with a 200 µs burst every 600 ms. This results in an average current consumption of 33 µA. Probing the output of the multiplier is challenging because even the 10 MΩ impedance of a typical scope probe can affect the operation of the circuit. However, probing earlier stages illustrates the principle. Figure 10 and Figure 11 show the voltage at C11 at the output of the second multiplier stage, while Figure 12 and Figure 13 show the pulse switching of the 100 V, N-channel, enhancement mode MOSFET Q2 driven to its gate terminal by the 350 kHz switching frequency using a combination of an AND gate and the LTC6906 frequency clock generator.
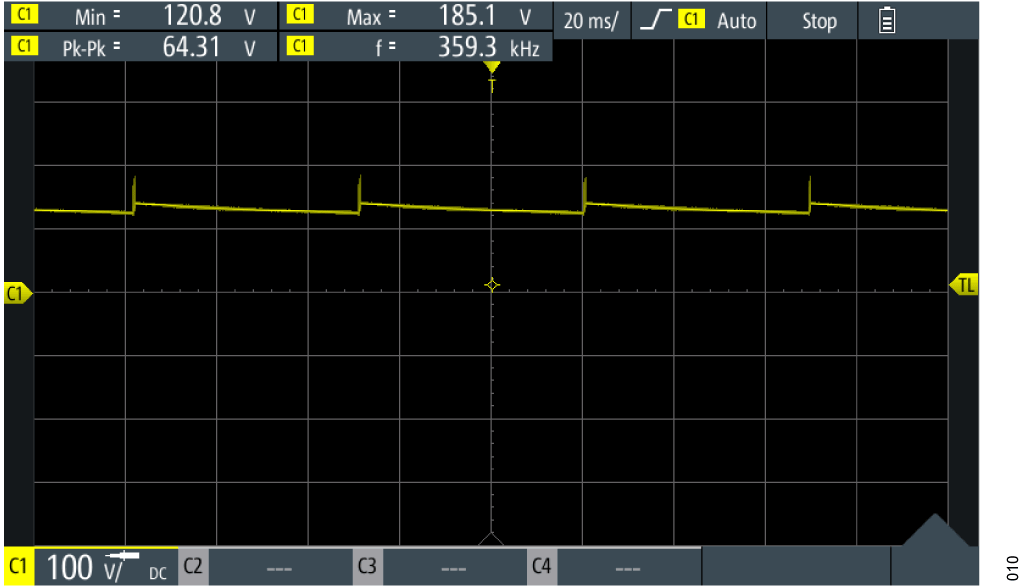
Figure 10. Hysteretic Regulation Measured at C11 at a Time Scale of 20 ms
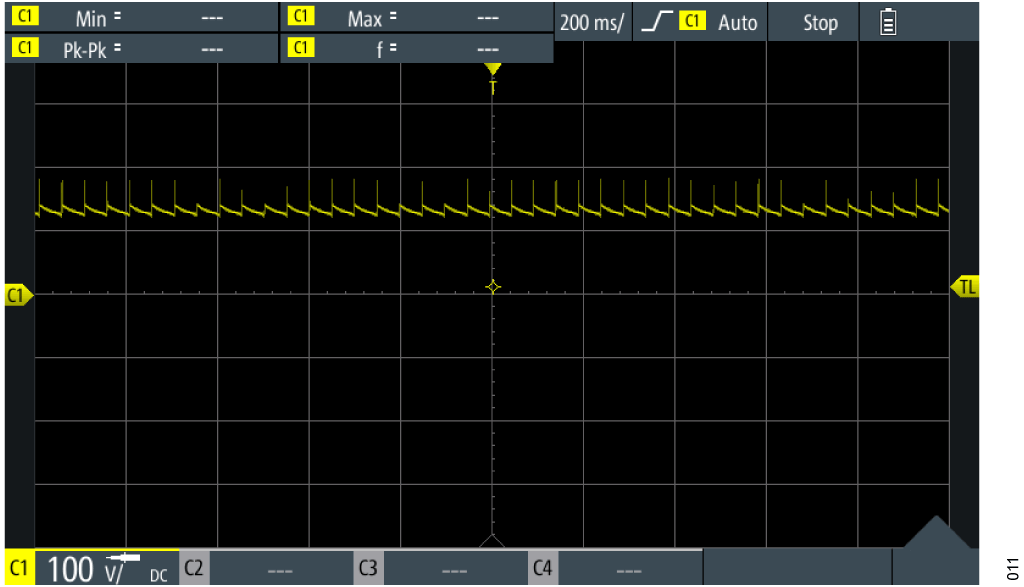
Figure 11. Hysteretic Regulation Measured at C11 at a Time Scale of 200 ms
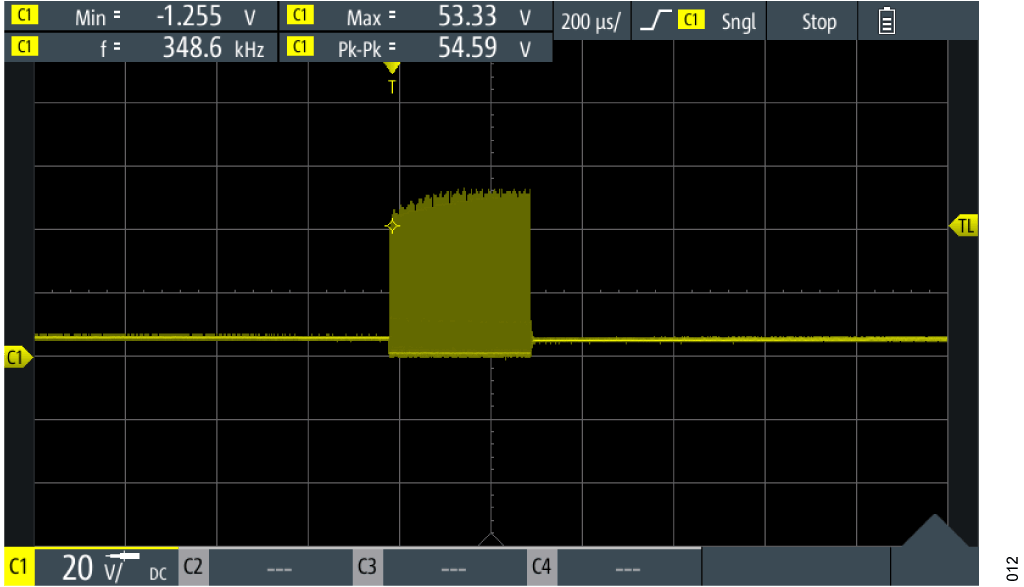
Figure 12. Boost Pulses at MOSFET Q2 Drain Terminal at a Time Scale of 200 μs
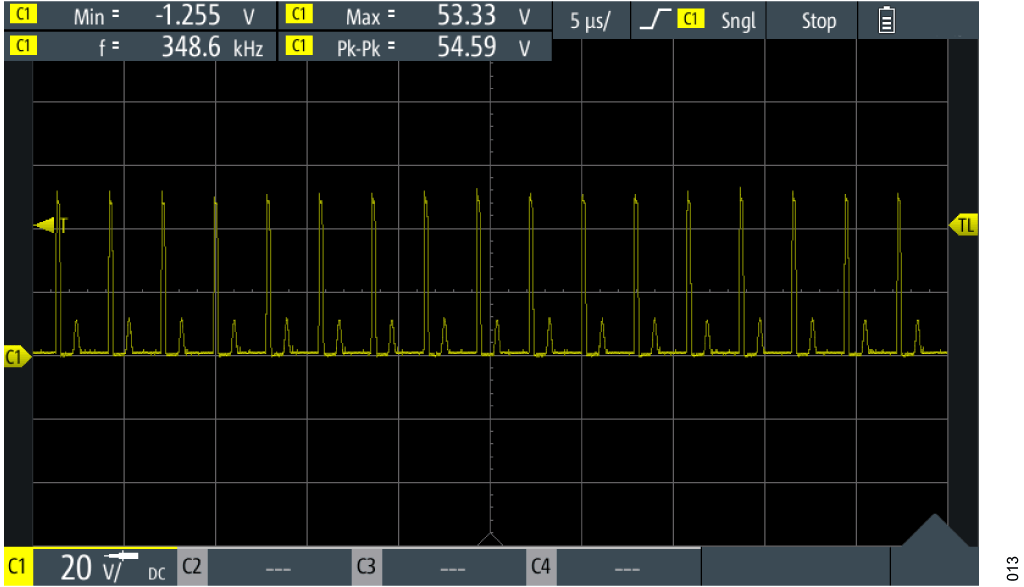
Figure 13. Boost Pulses at MOSFET Q2 Drain Terminal at 5 μs
Geiger Pulse Visual/Audible Indicators
The 18 µs output pulse from the Geiger-Mueller event detector circuit is too short to reliably generate a visual indication (LED) or audible click from a buzzer. An LTC6994 programmable delay block/debouncer is configured with a master timebase (tMASTER) of 2.5 µs, N divider value of 512, and a delay falling edge (POL) = 1. This results in a 1.28 ms pulse to an LED indicator and buzzer, producing an easily visible flash and audible click. Figure 14 shows the detailed schematic of the timer block delay.
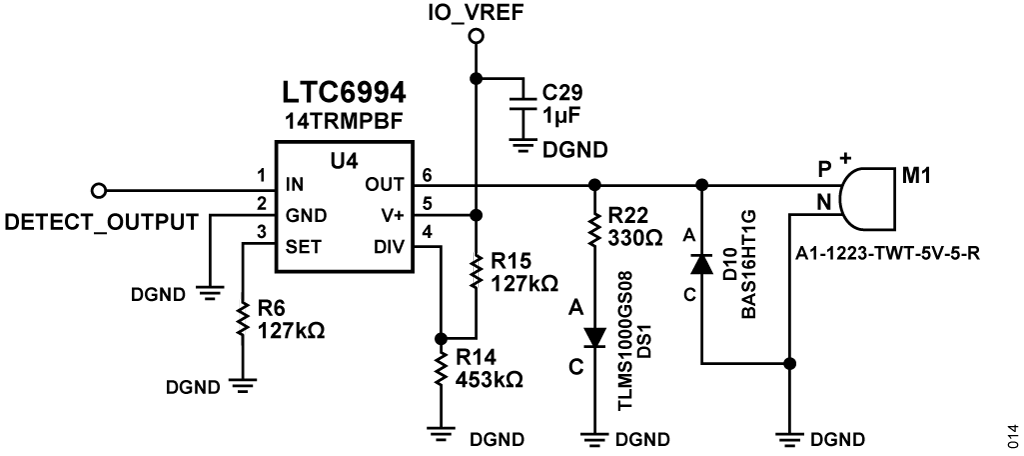
Figure 14. Timer Block LTC6994 Click Sound Generator

where:


High Voltage Power Good
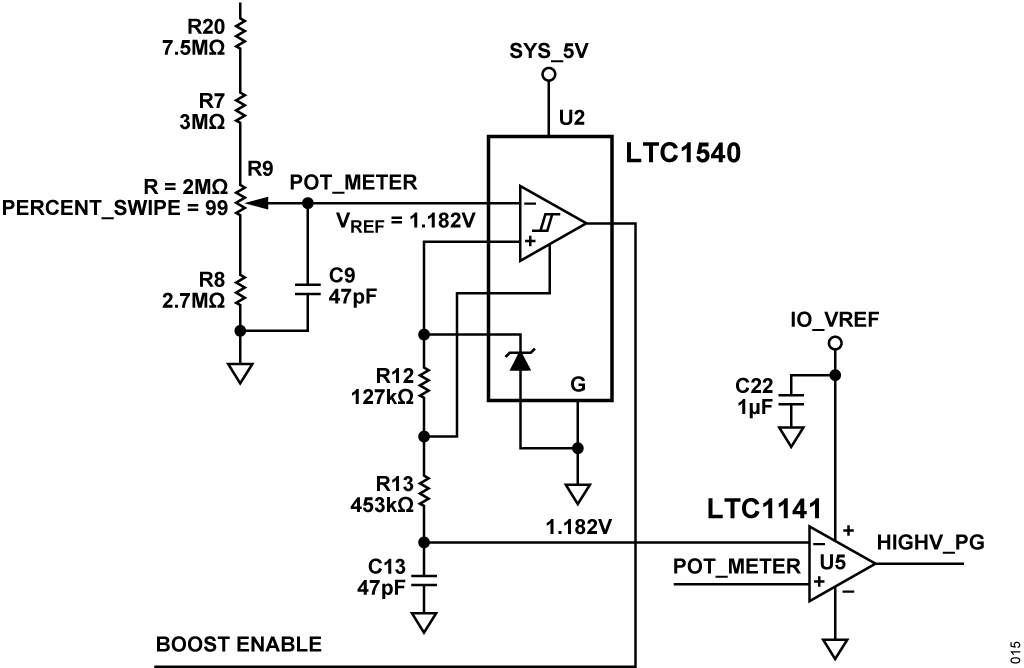
The second half of the LTC1441 comparator functions as a high voltage power-good indicator (see Figure 15).
The circuit uses the REF output (VREF) of the LTC1540 as a reference, which is the same reference that is used to set the regulation voltage. If the potentiometer wiper falls to less than the reference voltage, the comparator output asserts, indicating a loss of regulation.
Figure 15. High Voltage Power-Good Indicator
常见变化
The output pulse of the Geiger-Mueller tube can be taken from the cathode (outer shell) to avoid the need for a high voltage capacitor. However, taking the output pulse this way is more sensitive to electrical interference because the cathode acts as an antenna.
For long-term, battery-powered applications, the LTC6994 and power LED can be omitted from the circuit to minimize quiescent current.
电路评估与测试
The following section outlines the procedure for bringing up the CN-0536. For complete details on the hardware and software setups, see the CN0536 user guide.
Equipment Needed
The following equipment is needed:
- The EVAL-CN0536-ARDZ with GM tube installed
- The EVAL-ADICUP3029
- 280 V to 500 V Geiger-Mueller tube, such as SI-29BG
- An microUSB cable
- A host computer with a serial terminal program, such as TeraTerm or PuTTY
- A safe radiation source, for example, the Flinn Scientific AP8795 1μCi Cobalt-60 gamma source or similar.
- The ADuCM3029_demo_cn0536_uart.hex software file
System Block Diagram
Figure 16 shows the system block diagram.

Figure 16. The EVAL-CN0536-ARDZ Combined with the EVAL-ADICUP3029
Getting Started
To setup the EVAL-CN0536-ARDZ and the associated software, use the following steps:
- Connect the EVAL-CN0536-ARDZ on top of the EVAL-ADICUP3029 platform board as shown in Figure 17.
- Connect the EVAL-ADICUP3029 to the PC using the microUSB cable provided.
- From the PC, drag and drop the prebuilt ADuCM3029_demo_cn0536_uart.hex file onto the DAPLINK drive.
- Open the serial terminal program (for example, Tera Term or Putty)
- Connect the EVAL-ADICUP3029 by using the COM port it was assigned to set the baud rate to 115200 (see Figure 18).
- Place the radioactive source near the Geiger-Mueller tube and observe the terminal.
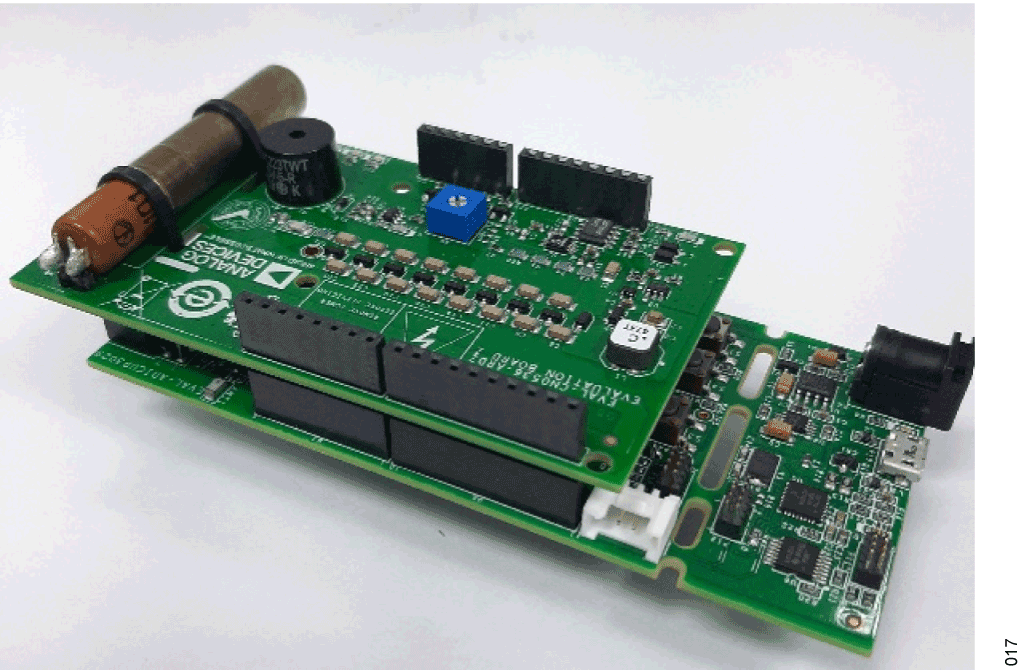
Figure 17. EVAL-CN0536-ARDZ and EVAL-ADICUP3029 Connection
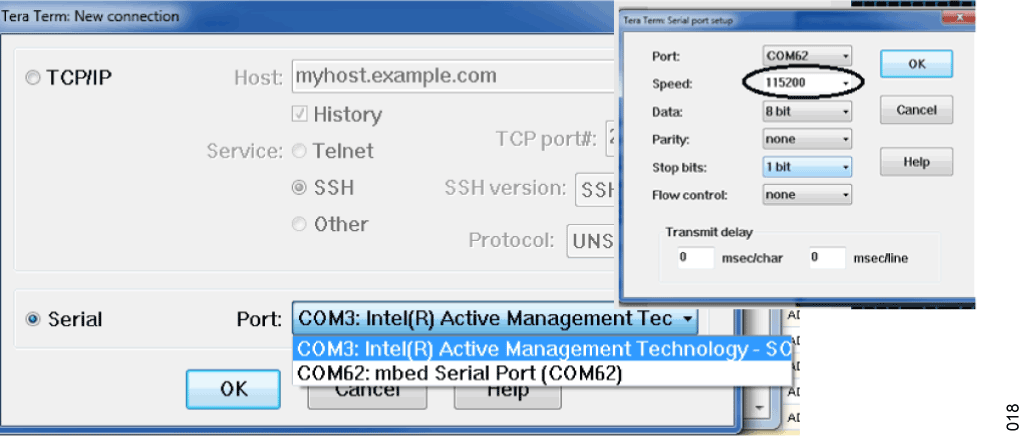
Figure 18. Using Tera Term as Serial Monitor With Baud Rate Set to 115200
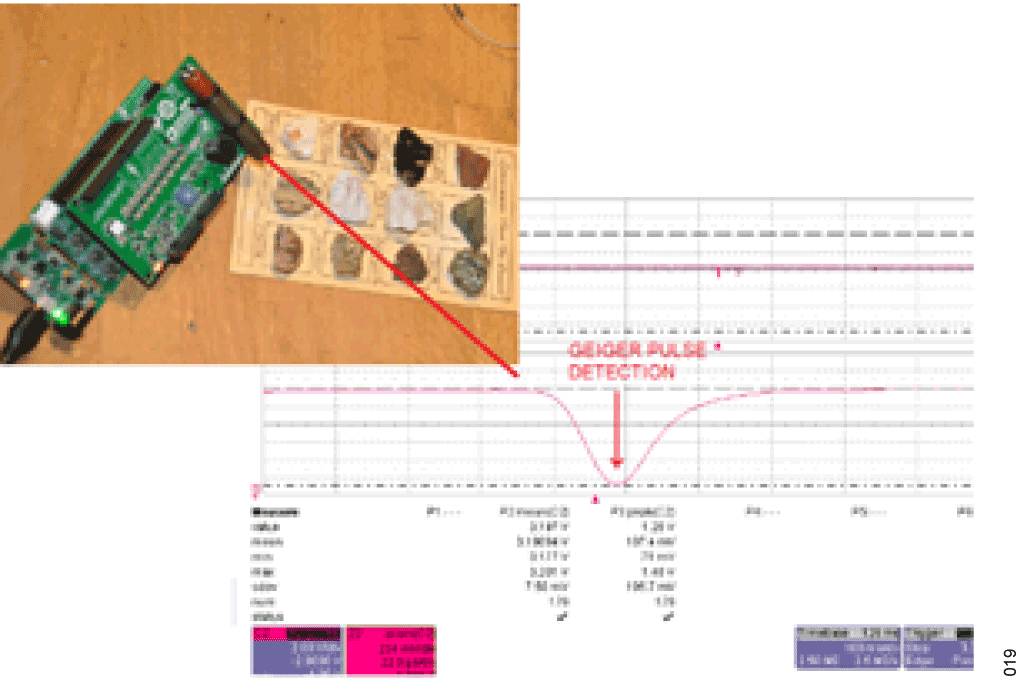
Figure 19. EVAL-CN0536-ARDZ Connected to the EVAL-ADICUP3029 Next to the Uranium Ore Sample
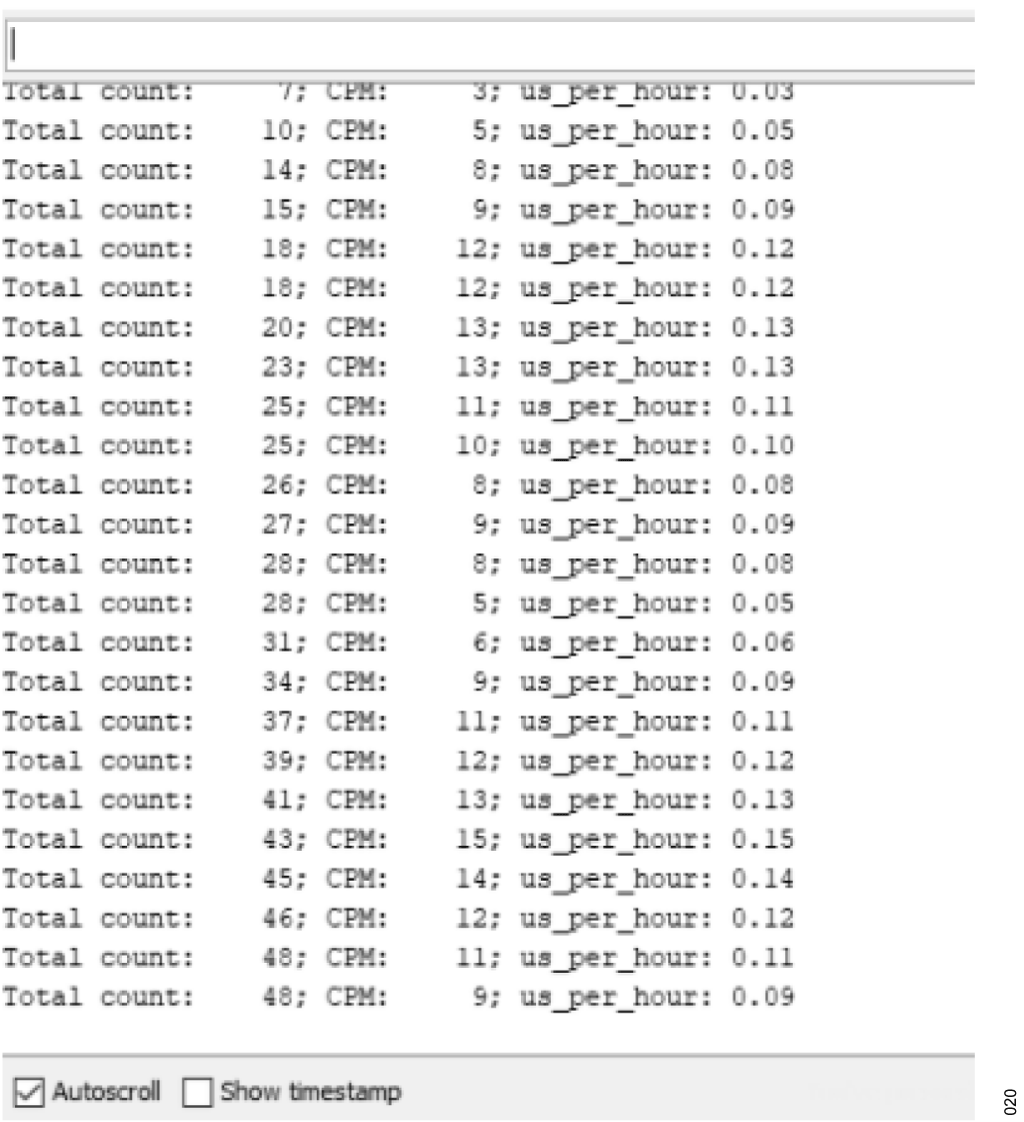
Figure 20. Geiger-Mueller Detection Pulse from an Uranium Ore Sample


