Reference Design for an Energy Meter Using the MAXQ3180/MAXQ3183 AFEs
Description
About the Reference Design
The MAXQ3180 reference design includes the following:
- A 3-phase energy meter
- PC software (ZIP)
- This application note
The reference design can be purchased online. For the reference design part numbers and ordering instructions, see the Order information section below. The PC software and the host application code may be updated periodically to improve or add features. All updates will be posted on Analog website. You will receive an e-mail notification if you subscribe to Analog EE-Mail™¹. If an update to the host application code is required, a serial-to-JTAG programming adapter should be used to reload the code into the MAXQ2000 microcontroller.
Specifications
The reference design supports 3-phase four wires only:ware
- AC conditions: 50Hz/60Hz, 220V,9A²
- Meter constant: 6400
- Meter accuracy: class 0.5s active and class 2 reactive
- Serial (PC) communication baud rate: 1200/9600/57600/115200
Contents
- About the MAXQ3180/MAXQ3183
- About the Reference Design
- Specifications
- Display and Communications
- An Under-the-Hood View of the Meter
- AC Connection Terminals
- Connecting Communication/JTAG Cables
- Connecting the Meter to a Meter Tester
- Using a USB/Serial Adapter
- Meter Operations
- Parameters Displayed on the LCD
- PC Software
- Startup and Select a Target Device
- Communication Configuration
- Meter Configuration
- Status
- Harmonics
- Vector Sum (MAXQ3183 Only)
- Calibration
- Gain
- Phase Angle
- Linearity Calibration
- Power Script
- MAXQ3180 Registers
- RAM Registers Map
- Virtual Registers Map
- System Commands
- File Operations
- Configuration File
- Accuracy Tests
- Active Power—Balanced Loads
- Reactive Power—Balanced Loads
- Active Power—Phase A
- Active Power—Phase B
- Active Power—Phase C
- Active Power—Frequency Influence
- Current RMS—Phase A/B/C
- Harmonics: IEC Phase Fired Current Waveform (IEC 60235:21)
- Vector Sum (MAXQ3183 only)
- Balanced Loads (IA + IB + IC)
- Unbalanced Loads (IA + IB + IC)
- Schematics and Build of Materials (BOM)
- Measurement Board (Hot Board)
- BOM Listing
- Main Board (Cold Board)
- BOM Listing
- Updating the Application Code
- Connecting the JTAG Cable
- Loading Code with MTK
- Order Information
- Next Steps
About the MAXQ3180/MAXQ3183
The MAXQ3180 and MAXQ3183 are polyphase multifunction, energy measurement, analog front ends (AFEs) with many advanced power-monitoring features. The devices incorporate an 8-channel high-accuracy ADC. A digital signal processor (DSP) processes the ADC samples to provide a rich array of energy and power-measurement parameters including, but not limited to: active/reactive/apparent power and energy, power factors, and harmonic components. An SPI™ port is provided for interfacing with a host controller.
The MAXQ3180 and MAXQ3183 are two of the three polyphase AFE devices from Analog Devices. The third part, the MAXQ3181, is for active energy and power only. Table 1 summarizes the key features of the polyphase AFE family.
| Feature | MAXQ3181 | MAXQ3180 | MAXQ3183 |
| Active energy and power: positive/negative | X | X | X |
| Reactive energy and power: positive/negative |
X | X | |
| V and I RMS | X | X | X |
| X | X | X | |
| Neutral current monitoring | X | X | X |
| Vector sum of currents | X | ||
| Temperature sensor | X | X | X |
| Phase sequence indication | V | V | V, I |
| Voltage and current harmonics | X | X | |
| Current THDN | X | ||
| Total energy and power | X | X | X |
| Fundamental energy and power | X | X | |
| Voltage phasor angles | X | X | |
| Serial interface | SPI slave | SPI slave | SPI slave |
| Pulse output | CFP | CFP, CFQ | CFP, CFQ |
| Package | 28-pin TSSOP |
28-pin TSSOP |
28-pin TSSOP |
The MAXQ3181 is fully pin compatible with the MAXQ3180 and its registers are a subset of the MAXQ3180's registers. Consequently, the same reference design can be used to evaluate the MAXQ3181. The AFE device on the measurement board was changed, but no alteration of the application code or the PC software was required. Note that when evaluating the MAXQ3181 in the rather simplistic manner of the reference design, some metering parameters that are not available in the MAXQ3181 will appear random and meaningless.
For simplicity, this application note will refer to the target device simply as the MAXQ3180; the MAXQ3183 and its unique features will be cited only when necessary. The devices' reference designs share the same metering board and use the same host microcontroller (i.e., the MAXQ2000). The application code (residing in the MAXQ2000)) and PC software support both AFEs.
About the Reference Design
The MAXQ3180 reference design includes the following:
- A 3-phase energy meter
- PC software (ZIP)
- This application note
The reference design can be purchased online. For the reference design part numbers and ordering instructions, see the Order information section below.
The PC software and the host application code may be updated periodically to improve or add features. All updates will be posted on Analog's website. You will receive an e-mail notification if you subscribe to Analog EE-Mail™¹. If an update to the host application code is required, a serial-to-JTAG programming adapter should be used to reload the code into the MAXQ2000 microcontroller.
Please see the Microcontroller Tools page for additional information.
Specifications
The reference design supports 3-phase four wires only:
- AC conditions: 50Hz/60Hz, 220V,9A²
- Meter constant: 6400
- Meter accuracy: class 0.5s active and class 2 reactive
- Serial (PC) communication baud rate: 1200/9600/57600/115200
Display and Communications
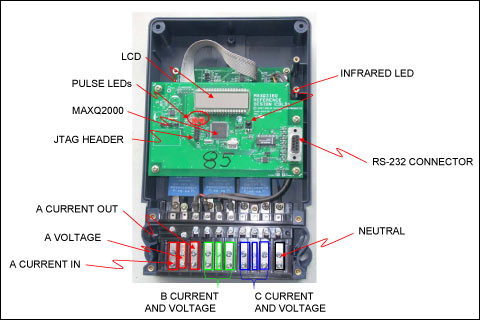
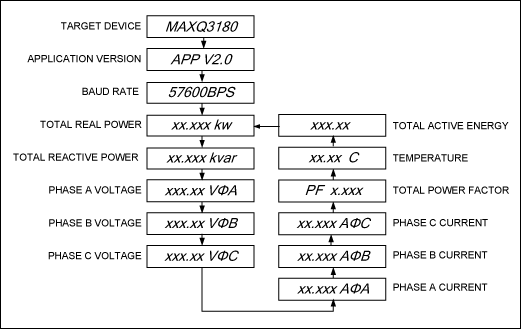
The reference-design meter starts running automatically upon power-up and will display various information on the board's LCD. The first item displayed is the device name (i.e., the MAXQ3180 or MAXQ3183), then the RS-232 baud rate, followed by various power and energy parameters (voltage RMS, current RMS, total power factor, total kilowatt-hour usage since last power-on). This information automatically rotates continually with an update rate of one parameter per second. More energy and power parameters can be retrieved and displayed by the PC software.
The meter communicates with a PC through an RS-232 serial port, which is hidden inside the meter case. To access the serial port, open the meter case. (See the Connection communication/JTAG cables section below.) Be sure to power off the AC supply before proceeding. Note that the MAXQ3180 reference design supports infrared communication in hardware, but the firmware (MAXQ2000 code) support for this feature has not been implemented as of this writing.
An Under-the-Hood View of the Meter
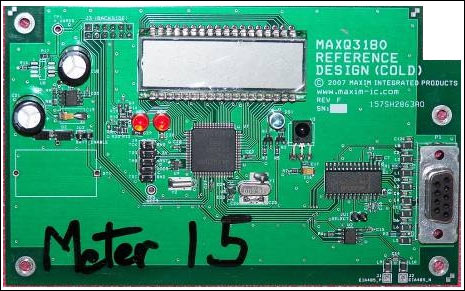
Figure 1 shows the communication and display elements of the meter.
AC Connection Terminals
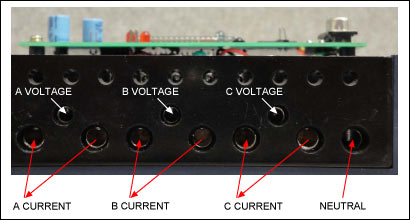
Refer to Figure 2 when making AC connections between the reference-design meter and a meter tester.
The meter case does not support a neutral current input, as there are only three current input pairs (terminals). However, the metering board does have input nodes for the neutral current. This limitation makes it very inconvenient to demonstrate the four-current vector-sum feature of the MAXQ3183.
The meter design uses two boards. The "cold board" (the board that contains the microcontroller and display) is safe to touch—no high voltages exist on this board. The screws and connections immediately below the board are not safe to touch, however. The "hot board" mounted below the cold board contains the AC-input circuits and the target device (e.g., MAXQ3180/MAXQ3183). This board is directly connected to the AC neutral and is, therefore, not safe to touch. Communication between the hot and cold board is through the SPI connector, which is isolated on the hot board.

Exercise extreme caution when making connections to a live system!
Connecting Communication/JTAG Cables
Use the following steps to open the meter case and connect the serial communication and JTAG cables.
| Step | Illustration |
| Unscrew the two tie-down screws for the terminal cover (at the bottom of the meter case). | 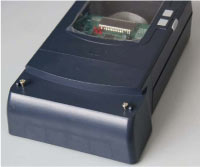 |
| Remove the terminal cover by pulling it upward. | 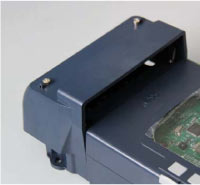 |
| Unscrew the hold-down screws for the meter's top cover plate. | 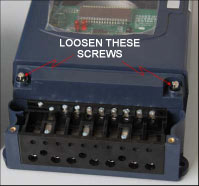 |
| Turn the meter bottom side up and unscrew the two screws. | 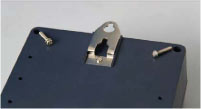 |
| Pull the cover plate off. | 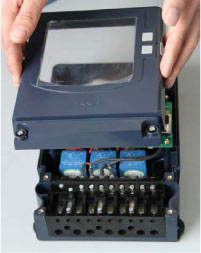 |
| Connect the serial cable. | 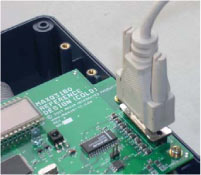 |
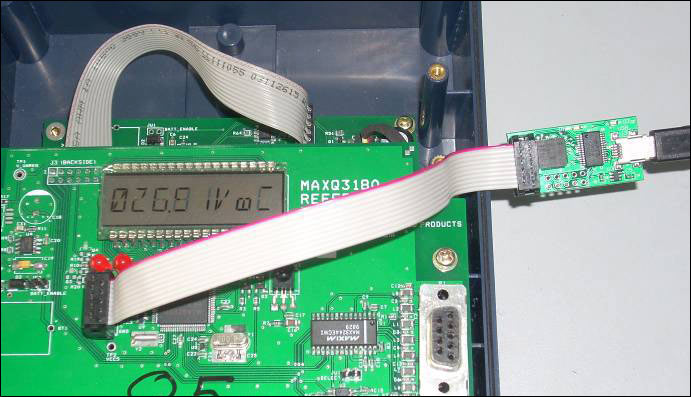
| If the application code needs updating, connect the JTAG cable. When connecting the JTAG cable, make sure that pin 1 of the cable is connected with pin 1 of the JTAG header on the board. Pin 1 of the JTAG cable is normally on the edge of the cable marked by a red or pink color. The pin 1 edge should face the LCD glass. | 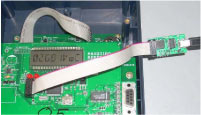 |
Connecting the Meter to a Meter Tester
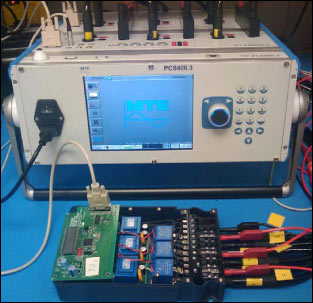
Refer to the AC terminal descriptions above and to the meter tester's manual for instructions on how to connect the meter to a meter tester (Figure 3). Note that the meter terminals are rated 10A (max) and that the current transformers are rated at 6A. Do not load more than 6A over an extended period of time.
Using a USB/Serial Adapter
If your computer does not have a serial port but has USB ports, you can use a USB/serial adapter to interface with the meter. Although we do not have a specific requirement for the adapter, our experience shows that some adapters work more reliably than others. We have had good experience with SerialGear® (USBG-COM-SI-M) in our lab.
Meter Operations
The reference meter illustrates the metering functions of the MAXQ3180 and MAXQ3183 energy meter AFEs. The reference meter has been verified for power-measurement accuracy and tested for ESD and EFT. However, the reference design did not go through the complete test sweep of a production meter for accuracy sweep or for EMC compliance. We do not recommend nor imply that using the reference design hardware or software "as is" for any production application.
Parameters Displayed on the LCD
The reference meter displays a limited number of parameters on the LCD: target device name, the serial-port baud rate compiled into the host firmware, and various power- and energy-measurement values. Figure 4 illustrates the display sequence. The Target device name and Baud rate are displayed at power-up only. The measurement values are continually refreshed at the rate of one update per second.
PC Software
The PC software provides a convenient way to evaluate the reference meter. It supports most of the MAXQ3180's metering features. As an example, for each individual phase and the combined (total) of the three phases plus neutral, the software retrieves: the voltage and current RMS values, active power, reactive power, apparent power, fundamental power, harmonics, and power factors. The software also provides many calibration screens for performing various meter calibrations like gain, phase angle, and linearity. The software was developed with the Microsoft® .NET framework for Microsoft Windows®-based computers. See the download link above for more information regarding the software installation and requirements.
The most intuitive way to demonstrate the metering functions is to present them graphically. Our reference-design PC software does that. The following screen shots illustrate the various parameters that the PC software displays and the inputs/controls for which user entry is required. Note that the same PC software supports both the MAXQ3180 and the MAXQ3183. The target device must be selected at the startup screen since features are grouped by functions; the availability of function tabs varies according to the target device. For example the Vector Sum tab is only available when the MAXQ3183 is selected as the target device.
Startup and Select a Target Device
The PC software supports multiple target devices with a consistent graphical user interface (GUI). Select the target device on the startup screen by clicking on Target Device.
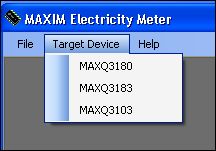
Communication configuration
Once the target device has been selected, configure the serial port. Click Connection on the menu and select Connect.

The PC software will display a dialog box that lists all the available serial ports. Select the proper port and baud rate (baud rate is displayed on the meter LCD when the meter is first powered up) and then click OK.
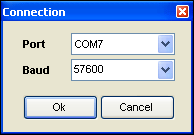
Meter configuration
The Configuration tab contains text boxes and dropdown menus for configuring many aspects of meter operations.
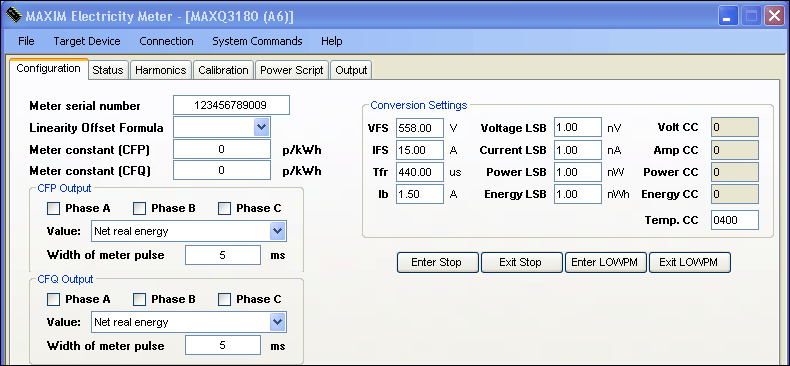
When a text-box entry is changed, leaving the field causes the entered value to be written either to the MAXQ3180 registers (data RAM) if it is a MAXQ3180 register, or to meter data storage area (MAXQ2000 data RAM). Changing a dropdown item has the same effect. One can save the configuration values to MAXQ2000 flash memory so those values can be retrieved later by selecting System Commands, then "Save configuration to flash memory." All configuration parameters in the Conversion Settings group box except the Temp. CC are saved in the software configuration file, not in the MAXQ2000's data storage area. Use menu command File and then Save Configuration to save the Conversion Settings. Temp. CC is saved to the MAXQ2000 data storage if the target device is the MAXQ3180; the Temp. CC value is saved to the MAXQ3183 TEMP_CC register if the target device is the MAXQ3183.
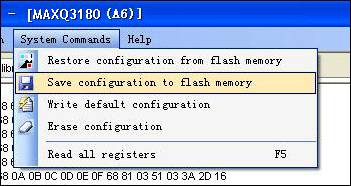
Be careful when saving a configuration to flash, as this will overwrite all previously saved meter configuration values; it can also impact meter operations or performance. The reference meter that you received has been calibrated and its configuration and calibration values are stored in the MAXQ2000 flash.
Refresh the Configuration tab (F5 or System Commands then Pool all Registers) to view the configuration values for this meter. You must refresh this tab before proceeding. This refreshing action not only pulls the configuration values from the MAXQ2000 flash for displaying in the software, but it also stores them in the software memory for use in any subsequent computations.
Press F5 to load configuration values, before proceeding
Clicking the Enter Stop button will cause the MAXQ3180 to enter stop mode. To exit stop mode one must initiate one of the following:
- Power cycle the MAXQ3180 (meter)
- External reset by driving active-low RESET low
- External interrupt by driving active-low SSEL low
- The active-low RESET pin is not brought out to the cold board on the reference design, so viable options are A and C in the above list. Click the Exit Stop button to exit stop mode. The Exit Stop button implements option c.
Clicking Enter LOWPM will cause MAXQ3180 to enter the low-power measurement mode. In LOWPM mode the MAXQ3180 runs on the internal 1MHz clock instead of the external high-frequency crystal; it only provides a subset of measurement parameters. This mode is intended for operation on a battery supply (i.e., when an AC main is not present). In this mode the MAXQ3180 will periodically wake up to collect voltage and current data either for AC supply monitoring or for tamper detection. It then quickly returns to STOP mode. Click Exit LOWPM to return to normal operation mode. When the PC software first connects with a reference meter, it checks the conversion settings (read from the Configuration File) for consistency with the X_CC (VOLT_CC, AMP_CC, PWR_CC, and ENR_CC) values stored in the MAXQ2000.
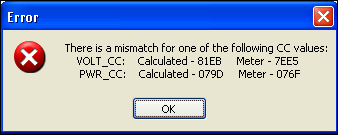
X_CC is computed using the conversion settings:

If any one of the X_CC values does not match, an error window alerts you. The error needs to be corrected before you proceed.
Status
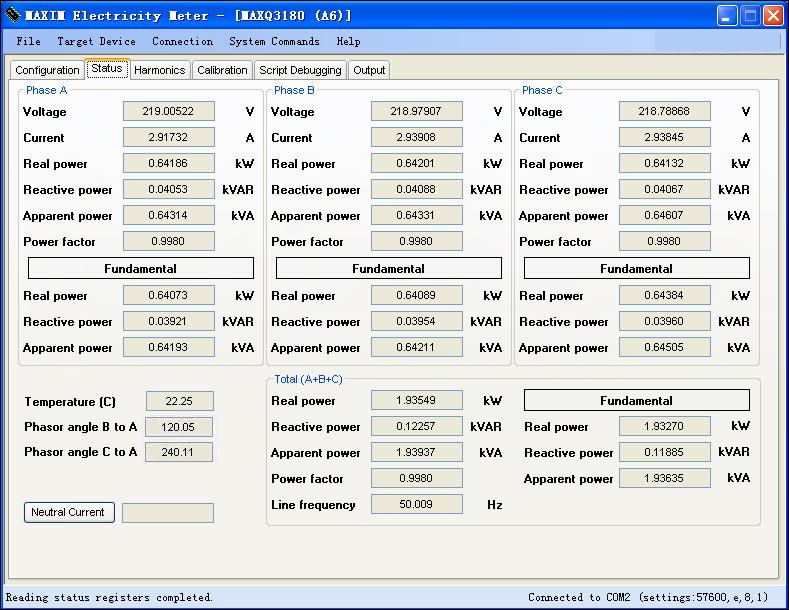
For each phase and total of the three phases plus neutral, the Status tab displays: the RMS of voltage and current, real/reactive/apparent power, power factor, and fundamental powers (real/reactive/apparent). Temperature, system frequency, and voltage phasor angles (with respect to phase A) are also presented on this tab. Press F5 to update all the values on this tab except for Neutral Current. Measurement of neutral current is not supported by the reference design because dedicated AC-input terminals are not available on the meter case. However, one could sacrifice one of the phase-current input terminals and use that for neutral current. If this were done, clicking the Neutral Current button would cause the MAXQ3180 to perform a neutral current measurement on demand.
Harmonics
Harmonic components of phase voltage or current are computed on demand. The results are presented in a chart, in tabular form, and can also be exported into a CSV format file.
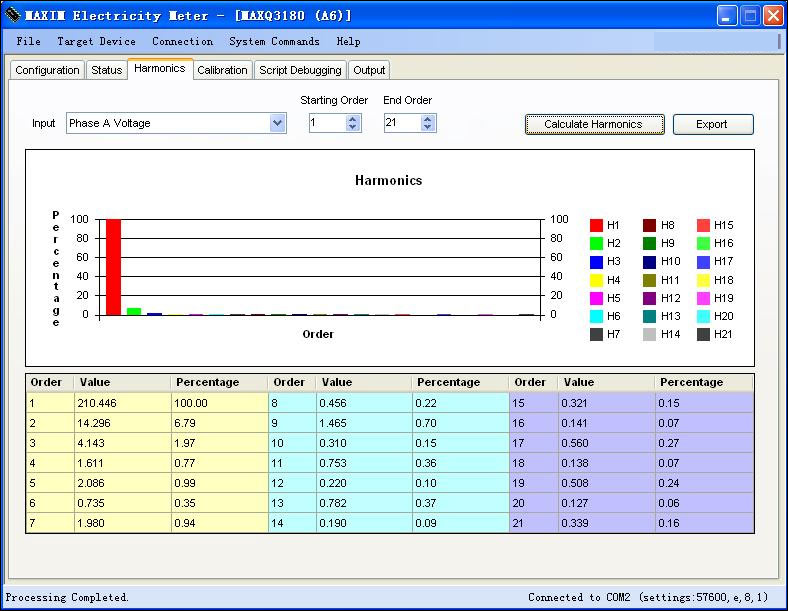
See the MAXQ3180 data sheet and related application notes for more information about configuring the MAXQ3180 for measurement of harmonic components.
Vector sum (MAXQ3183 only)
Vector sum of currents is available for the MAXQ3183 only and is computed on demand. Two forms of vector sum are supported:
- Three-current vector sum = sum of three phase currents
- Four-current vector sum = sum of three phase currents and a neutral current

See the dedicated application note 4664," Calibration
Full meter calibration can be time-consuming. During a production run the calibration process is normally automated by directly controlling both the meter under test and the meter tester with a software tool. The PC software for this reference design lets users recalibrate the reference meter for specific experiments. The software controls the meter only and does not control any meter tester, so the process is not fully automated.
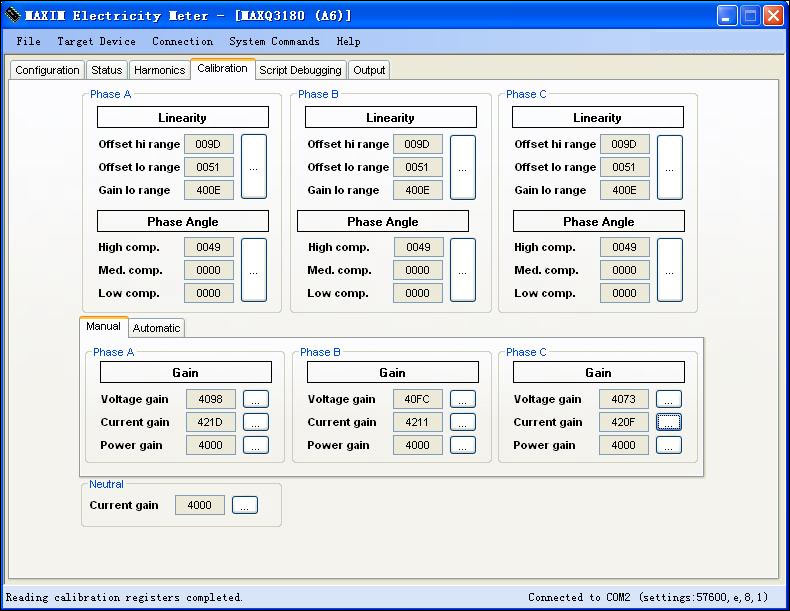
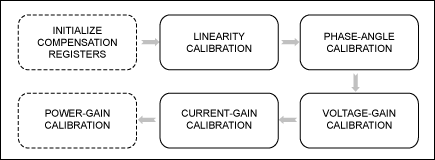
There are three calibration categories: gain, phase angle, and linearity. Pop-up dialog screens are provided for each category. Calibration should follow the sequence outlined below where the dashed steps may not be required depending on the requirement for design accuracy.
Gain
Gain can be calibrated for each of the three phase voltages, and the three phase currents and neutral current. Power gain can be calibrated too, if necessary. In most cases, though, if the voltage and current are accurately calibrated, the power-gain calibration is not needed. All gain calibrations share the same flow. We use voltage calibration to illustrate the software operations.
The "by Source" option is for a setup in which the calibration set point (value) is provided by the meter tester. This value should be entered into the Source Reading (V) text box on the dialog screen.
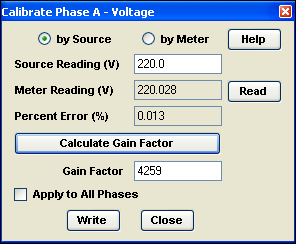
After entering the value, click the Read button to retrieve the value measured by the MAXQ3180. Error value is computed and displayed in the Percent Error (%) box.
Next, click on the Calculate Gain Factor button to compute the corresponding hex value for the Gain register.
Note that you could apply the same gain factor value to all three voltage Gain registers to save calibration time if your input circuits are very consistent (i.e., would yield the same gain factor values). Simply check the Apply to All Phases checkbox.
Gain factor is computed from the Source Reading (V) value (VSOURCE) and the Meter Reading (V) value (VMETER) as follows.

G is converted into a 16-bit unsigned integer before writing to the MAXQ3180 Gain register.
The "by Meter" option is for a setup in which the measurement error is reported by the meter tester. Enter this measurement into the Percent Error (%) text box on the dialog screen.
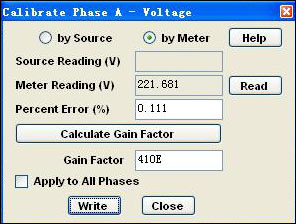
Click the Read button to retrieve the measured value by the meter. Note that this value is for information only; it is not used in the gain factor calculation.
Then click the Calculate Gain Factor button to compute the corresponding hex Gain register value.
The computed gain factor can be applied to all three phases by checking the Apply to All Phases check box.
Gain factor is computed from the measured error (e) as follows:

Note that for any gain calibration, it is recommended that you initialize the Gain register value before proceeding. However, initialization is not required. If the Gain register is not initialized, the gain factor calculation needs to factor in the existing factor (GOLD). The equation is:

For gain calibration, the software also provides an automatic way to simplify the process.

To use Automatic mode for gain calibration of any parameter (voltage, current, or power), the meter tester must provide the same input signal levels to all three input circuits of the meter. Clicking on the Calibrate button will cause the "by Source" calibration process to run for any parameter (i.e., voltage, current, or power) that has an entry in the associated text box. You can skip the calibration for a parameter by leaving its Target entry box empty. For example, in the above screen shot calibration is done for voltage and current only, since the Target entry box for power is empty.
Phase angle
Phase angle calibration is typically done at PF = 1.0 and PF = 0.5L. However, the software does accept an entry of other source phase angles. The measurement parameter chosen (in the "by Meter" mode) is the active power, because we are most interested in the accuracy of the active power.
The MAXQ3180 supports phase-angle compensation in three load ranges: high, mid, and low. In most designs the sense circuit does not change its phase dependency with respect to loading levels, in which case a single-range calibration is sufficient. However, some low-cost current transformers do exhibit significant phase dependency with respect to loading levels. Because the MAXQ3180 supports phase compensation in three ranges, the software can minimize the effect of poor current transformer phase behavior.
If you need to calibrate in three load ranges, make sure that you obtain the proper current threshold values from the transformer specification. These thresholds should be entered into the I1THR and I2THR registers after they are converted into meter units as detailed in data sheet. Note that I1THR = I2THR = 0 by default, which means that the phase-angle compensation value in X.PA0 is applied to the full range.
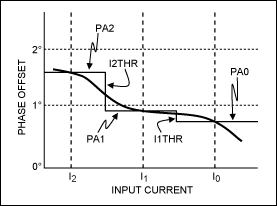
The illustration below shows a single-range calibration in the High range for phase A. For a three-range calibration, this same process is repeated three times. In a single-range calibration the range High must be selected and I1THR and I2THR must be set to 0. Selecting Mid range will cause the correction value to be written to X.PA1 only; selecting Low will cause the value to be written to X.PA2 only.
Again, two calibration modes are supported: "by Source" and "by Meter." The "by Meter" mode is the preferred calibration mode because it minimizes the error of active power.
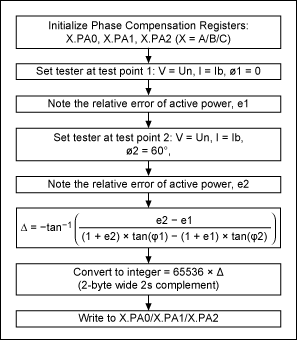
In the "by Meter" calibration mode, the user inputs the source phase angles and the relative errors of the active power at the respective input point. Typical choices for the source angles are 0 degrees (PF = 1.0) and 60 degrees (PF = 0.5L). Both angles are included in the standard meter-accuracy test sweep.
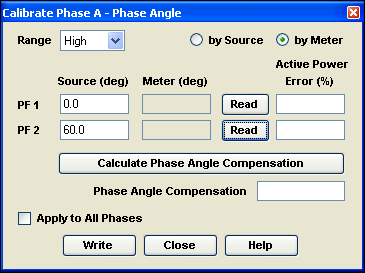
Clicking on the Read buttons will read the phase angles as seen³ by the meter. Note that these values are not used in the compensation calculation, but are displayed for information only.
Click on the Calculate Phase Angle Compensation button to compute the correction value. Note that the user can directly enter a phase compensation value here too, in 2-byte wide and 2s complement hex format.
Click Write to write the correction value to the X.PA0 (X = A) register. Check the Apply to All Phases checkbox if the same correction value is to be applied to all three phases. In the "by Source" mode, the input is the source phase angle. PF = 0.5L (angle = 60) is a good test point.
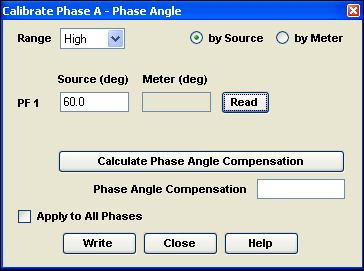
Click on the Read button to read the phase angle as seen by the meter.
Click on the Calculate Phase Angle Compensation button to compute the correction hex value.
Click Write to write the correction value to the X.PA0 register (X = A).
Check the Apply to All Phases checkbox if the same correction value is to be applied to all three phases.
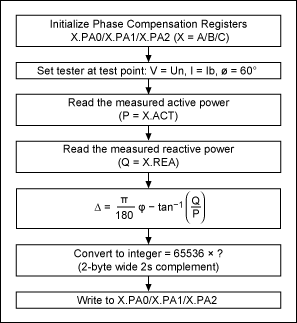
Note that in the "by Source" mode, the correction value is computed from the difference in phase angle rather than the error of active power. Thus, this is not the preferred mode of phase calibration since accurate active-power measurement is the ultimate goal.
In a single-range calibration, the range High must be selected and I1THR and I2THR must be set to 0. Selecting the Mid range will cause the correction value to be written to X.PA1 only; selecting Low will cause the value to be written to X.PA2 only.
The processing flow for "by Meter" mode is shown below.
The processing flow for "by Source" mode is shown below. Note that for "by Source" to work well, the test point should be set far from PF = 1.0. PF = 0.5L is normally used.
Linearity calibration
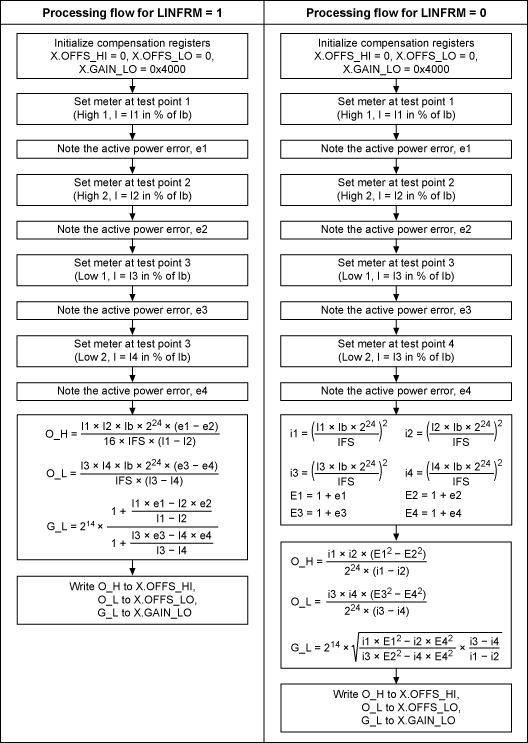
Linearity calibration smoothly joins and flattens two error curves, one from the high range and one from the low range. Low range is where the current input is low enough to cause the automatic-gain switching to set the ADC hardware gain at GAIN = 32. In high range the ADC gain is set at GAIN = 1. Again two modes of calibration are supported: "by Meter" and "by Source." The "by Meter" mode is preferred because it uses the errors of active power in computing the correction values.
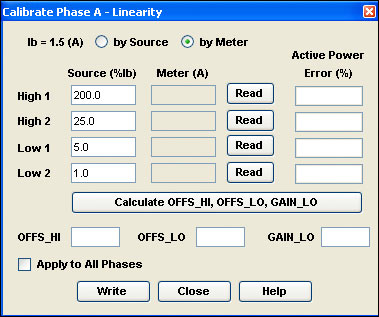
In the "by Meter" calibration mode, the user inputs the four current levels expressed in percentage of Ib (%Ib) and the relative errors of active power at the four current levels. High 1 is the highest load and Low 2 is the lowest load used in the calibration. These loads are not necessarily the highest and lowest operating points. High 2 should be selected so that the input amplitude on the MAXQ3180's current input pins is close to, but higher than (VREF/2)/32 (0.032V). Low 1 should be selected so that the input amplitude on the MAXQ3180's current input pins is close to, but lower than (VREF/2)/32 (0.032V).
Click on the Read buttons to retrieve and display the current values measured by the meter. Note that these values are for information only and not used in the subsequent calculations.
Click the Calculate OFFS_HI button to compute OFF_HI, OFFS_LO, and GAIN_LO.
In the "by Source" calibration mode, the user inputs the four current levels expressed in percentage of Ib (%Ib). High 1 is the highest load and Low 2 is the lowest load used in the calibration. They are not necessarily the highest and lowest operating points. High 2 should be selected so that the input amplitude on the MAXQ3180's current input pins is close to, but higher than (VREF/2)/32 (0.032V). Low 1 should be selected so that the input amplitude on the MAXQ3180's current input pins is close to, but lower than (VREF/2)/32.
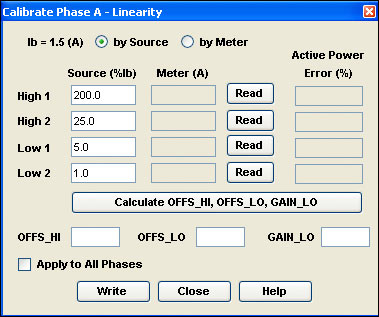
Click on the Read buttons to retrieve and display the current values measured by the meter. Relative errors of current (instead of active power) are computed at this step too.
Click the Calculate OFFS_HI... button to compute OFF_HI, OFFS_LO, and GAIN_LO.
Note that for systems where active power accuracy is the ultimate goal, calibration should use the "by Meter" mode, since the percentage error of active power directly affects the compensation computation.
The MAXQ3180 supports two linearity compensation methods that are user programmable in register OPMODE2 (OPMODE2.LINFRM). Linearity compensation is selected with the Configuration tab of the PC software.
Power script
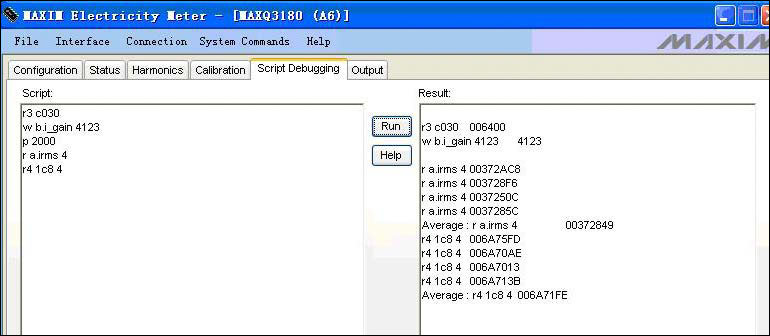
The power script tool is a very convenient way for reading and writing most of the MAXQ3180 registers either by specifying the register address or register name. From the Script Debugging tab, click the Help button to print a list of the supported commands.
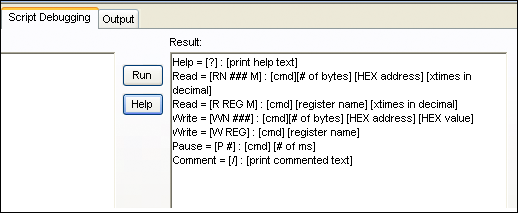
Basic syntax is described below.
| Command | Description |
| R RegName {N} | Read register RegName N times, where N is an optional argument. N should be specified in decimal and defaults to 1 if unspecified. |
| R[K] RegAddr {N} | Read K bytes from register at address RegAddr N times, where N is an optional argument. N should be specified in decimal and defaults to 1 if unspecified. K is an integral part of the command and signifies the length of the target register (in number of bytes): R1 RegAddr—read 1 byte R2 RegAddr—read 2 bytes R3 RegAddr—read 3 bytes R4 RegAddr—read 4 bytes |
| W RegName V |
Write value V to register named RegName, where V is expressed in hex. |
| W[K] RegAddr |
Write value V to register at address RegAddr, where V is expressed in hex. K is an integral part of the command and signifies the length of the target register (in number of bytes). W1 RegAddr—write 1 byte W2 RegAddr—write 2 bytes W3 RegAddr—write 3 bytes W4 RegAddr—write 4 bytes |
When reading a register multiple times, the time delay between sequential reads is 0.5s. In addition to each individual read, the average value of the N reads is displayed. This tool makes it very easy to monitor the settling effect of filters on any of the measurement parameters, such as power and current or voltage.
MAXQ3180 Registers
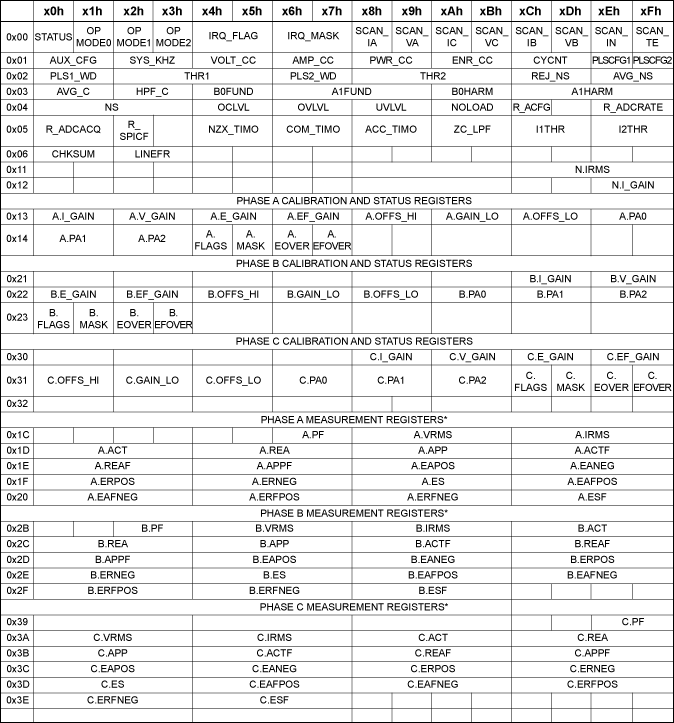
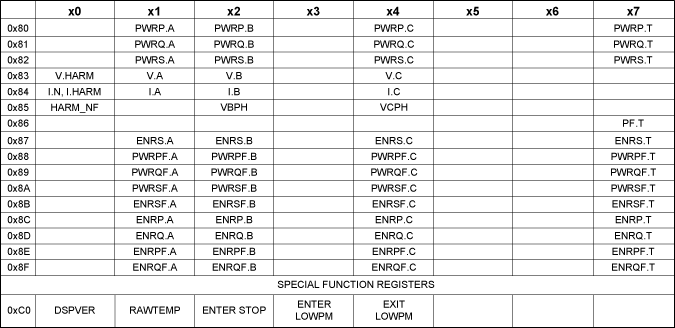
MAXQ3180 registers are grouped in to two categories: RAM registers and virtual registers.
RAM registers map
System Commands
Several system-level commands are provided on the main menu. These commands facilitate operations with the reference meter.
| Command | Description |
| Restore configuration from flash memory | Restores the values saved in MAXQ2000's flash back to the MAXQ3180's RAM registers. This command is executed automatically when the system powers up. |
| Save configuration to flash memory | Saves the current MAXQ3180 register values into the MAXQ2000's flash memory. |
| Write default configuration | Restores default setting values into MAXQ3180's RAM. Note that this operation does not alter the settings stored in the flash memory. |
| Erase configuration | Erases the MAXQ3180 configuration information from the MAXQ2000's flash memory |
| Read all registers | Reads all registers associated with the currently active tab |
File Operations
Three File operations are supported and described below.
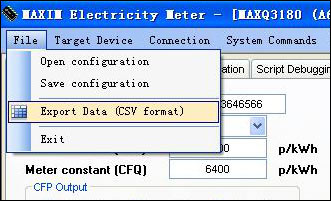
| File Operation Command | Description |
| Open Configuration | Loads the contents of the configuration file into the software |
| Save configuration | Saves the configuration parameter into the XML file |
| Export Data (CSV Format) | Exports all the MAXQ3180 registers to a comma-delimited text file |
Configuration File
The software uses an XML-formatted configuration file (MtrConfig.xml) to store design-related parameters such as the voltage and current transducer transfer ratios (VFS and IFS) and the resolutions of the various virtual registers.
<?xml version="1.0" encoding="utf-8"?>
<cls_Configurationxmlns:xsi="http://www.w3.org/2001/XMLSchema-instance"
?xmlns:xsd="http://www.w3.org/2001/XMLSchema">
  <Initialized>0</Initialized>
  <ComPort>1</ComPort>
  <Vfs>558</Vfs>
  <Ifs>15</Ifs>
  <Tfr>320</Tfr>
  <Ib>1.5</Ib>
  <VLSB>1</VLSB>
  <ILSB>0.0099999997764825821</ILSB>
  <PLSB>1</PLSB>
  <ELSB>0.0099999997764825821</ELSB>
  <Baud>115200</Baud>
  <EnableDataLog>true</EnableDataLog>
  <HarmonicDly>2</HarmonicDly>
  <Temp_CC>1024</Temp_CC>
</cls_Configuration>
Two of the parameters (EnableDataLog, HarmonicDly) need to be edited in this file directly, when necessary. All other parameters can be changed in the GUI software. A brief description of the resolution variables are given below. For more information see the device data sheet.
| Variable | Description |
| VFS | Voltage transducer value in volts. The AC-voltage input amplitude produces VREF/2 (~1.024V) volts on the voltage-input pins of the MAXQ3180. This MAXQ3180 reference design uses a voltage-divider consisting of 545kΩ (8 × 68 + 1) and 1kΩ, which gives a VFS = 545/1 × (2.048/2) = 558.08 ~ 558 (V). |
| IFS | Current transducer ratio in amperes. It is the AC-current input amplitude that would produce VREF/2 (~1.02V) volts on the current-input pins of the MAXQ3180. This reference design uses a current transformer of primary/secondary ratio = 300 and a burden resistor value of 20Ω. So its IFS = 1.024 × 300/20 = 15.36 ~ 15 (A). |
| VLSB | LSB for virtual voltage registers in nV. VLSB = 1 means a value of 1 in the virtual voltage registers, so (V.X, X = A, B, C) represents 1nV. |
| ILSB | LSB for virtual current registers in nA VLSB = 1 means a value of 1 in the virtual current registers, so (I.X, X = A, B, C) represents 1nA. |
| PLSB | LSB for virtual power registers in nW, VLSB = 1 means a value of 1 in the virtual power registers, so (PWRP.X, PWRQ.X, PWRS.X, PWRPF.X, PWRQF.X, PWRSF.X, X = A, B, C) represents 1nW. |
| ELSB | LSB for virtual energy registers in nWh. VLSB = 1 means a value of 1 in the virtual energy registers, so (ENRP.X, ERNQ.X, ENRS.X, ENRPF.X, ENRQF.X, ENRSF.X, X = A, B, C) represents 1nWh. |
Accuracy tests
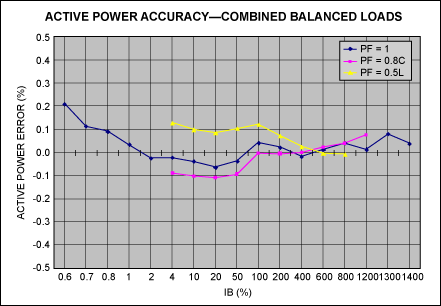
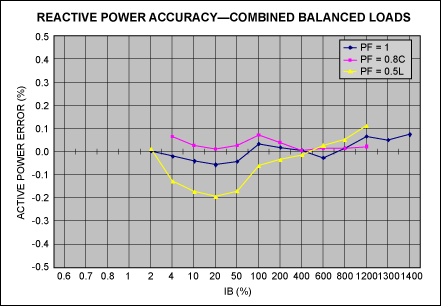
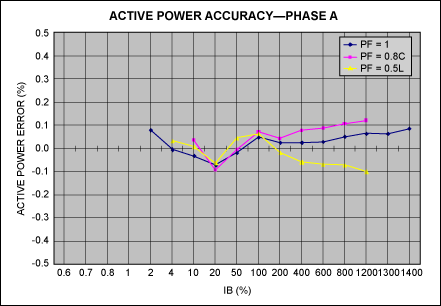
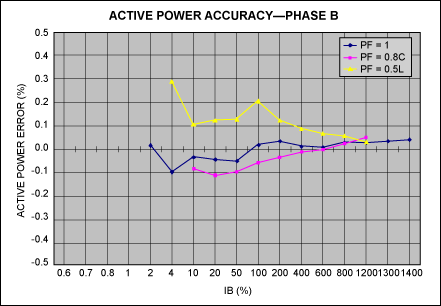
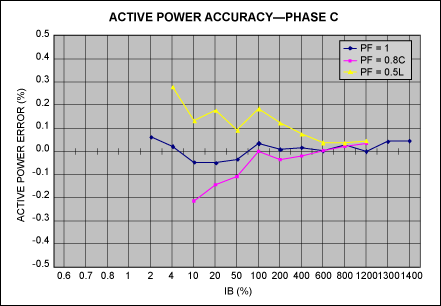
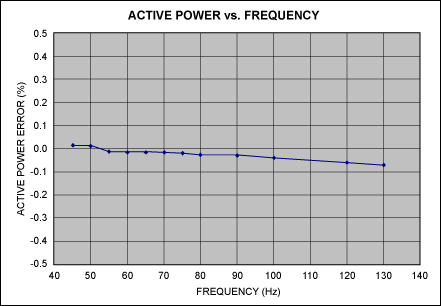
Accuracy test results for some typical configurations are shown below. Note that data were taken with different meters at various times. The meters were calibrated in balanced loads condition unless otherwise noted. Calibrating in balanced loads condition takes much less test time compared to calibrating each phase individually.
Harmonics: IEC phase fired current waveform (IEC 60235:21)
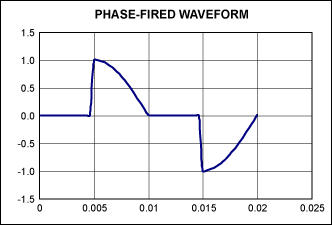
The IEC phase-fired waveform is chosen for this test because the waveform contains significant harmonic component even at the 21st order. Note that the harmonic measurement performance is sensitive to the harmonic filter setting and the lowpass filters placed in the input circuits. See the relevant application notes on harmonics measurement using the MAXQ3180/MAXQ3183 for details.
Below is the screen capture of a test using the MAXQ3183. (Harmonic components measurement is supported in the MAXQ3180 as well.) The result was presented as the ratio of the harmonic component magnitude with respect to the fundamental component.
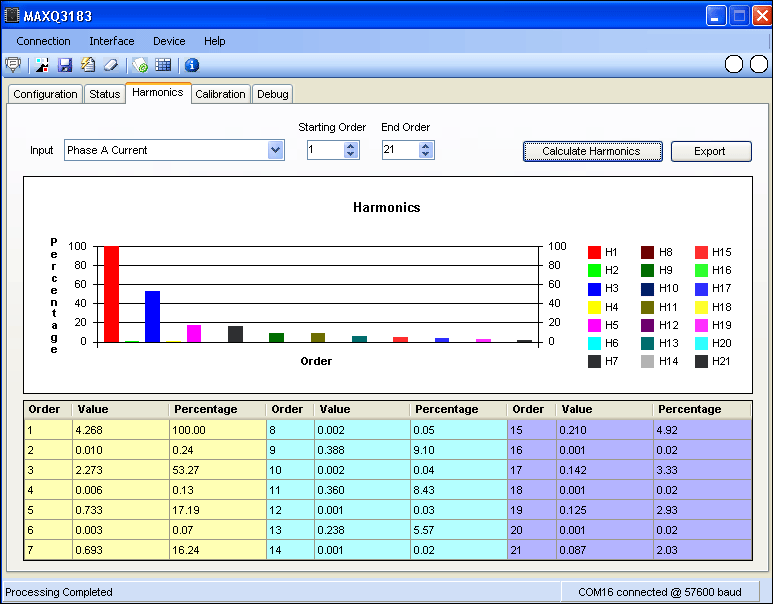
The result can be exported to a CSV file too. The table below shows the difference between the reference-design meter (column H(k)/H(1)) and the tester measurement (Tester column).
| k | AUX_CFG | I.HARM | H(k), in A | H(k)/H(1) | Tester |
| 1 | 01C3 | 006D7B8D | 6.41 | 100.0% | 100.0% |
| 2 | 02C3 | 00004D53 | 0.02 | 0.3% | 0.0% |
| 3 | 03C3 | 003A4A86 | 3.42 | 53.2% | 53.3% |
| 4 | 04C3 | 000002B73 | 0.01 | 0.2% | 0.0% |
| 5 | 05C3 | 0012D3A8 | 1.10 | 17.2% | 17.3% |
| 7 | 07C3 | 0011DAF6 | 1.05 | 16.3% | 16.6% |
| 9 | 09C3 | 00A01FC | 0.59 | 9.1% | 9.3% |
| 11 | 0BC3 | 00094A3B | 0.54 | 8.5% | 8.8% |
| 13 | 0DC3 | 0006025E | 0.35 | 5.5% | 5.8% |
| 15 | 0FC3 | 000554FD | 0.31 | 4.9% | 5.2% |
| 17 | 11C3 | 00039A99 | 0.21 | 3.3% | 3.6% |
| 19 | 13C3 | 00032661 | 0.18 | 2.9% | 3.2% |
| 21 | 15C3 | 00022FD3 | 0.13 | 2.0% | 2.3% |
Vector sum (MAXQ3183 only)
The vector sum feature is available in MAXQ3183 only, and is an on-demand feature. Please see MAXQ3183 data sheet and relevant application notes for information on how to configure the MAXQ3183 for vector sum measurement.
Two modes of vector sum are supported in the MAXQ3183: 3-current vector sum and 4-current vector sum. The 3-current vector sum mode performs the sum of the three phase currents, while the 4-current vector sum mode includes the neutral current in the sum. Since the meter case of this reference design does not have input terminals for the neutral current, we tested the 3-current vector sum only.
Balanced loads (IA + IB + IC)
Balanced loads were applied to the meter, swept from 10A to 0.02A. The first block of data is the register values (in hex) of the current RMS registers. The second block of data is the register values converted to amperes. The RMS measurements agree with the source values very well. The third block is the expected value of 3-current vector sum, which should be 0 since the loads are balanced.
| Source (IA + IB + IC) | 10 | 6 | 1 | 0.1 | 0.05 | 0.02 | |
| Values of RMS Registers | A.IRMS (1CC) | 00AAAE2A | 0066619F | 001112C4 | 0001B610 | 0000DABC | 00005654 |
| B.IRMS (2B8) | 00AAAB48 | 00666352 | 0011111B | 0001B665 | 0000DC3A | 0000593B | |
| C.IRMS (3A4) | 00AAB08A | 0066665C | 00111149 | 0001B3E3 | 0000DA16 | 000056C8 | |
| N.IRMS (11C) | 00008B7E | 00007652 | 00006D17 | 000033F2 | 00003729 | 00003462 | |
| Values of RMS Registers (A) | X.IRMS in (A) | ||||||
| A.IRMS | 10.001 | 5.999 | 1.000 | 0.100 | 0.050 | 0.020 | |
| B.IRMS | 10.000 | 5.999 | 1.000 | 0.100 | 0.050 | 0.020 | |
| C.IRMS | 10.001 | 6.000 | 1.000 | 0.100 | 0.050 | 0.020 | |
| Expected 3-Current Vector Sum | IVS3 in A | ||||||
| N.IRMS | 0.032 | 0.027 | 0.025 | 0.012 | 0.013 | 0.012 | |
| IVS3 Exp | 0.00 | 0.00 | 0.00 | 0.00 | 0.00 | 0.00 | |
| IVS3 err (A) | 0.032 | 0.027 | 0.025 | 0.012 | 0.013 | 0.012 | |
Unbalanced loads (IA + IB + IC)
A similar test was performed with unbalanced loads.
| Source (IA + IB + IC) | 10 | 6 | 1 | 0.1 | 0.05 | 0.02 | |
| Values of RMS Registers | A.IRMS (1CC) | 00AAAE2A | 0066619F | 001112C4 | 0001B610 | 0000DABC | 00005654 |
| B.IRMS (2B8) | 00AAAB48 | 00666352 | 0011111B | 0001B665 | 0000DC3A | 0000593B | |
| C.IRMS (3A4) | 00AAB08A | 0066665C | 00111149 | 0001B3E3 | 0000DA16 | 000056C8 | |
| N.IRMS (11C) | 00008B7E | 00007652 | 00006D17 | 000033F2 | 00003729 | 00003462 | |
| Values of RMS Registers (A) | X.IRMS in (A) | ||||||
| A.IRMS | 10.001 | 5.999 | 1.000 | 0.100 | 0.050 | 0.020 | |
| B.IRMS | 10.000 | 5.999 | 1.000 | 0.100 | 0.050 | 0.020 | |
| C.IRMS | 10.001 | 6.000 | 1.000 | 0.100 | 0.050 | 0.020 | |
| Expected 3-Current Vector Sum | IVS3 in A | ||||||
| N.IRMS | 0.032 | 0.027 | 0.025 | 0.012 | 0.013 | 0.012 | |
| IVS3 Exp | 0.00 | 0.00 | 0.00 | 0.00 | 0.00 | 0.00 | |
| IVS3 err (A) | 0.032 | 0.027 | 0.025 | 0.012 | 0.013 | 0.012 | |
Schematics and Bill of Materials (BOM)
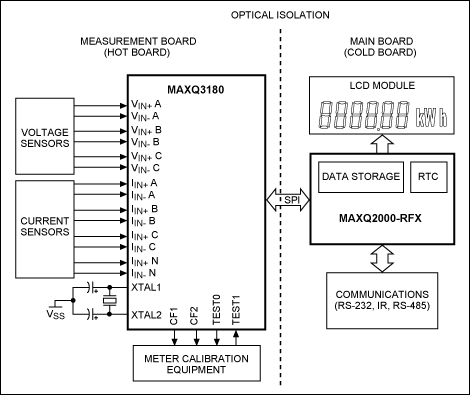
The two-board design uses a hot board for the metrology circuits and a cold board for the host microcontroller, communication, and display (Figure 5). The two boards communicate through an isolated SPI link.
Measurement Board (Hot Board)
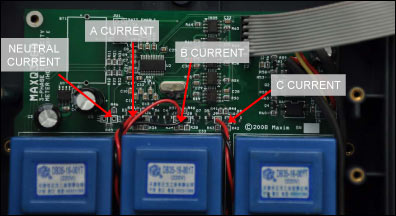
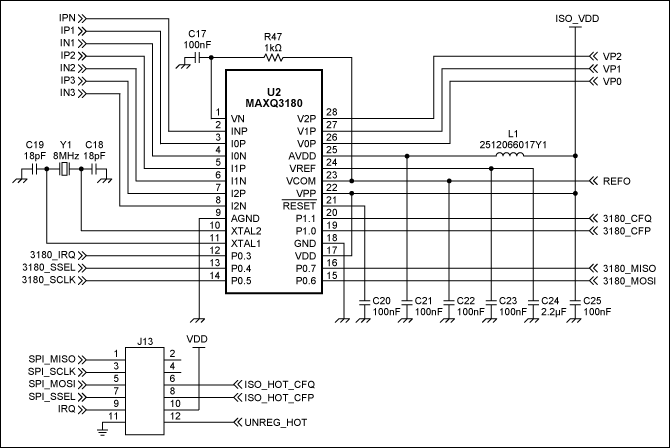
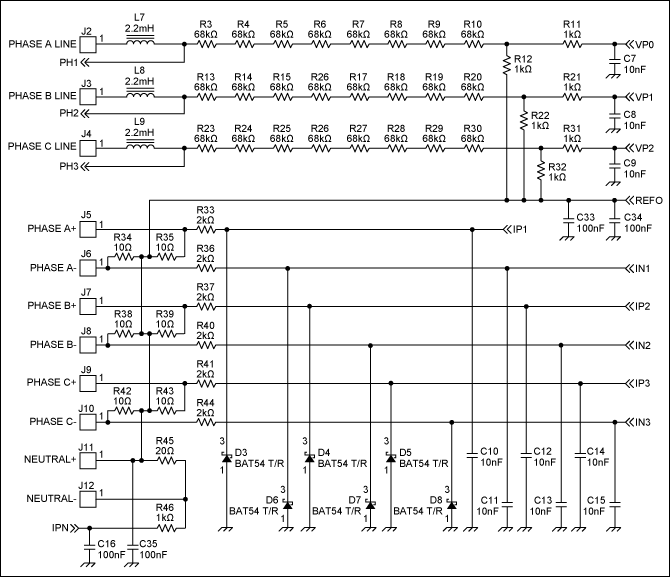
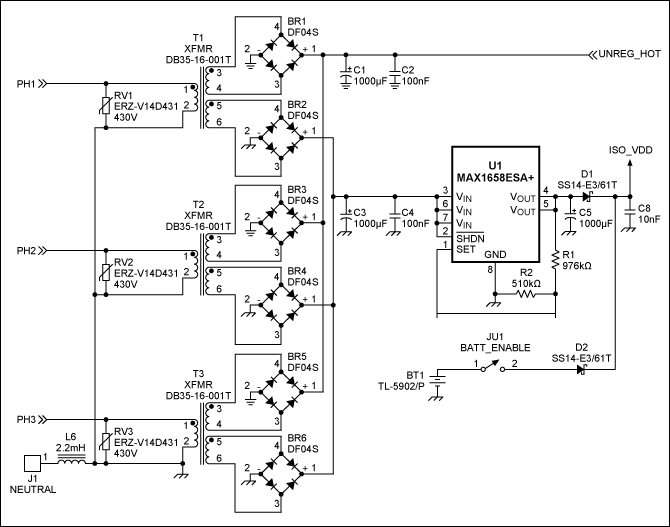
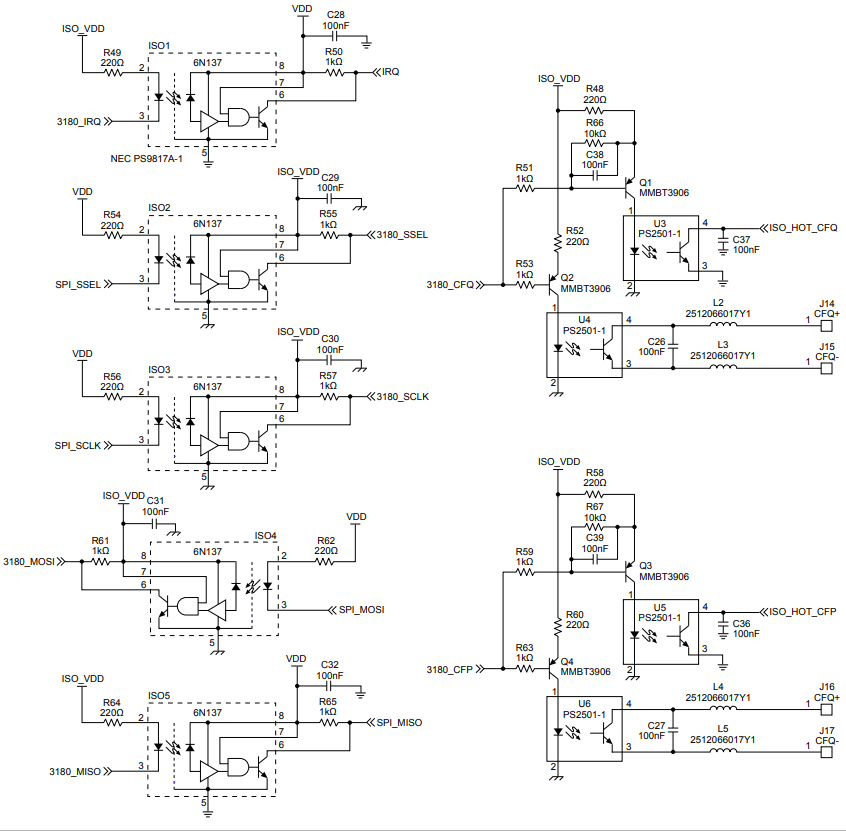
The MAXQ3180 has three voltage channels, four current channels, and an internal channel for temperature measurement. The MAXQ3180 reference design uses resistor-dividers for voltage sensing and current transformers for current sensing. Note that the metrology board supports neutral current inputs, but there are no meter terminals for the neutral current inputs (Figure 6). Figures 7 through 10 show the schematics of the hot board.
The main board includes a MAXQ2000 supervisory microcontroller unit, an LCD display, and communications (Figure 11). Figures 12 and 13 show the schematics of the cold board.
Updating the Application Code
The MAXQ3180 reference design uses the MAXQ2000 microcontroller to implement communications, display, and other user-interface functions. Analog may periodically update the MAXQ2000 code to support improvements or new features. The application code can be loaded through the onboard JTAG port. To perform a field firmware upgrade, you will need a MAXQ® JTAG adapter and a program for loading the code, both of which can be obtained either from a third party or from Analog. The Microcontroller Tool Kit (MTK) software from Analog is available for free download.
Connecting the JTAG Cable
Code loading can be carried out either with the meter powered from a live AC supply or with the cold board only while it is powered from a bench power supply. If you are using an AC supply, exercise extreme caution when attaching the JTAG cable to the meter or during program loading. Do not touch the hot board! Loading code with MTK is illustrated below.
Power down the MAXQ3180 reference meter before proceeding! Make sure that the JTAG cable pin 1 is connected to the pin 1 of the JTAG header on the board. The pink color strip on the cable should face the LCD screen when properly connected (Figure 14).
Loading Code with MTK
- Start up the MTK and select MaxQ.
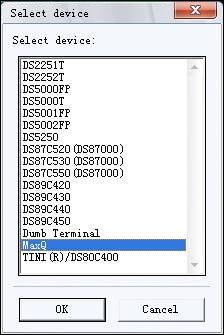
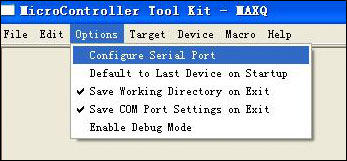
- Select the desired serial port for the JTAG adaptor on the Options menu: Options, then Configure Serial Port.
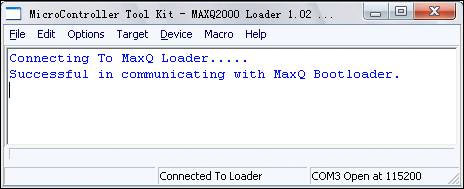
- In the Target menu, click Connect to MaxQ Loader. The message "Successful in communicating with MaxQ Bootloader" will appear to confirm proper operation. Note that the MAXQ3180 reference design will stop executing application code and the LCD will be blank during programming.
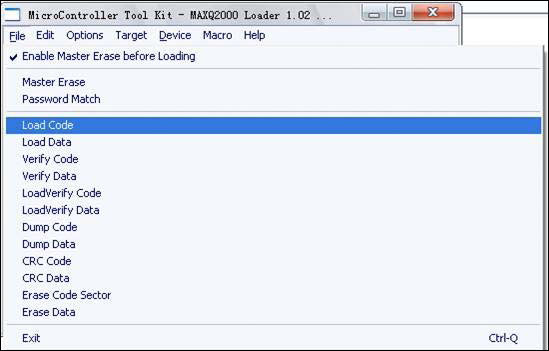
- Select File, then Load Code from the menu.
- Select the hex file to load into the MAXQ2000.
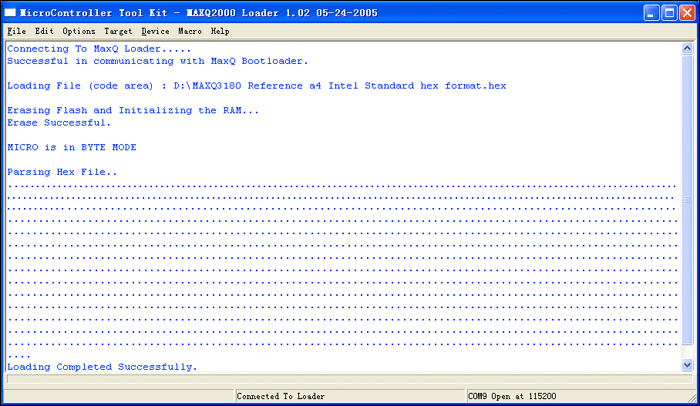
When code has been successfully downloaded to the MAXQ2000, you will see the Loading Completed Successfully message.
After code downloading is complete, click Target and then Disconnect from loader. Remove the JTAG cable from the meter (do not touch the hot board!) and cycle the power to the meter. The meter should start running by displaying the device name (MAXQ3180 or MAXQ3183) as the first message on the LCD screen.
Order Information
The MAXQ3180/MAXQ3183 reference designs can be ordered online.
| Part Number | Description |
| MAXQ3180-KIT | MAXQ3180 Reference Design |
| MAXQ3183-KIT | MAXQ3183 Reference Design |
Next Steps?
After you have completed the evaluation of the reference meter and seen the vast array of features offered by these devices, your next question may be, "What do I need to do now to use those features in my own design?"
Your next step can be as simple as requesting a few samples. Put them on your own board if you have an existing design that uses a similar discrete solution as this reference design, i.e, an AFE and microcontroller. Then make the necessary software changes in your host controller to control the MAXQ3180/MAXQ3183. There are application notes and sample code available on the Analog website to help speed your transition to working with the MAXQ3180/MAXQ3183. If you decide to start from a proprietary design and boards, the schematics and layout files for this reference design are available from Analog.
