
製品概要
設計リソース
評価用ボード
型番に"Z"が付いているものは、RoHS対応製品です。 本回路の評価には以下の評価用ボードが必要です。
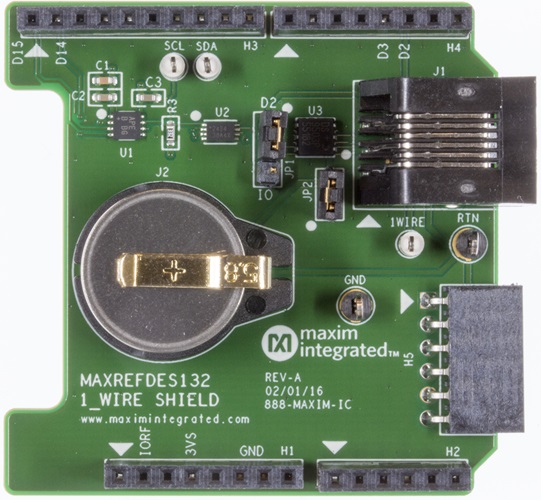
- MAXREFDES132# ($53.42) 1-Wire Shield
説明
MAXREFDES132# provides a convenient platform for interfacing with 1-Wire® devices, 1-Wire Evaluation Kits (EV kits), and iButton® devices using the DS2484 I2C-to-1-Wire master, or a bit-bang master on D2 of the Arduino form-factor pinout.
機能と利点
Features
- DS2484 1-Wire master
- F5 iButton socket
- 6P6C RJ-11 jack
- mbed.org library and Arduino libraries
- Arduino® shield form factor
Competitive Advantages
- Portable
- Compact
- Flexible
- Cost effective
詳細
Analog Devices’s 1-Wire bus continues to flourish in the era of IoT. This unique protocol provides communication and power along a single wire, at relatively long distances. Now, with MAXREFDES132#, Analog Devices merges a reliable, hardware based 1-Wire master with Arduino and mbed.org platforms.
MAXREFDES132# provides a convenient platform for interfacing with 1-Wire devices, 1-Wire EV kits, and iButton through the DS2484 I2C-to-1-Wire master, or a bit-bang master on D2 of the Arduino form-factor pinout. Both masters are supported by the ARM® mbed™ OneWire Library and the Arduino Library. Bit Banging is only supported on the MAX32600MBED platform, the DS2484 I2C-to-1-Wire master can be used on any mbed platform.
System Diagram
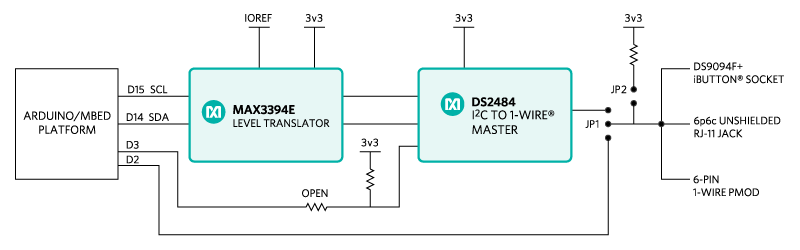
Figure 1. The MAXREFDES132# reference design block diagram.
Figure 1 is a block diagram of MAXREFDES132#.
The MAX3394E two-channel bidirectional level-translator provides compatibility between 5V and 3.3V platforms using the IOREF pin of the Arduino form factor.
The DS2484 I2C-to-1-Wire master provides internal user-adjustable timers that relieve the system host processor from generating time-critical 1-Wire waveforms, supporting both standard and overdrive 1-Wire communication speeds. In addition, the 1-Wire bus can be powered down under software control through D3 of the Arduino form-factor pinout.
D2 can be used to bit bang the 1-Wire bus by installing JP1 on pins 1-2 and installing JP2 to connect the provided pullup to the bus. Bit Banging is only supported by the OneWire Library on mbed for the MAX32600MBED board.
A OneWire Library that supports all of our silicon masters from one common API has been developed for ARM Cortex®-M micros using the online development environment mbed.org. The library and example programs can be found at the following links.
- mbed.org
- Arduino
- Library
- Example programs for Arduino can be found in the library download folder OneWire/examples The demo program iterates through the devices on the 1-Wire bus, and prints their 64-bit ROM IDs to a terminal. If the DS1920 is found, a temperature conversion is executed and the temperature is displayed in the terminal.

Figure 2. Demo program flow chart.
Required equipment:
- Windows® PC with a USB port
- MAXREFDES132#
- Compatible Arduino form-factor mbed platform
Procedure
The reference design is fully assembled and tested. Follow the steps below to verify board operation.
mbed.org
- Connect MAXREFDES132# to your platform.
- Ensure JP1 and JP2 are configured properly for the 1-Wire master you would like to use.
- Install the provided DS1920 iButton, or user supplied 1-Wire device.
- Connect USB cable from the PC to your platform.
- If you have never used mbed, setup an account and add your platform to your online compiler according to the instructions on your platform's product page.
- If you are using Windows and have never used serial communications between your PC and your mbed platform, follow the instructions.
- Navigate your browser to the following link.
- Click the 'Import this program' button and import the demo as a 'program'
- Ensure that the #define for the 1-Wire master you want to use is uncommented and all others commented out
- Compile and download the resulting binary to your platform.
- Open Hyperterminal, or your favorite terminal emulator to find the appropriate COM port for your platform, and configure the connection for 9600bps, 8-N-1 with no flow control.
- Ensure the terminal is configured for 'Auto' receive and 'CR+LF' transmit.
- Press the reset button on your platform and exercise the demo.
Arduino
- Download the OneWire Library and install it to your libraries folder following the directions.
- Connect MAXREFDES132# to your Arduino board.
- Ensure JP1 and JP2 are configured properly for the 1-Wire master you would like to use
- Install the provided DS1920 iButton, or user supplied 1-Wire device
- Connect USB cable from the PC to your Arduino board.
- Ensure that you have the COM port that your Arduino board is connected to selected in the Arduino IDE.
- Download the example program to your Arduino board and open the Serial terminal.
1-Wire is a registered trademark of Analog Devices Integrated Products, Inc.
Arduino is a registered trademark of Arduino LLC.
ARM, Cortex, and mbed are registered trademarks of ARM Holdings.
iButton is a registered trademark of Analog Devices Integrated Products, Inc.
Windows is a registered trademark and registered service mark of Microsoft Corporation.
関連資料
-
MAXREFDES132 Design Files2021/02/16ZIP13M
サポートおよびトレーニング
技術的なご質問についての回答は、ナレッジベースを検索してください。また、アナログ・デバイセズのアプリケーション・エンジニアの専任チームが、技術的なご質問にお答えいたします。