Transform a LED Driver from Buck to Boost for Enhanced Flexibility, Reduced BOM
Transform a LED Driver from Buck to Boost for Enhanced Flexibility, Reduced BOM
著者
Fons Janssen
2016年11月15日
要約
With a few extra components and some rearrangement of the topology, a buck-mode DC-DC converter IC can be made into a boost-mode device, to drive LED strings with voltages higher than the supply voltage.
The hysteretic-buck LED driver is a popular, easily implemented current source for situations where the voltage across the LED string is lower than the input voltage. By rearranging the external components, it is practical to switch this topology from buck mode to boost mode, to support LED strings where the sum of the diode drops is greater than the input voltage.
While there are many boost regulators available, this topology allows a single-buck regulator IC to provide both buck and boost functions, and so may simplify the bill of materials (BOM) and reduce overall cost. Although using the buck device for boost operation may result in increased variation in the LED current beyond what is acceptable, an additional control loop can be added to further regulate the current, if needed.
This transformation example uses the MAX16822A/MAX168321 hysteretic buck converters from Maxim Integrated, which are 2MHz high-brightness LED-driver ICs with integrated MOSFET and high-side current sense, Figure 1. (The MAX16822A and MAX16832 differ only in current rating: 500mA versus 1A, respectively.)
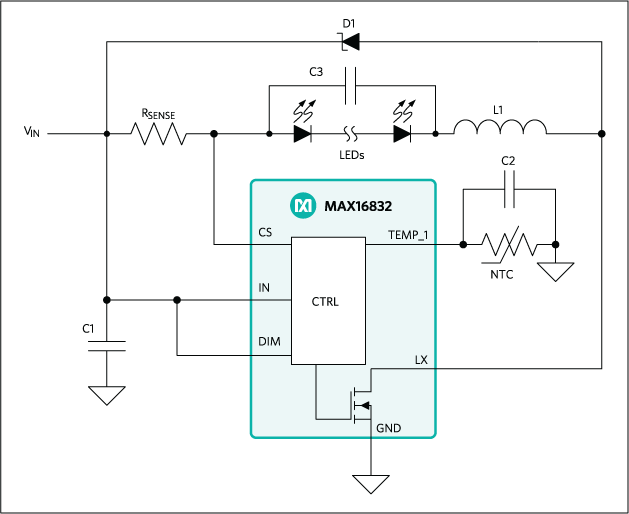 Figure 1. Typical application circuit of the MAX16832 as a buck-converter LED driver.
This circuit regulates the voltage on sense resistor RSENSE so that a constant current flows through the LEDs that are in series with that resistor. The MOSFET within the MAX16832 is turned on for currents below the set point and turned off for currents above it. When the MOSFET is on, the current ramps up and flows from input voltage VIN to GND through the sense resistor, the LEDs, the inductor, and the MOSFET; when the MOSFET is off, the current ramps down and flows back to VIN via the sense resistor, the LEDs, the inductor, and diode D1.
Adding the hysteresis results in a self-oscillating system, which generates a sawtooth-shaped LED current, Figure 2. The amplitude of the sawtooth is determined by the amount of hysteresis. Capacitor C3 acts as a filter, so that the LEDs mainly see a DC current. This topology is known as a high-side buck topology.
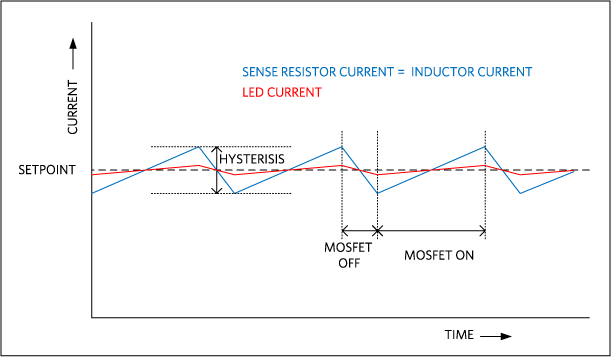 Figure 2. The current waveform of the hysteretic buck LED driver has a sawtooth LED current due to self-induced oscillation.
Going from Buck to Boost
A buck topology can only be used if the voltage across the LEDs is less than the input voltage. When voltage across the LEDs is greater than the input voltage, a boost topology is needed. Since the boost topology also has the switching MOSFET on the low-side, it is straightforward to change the high-side buck topology into a boost topology by rearranging the external components, Figure 3. In this boost topology, the current is regulated in the same way as in the high-side buck topology.
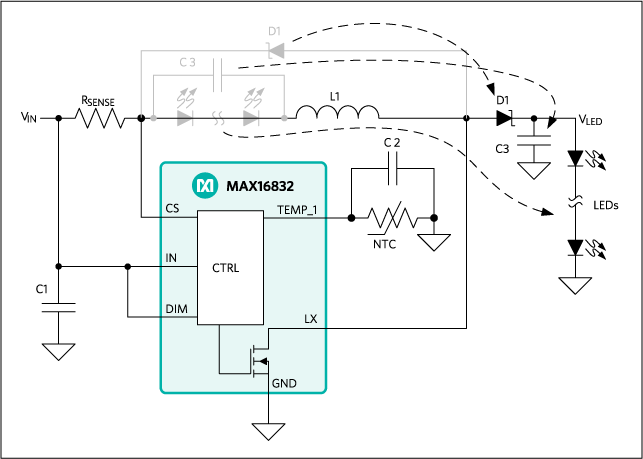 Figure 3. Change topology from high-side buck to boost just requires some rearrangement of the external components.
The difference is that the LEDs are no longer in series with the sense resistor and inductor. The result is that the input current is regulated rather than the LED current. Figure 4 shows the waveforms for the input and output currents; the LED current is a filtered version of the output current through C3.
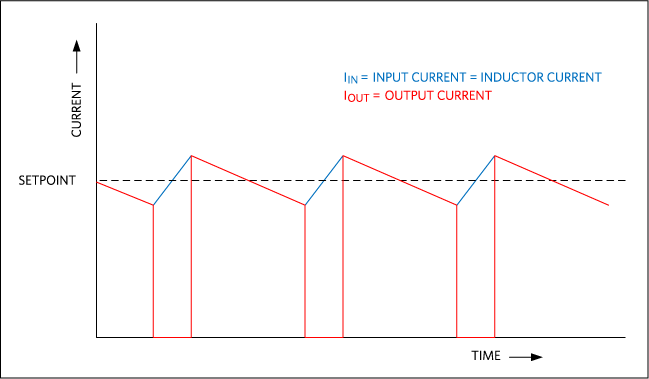 Figure 4. When configured as a hysteretic boost LED driver, the input current is regulated rather than the LED current, as shown by the waveforms for the input and output currents.
The result of this arrangement is that the LED current depends not only on the regulated input current (IIN), but also on input voltage (VIN), output voltage (VLED), and the efficiency (η) of the converter:

If the resulting variation in the LED current is greater than acceptable, an extra circuit based on the MAX85152 (a wide-Input, 0.6V shunt regulator for isolated DC-to-DC converters) can be added to regulate the LED current, Figure 5.
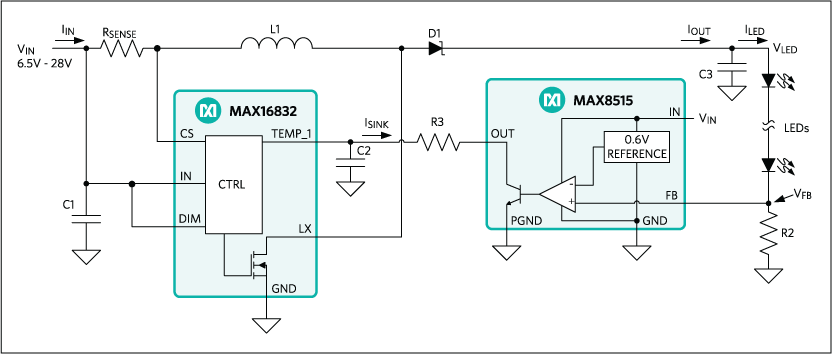 Figure 5. An additional circuit based on the MAX8515 shunt regulator can be used to improve LED current regulation, if needed.
MAX8515 acts as an error amplifier and compares feedback voltage VFB to an internal reference voltage of 0.6V. VFB is directly proportional to the LED current, with VFB = R2 × ILED. Since the output of the amplifier can sink current from the TEMP_I pin but cannot source current, a small constant current is sourced by the TEMP_I pin itself.
The difference between both currents is integrated by capacitor C2. If the MAX8515 sinks more current than the TEMP_I pin sources, the voltage decreases; the reverse is true as well. The set point for the input current IIN is proportional to this voltage, Figure 6. Therefore, if VFB is smaller than the 0.6V reference, no current will be sunk and the voltage on TEMP_I increases. This, in turn, increases the input power, and therefore, the LED current and VFB. If VFB is greater than the reference, the voltage on TEMP_I is pulled lower in order to reduce the LED current.
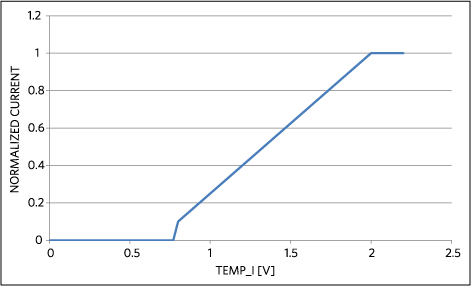 Figure 6. The MAX8515 manages the sinking and sourcing, as seen in the relation between voltage on TEMP_I and input-current set point.
LED Current-Control Loop Minimizes Variations
These parameters apply to the control loop used to regulate the LED current, Figure 7:
- The 0.6V reference voltage of the MAX8515 is the input for the control loop;
- VFB is the output and is directly proportional to the LED current, with ILED = VFB/R2;
- G1 is the gain of the MAX8515 and resistor R2 (note that the gain of MAX8515 is actually negative due to the inverting action of the NPN transistor; this is compensated by swapping the plus and minus signs on the adder);
- Capacitor C2 is the integrator while G2 is the gain between the TEMP_I voltage and the feedback voltage.
 Figure 7. Control loop for regulating the LED current begins by maintaining the feedback voltage VFB at 0.6V.
This control loop regulates VFB to 0.6V:

To correctly configure the boost circuit, sense resistor RSENSE should be chosen so that the maximum input current is slightly higher than needed. The extra control loop then reduces the input current to get the correct LED-current value. The value of this resistor can be calculated as follows:

The additional sense resistor R2 can be calculated by:

Overvoltage Protection also Needed
An LED normally fails as a short circuit; thus, lowering the output voltage. If the output voltage remains higher than the input voltage, the circuit continues to function correctly. However, if the LED fails by becoming a high impedance (open circuit) rather than a short circuit, the output current charges the output capacitor C3 to a value beyond the operating range of the IC, and cause it to fail.
To protect the circuit from such a condition, a few extra components can be added to the basic circuit, Figure 8. If the gate voltage of Q2 reaches its turn-on threshold, Q2 pulls down the DIM pin on the converter. This automatically stops the converter from switching and the output voltage slowly drops until Q2 is turned off. The cycle repeats so that the output voltage varies around the overvoltage threshold, which is chosen to be within the operating range of the converter.
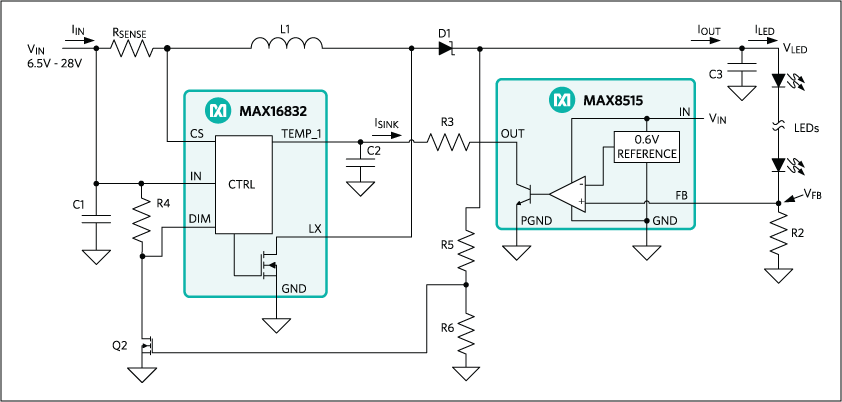 Figure 8. Over-voltage protection is needed when an LED fails open circuit; thus allowing C3 to become charged beyond the maximum rating of the IC.
Measurements Confirm, Extend Analysis
To verify the buck/boost analysis and assess overall performance, two circuits were built and tested, one with the extra LED current regulation (circuit 2) and one without it (circuit 1). The circuits were designed to drive eight LEDs (≈24V) at 200mA from a 12V input. The efficiency was estimated to be around 95%.
Circuit 1: With the output at 4.8W (24V × 200mA), input power was estimated at 4.8W/0.95 ≈ 5.05W. Using a 12V power supply, the input current should be regulated to 5.05W/12V ≈ 421mA, which results in a 470mΩ value for the RSENSE (200mV/421mA).
Circuit 2: For regulation of the LED current, R2 needs to be 3Ω (600mV/200mA). To extend the input voltage down to 8V, RSENSE should meet the following condition:

so a value of 300mΩ was chosen.
Table 1 shows the key component values: Glossary of Technical Terms| Reference | Without LED current regulation | With Led current regulation |
|---|---|---|
| L1 | 100µH | 100µH |
| RSENSE | 470mΩ | 300mΩ |
| R2 | N.A. | 3Ω |
| R3 | N.A. | 27kΩ |
| C1, C2 | 1µF | 1µF |
| C3 | 10µF | 10µF |
To demonstrate the added value of the LED current regulation, the LED current was recorded for an input voltage range of 8V up to 16V for both circuits, Figure 9. It is clear that, for the circuit without LED current regulation, the LED current is only at its 200mA target value when the input voltage is at its nominal value of 12V. For other values, it scales linearly with the input voltage. If the input voltage is regulated, the variation on VIN may be very small and result in an acceptable LED current variation.
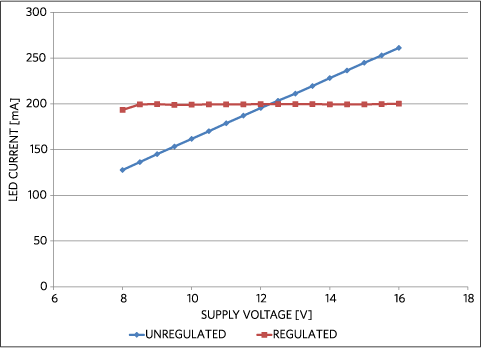 Figure 9. LED current versus input voltage with (red) and without (blue) additional regulation shows the output current's sensitivity to the input voltage.
In comparison, the circuit with LED current regulation does not show this effect, but has a constant value over the entire input voltage range. The extra control loop clearly shows its value by regulating the LED current to the target value for the entire input-voltage range; it is slightly lower only with 8V input. Most likely, the efficiency was slightly lower than the estimated 95% due to losses in R2. A quick measurement showed that the input current was at the maximum for VIN = 8V. A simple fix would be to lower RSENSE to 270mΩ.
Another nice feature of the hysteretic-buck LED driver is that the control loop is inherently stable since there is no feedback. Adding the additional control loop introduces feedback, which could introduce instabilities. A Bode plot of the stability of the control loop revealed that the circuit has a phase margin of about 47°, which is sufficient to guarantee stable operation, Figure 10.
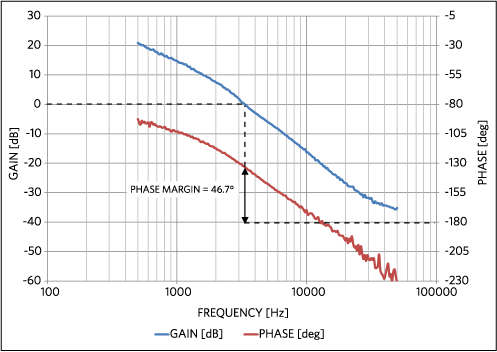 Figure 10. The Bode plot of the LED driver circuit with the current regulation confirms the circuit has sufficient phase margin to guarantee stable operation.


