AN-1282: Profiling the ADuCM350 Supply Current in an Example Application
Introduction
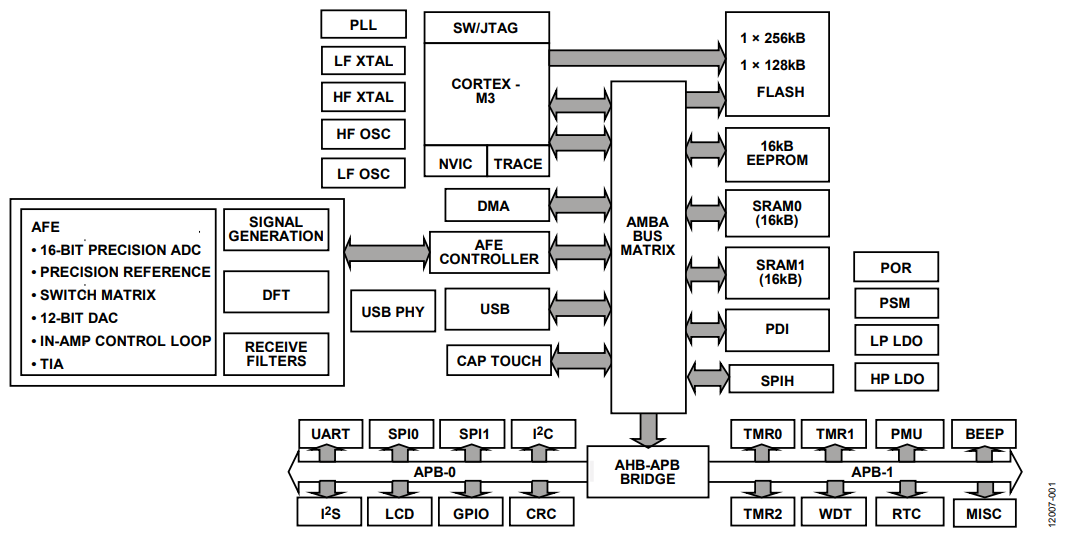
The ADuCM350 is an ultralow power, integrated mixed signal metering solution that includes a microcontroller subsystem for processing, control, and connectivity. The processor subsystem is based on a low power ARM Cortex™-M3 processor, a collection of digital peripherals, embedded static random access memory (SRAM) and flash memory, and an analog subsystem that provides clocking, reset, and power management capabilities.
The ADuCM350 is specifically designed for high precision analysis of electrochemical reactions. This application note demonstrates an example application of the low power features on the ADuCM350 and facilitates typical in-application supply current measurements.

ADUCM350 as a Low Power Device
The ADuCM350 is designed for use in low power, impedance measurement applications. It features three low power mode options: CORE_SLEEP, SYS_SLEEP, and hibernate.
CORE_SLEEP Mode
In CORE_SLEEP mode, the system gates the clock to the Cortex-M3 processor after it enters sleep mode. The rest of the system remains active. No instructions can be executed; however, direct memory access (DMA) transfers can continue to happen between peripherals and memories.
This mode has the advantage of eliminating instruction accesses to flash memory, as well as usage of stack and temporary variables in SRAM0, significantly reducing dynamic power in the system. DMA accesses into SRAM or flash automatically enable the clocks to that particular block. The nested vector interrupt controller (NVIC) clock, FCLK, remains active, and the NVIC processes the wake-up events.
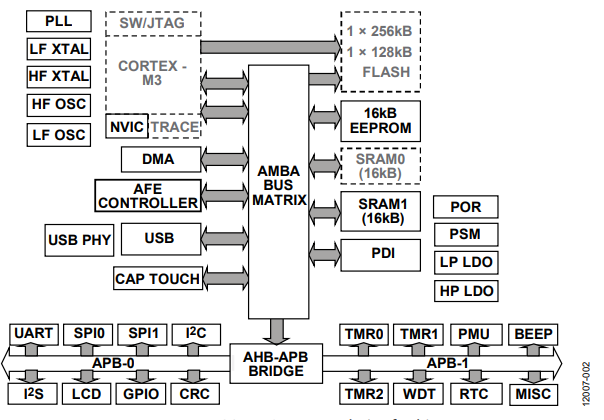
Figure 2 shows the ADuCM350 in the default CORE_SLEEP mode with only the core clock gated. Figure 3 shows an example where various submodules are also clock gated in CORE_SLEEP mode to provide additional power reduction.


SYS_SLEEP Mode
In SYS_SLEEP mode, the system gates the system bus clock (HCLK) and peripheral bus clock (PCLK) after the Cortex-M3 processor enters sleep mode. The gating of these clocks stops all advanced high performance bus (AHB) attached masters/slaves and all peripherals attached to the advanced peripheral bus (APB). Peripheral clocks are all off, and they are no longer user programmable. The NVIC clock (FCLK) remains active, and the NVIC processes the wake-up events.
Figure 4 shows SYS_SLEEP mode, where the majority of the ADuCM350 modules are clock gated.


Hibernate Mode
In hibernate mode, the system disables power to all combinational logic and places sequential logic in retain mode. Because FCLK is stopped, the number of sources capable of waking up the system is restricted.
In hibernate mode, SRAM0 has the option of retaining 8 kB or 16 kB. There is no option to retain the contents of SRAM1 while in hibernate mode. The high power low dropout (HP LDO) regulator is disabled when it enters hibernate mode, and the low power low dropout (LP LDO) regulator provides DVDD system power. Note that the LP LDO regulator always supplies power to the real-time clock (RTC). The VCCM power supply monitor (PSM) is software programmable in hibernate mode. Figure 5 shows hibernate mode.


Clock Gating
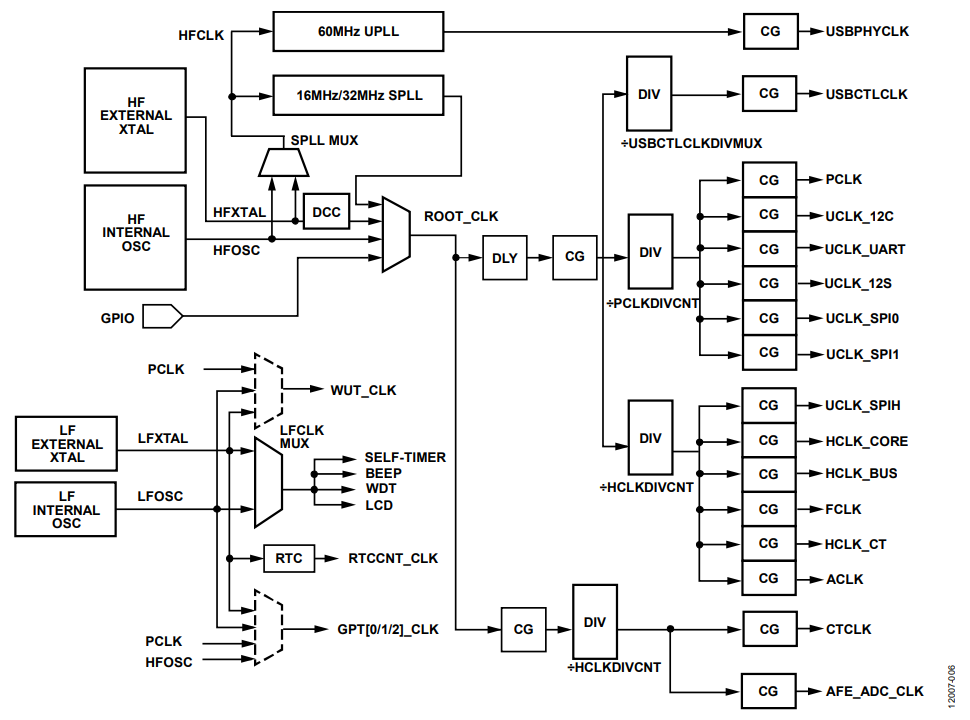
Clock gating is used in the active, CORE_SLEEP, and SYS_SLEEP modes to reduce dynamic power. Individual gates are available for every clock, as shown in Figure 6. Certain clocks are gated depending on the power mode, while others are user programmable. Clocks for many of the modules (for example, memories and DMA) are clock gated automatically when they are not in use. Table 1 summarizes the clock gating across the system.

| Clock | Active | CORE_SLEEP | SYS_SLEEP |
| FCLK | On | On | On |
| HCLK_CORE | On | Off | Off |
| HCLK_BUS | On | On | Off |
| HCLK_CT | On | On | User |
| PCLK | On | On | Off |
| UCLK_SPI0 | User | User | Off |
| UCLK_SPI1 | User | User | Off |
| UCLK_SPIH | User | User | Off |
| UCLK_I2C | User | User | Off |
| UCLK_UART | User | User | Off |
| UCLK_I2S | User | User | Off |
| USBPHYCLK | User/Auto | User/Auto | Off |
| USBCTLCLK | Auto | Auto | Off |
| ACLK | User | User | User |
| AFE_ADC_CLK | User | User | User |
| CTCLK | User | User | User |
Power Gating
Clock gating provides a means of reducing dynamic power consumption. The ADuCM350 also uses power gating to provide a large reduction in static power (leakage). Power gating is enabled when the ADuCM350 enters hibernate mode. Hibernate mode switches power off to combinatorial logic and places sequential elements into a low leakage retain state. The first 8 kB of system SRAM0 (Byte 0x0000 through Byte 0x1FFF) are always retained in hibernate mode. System SRAM0 Byte 0x2000 through Byte 0x3FFF have the option of being retained in hibernate mode. SRAM1 and universal serial bus random access memory (USB RAM) are never retained in hibernate mode.
Profiling the ADUCM350 Supply Current
A typical use case of the ADuCM350 involves performing an impedance measurement, processing the results, returning these results to the user, and entering a very low power state. To profile the supply current consumption of the ADuCM350 in a real use case, a firmware example and accompanying hardware were developed.
Firmware Overview
An example project was created to demonstrate some of the features and the supply current of the ADuCM350 in six different states: ready, analog front end (AFE) measurement, active core, active display, static display, or hibernate. Each state is infinitely looped to facilitate easily measuring the average supply current. Accompanying hardware facilitates changing states. In addition, an initialization state (State 0) exists that can be used to configure the ADuCM350, and it is only executed once at power up. The firmware is written to maximize the use of the application programming interfaces (APIs) provided in the latest ADuCM350BBCZ software development kit (SDK). The six different states include the following:
- State 1, the ready state, represents a transitional state. The core clock and the peripheral clock are set to the minimum frequency, and CORE_SLEEP mode is entered.
- State 2, the AFE measurement state, performs a 2-wire measurement of the attached load. State 2 takes advantage of the programmable sequencer to manage the measurement, allowing CORE_SLEEP to be used to minimize current consumption. This state represents the key use of the ADuCM350 as an impedance measurement device.
- State 3, the active core state, demonstrates the current consumed by a typical number crunching application. In this example, the real and imaginary components of the attached load, measured in the previous state, are converted into magnitude and phase values. These calculations can be required by a typical impedance measurement application.
- State 4, the active display state, returns the results of the State 3 calculations to the user visually, using the liquid crystal display (LCD) on the ADuCM350 GPIO test header board. The LCD loops the magnitude and phase results continuously. This state represents how the acquired data can be returned to the user visually.
- State 5, the static display state, takes advantage of the fact that SYS_SLEEP mode can retain a static value on an LCD. The LCD retains/displays the last active display state, and the ADuCM350 enters system sleep. An example use of State 5 is a user initiates a measurement and views the results; however, the user gets distracted and puts the device down. A powerdown was not requested by the user; however, to save on power, the system enters a low power mode while still (statically) displaying the last result.
- State 6, the hibernate state, simply puts the ADuCM350 into hibernate mode. There are a number of macros defined that allow various features to be enabled/disabled, giving different levels of supply current, depending on the application requirements. Most devices spend the vast majority of their life cycles in this state. This hibernate state represents a power down of the device of the user; however, the RTC and register values are retained. It is critical that this state consumes minimal current to extend the lifetime of the battery powering the device of the user.
Hardware Overview
The ADuCM350 supply current profiling example uses the EVALADuCM350EBZ evaluation board platform as the base hardware. The ADuCM350 Rev. B general-purpose input/output (GPIO) test header board is used to add the LCD and buttons to facilitate the state changes. The ADuCM350 Rev. 0 switch mux configuration board provides an example load for the AFE impedance measurement.
EVAL-ADUCM350EBZ Configuration
The EVAL-ADuCM350EBZ Rev. B motherboard is powered by the USB through the Analog Devices USB-SWD/UART-EMUZ emulator board, which ships in the EVAL-ADuCM350EBZ evaluation kit. The on-board regulator on the motherboard provides a stable 3.3 V supply for the board. Remove the short on J10 and connect an ammeter across the A pins to measure the current consumed by the ADuCM350. Table 2 shows the jumper configuration for the motherboard. For supply current measurements, it is also necessary to open LK4 to disconnect the super capacitor, C44, because this keeps the supply current artificially high. This artificially high supply current is particularly noticeable in the hibernate state.
| Mnemonic | State | Operation |
| LK1 | X1 | AN_A to AFE daughter board |
| LK2 | Open | LED GPIO functionality of P2.1 |
| LK3 | X1 | AN_B to AFE daughter board |
| LK4 | Open | Connect the super capacitor to the VBACK pin |
| LK5 | Short | VDDOUT to emulator board |
| LK6 | X1 | Thermistor voltage output measurement (AN_A) |
| LK7 | Short | VCCM_DIG to VCCM_ANA external connection (connected internally on chip) |
| LK8 | Open | LED GPIO functionality of P0.11 |
| LK9 | X1 | AN_C to AFE daughter board |
| LK10 | Short | AGND to DGND connector |
| LK11 | X1 | AN_C to AFE daughter board |
| LK12 | Open | LED GPIO functionality of P4.2 |
| LK13 | X1 | VBUS link |
| LK14 | Open | VLCDVDD supply |
| LK24 | Open | VUSB to VCCM_ANA connector; battery must be removed when IN |
| M1 | Open2 | P0.6 selected for UART TX |
| M2 | Open2 | P0.7 selected For UART RX |
| M3 | Open | REF_EXCITE used for thermistor operation |
| M5 | A | VDD_IO connection; A is VCCM |
| J10 | A3 | VCCM_ANA supply source |
| 1X = Don’t care. 2For printing, debug messages or results using UART, place in the B position. 3Connect ammeter across A position for current measurements or short the connection for regular operation from the on-board 3.3 V regulator. Place in B position for CR2032 battery power or C position for external supply from J12. |
||
USB-SWD/UART-EMUZ Emulator Board
The USB-SWD/UART-EMUZ emulator board handles UART over USB and serial wire (SW) communication as well as filling the role of an emulator and power supply to the EVAL-ADuCM350EBZ motherboard. The USB-SWD/UART-EMUZ emulator board ships in the EVAL-ADuCM350EBZ evaluation kit. When downloading code to the ADuCM350, short the LK1 to LK6 jumpers. However, when running the code and taking VCCM current measurements, only short LK6 and leave all other jumpers open, which prevents internal pull-up resistors consuming current, and driving up the VCCM current value.
ADUCM350 GPIO Test Header Board Configuration
The ADuCM350 Rev B GPIO test header daughter board is connected to the top right-hand corner of the motherboard. Header J6 and Header J21 on the motherboard must be mated with Connector J6 and Connector J21, respectively, on the daughter board. Push-Button P0_5 and Push-Button P0_4 are used to trigger the external interrupt required to change states. P0_5 increments the state, and P0_4 decrements the state. Alternatively, Rotary Switch S2 can be set to the desired state with Push Button P3_4 triggering a transition to that state. Note that values from 7 to F and 0 trigger State 6. Macros defined in the CurrentProfiling.h file dictate the method of the state change in use.
| Mnemonic | State |
| LK1 | Open |
| LK2 | Open |
| LK3 | Open |
| LK4 | Open |
| LK5 | Open |
| LK6 | Open |
| M0 | A |
| M1 | A |
| M2 | A |
| M3 | A |
| M4 | A |
| M5 | A |
Current Profiling Example Project
The current profiling example project contains two source files (CurrentProfiling_States.c and CurrentProfiling_Main.c) and a header file (CurrentProfiling.h) that call upon the latest ADuCM350BBCZ SDK drivers. The CurrentProfiling.h file contains some conditional compilation macros, constant definitions, and type definitions. The CurrentProfiling_States.c file contains the state functions, some support functions, and interrupt callback functions. The CurrentProfiling_Main.c file contains the main program loop.
State 0: Initialization
The initialization state is entered once at the beginning of the program and is not reentered. State 0 is used to configure the GPIOs and to enable the external interrupts for the push-button to allow the change of state. All peripherals that can be clock gated are gated in the initialization state. When the universal asynchronous receiver transmitter (UART) is not used for debug and results printing, the UART pins are disabled. When the RTC_ENABLE macro is set to 1, the RTC is configured and enabled. The ready state always follows the initialization state.
State 1: Ready
The ready state allows the user to measure the supply current when all peripherals are disabled and clock gated, the clocks are set to the minimum, and the ADuCM350 is put into CORE_SLEEP mode. The internal resistance capacitance (RC) oscillator is the high frequency (HF) clock source, and both the HCLK and PLCK dividers are set to 16, reducing both clock frequencies to 1 MHz. The SystemEnterLowPowerMode() API is used to enter CORE_SLEEP mode. The ADuCM350 only exits CORE_SLEEP mode when it receives an external interrupt from one of the change state push-buttons.
State 2: AFE Measurement
An AFE measurement requires a 16 MHz auxiliary clock (ACLK). ACLK is derived from HCLK, so the HCLK divider is set to 1 in the AFE measurement state. Ideally, an external crystal should be used as the ACLK source;however, to avoid variability due to different crystals from different manufacturers, the internal RC oscillator is used. The AFE is initialized and the power-up and calibration routines described in the Hardware Reference Manual, specifically the AFE Example Use Cases section, are called using APIs from afe.c in the SDK (see UG-587). These APIs feed predefined power-up and calibration sequences to the sequencer, which executes them independently of the core. The program then enters a while loop, repeatedly performing ac measurements until a change of state is requested. Because sequences execute independently of the core, the ADuCM350 is set to CORE_SLEEP mode while the sequence is executed, which contributes to a significant power saving, as can be seen in Figure 7. The results return data first in, first out (FIFO), which is read by the DMA. When the sequence finishes, an interrupt is generated. An interrupt is also generated when the data FIFO DMA transfer is complete. When both interrupts are triggered, the ADuCM350 exits CORE_SLEEP mode. The measurement is repeated indefinitely until a change of state interrupt is triggered.


State 3: Active Core
In the active core state, the real and imaginary values obtained in the AFE measurement state are used to calculate the magnitude and phase of the unknown impedance. The CMSIS function, ARM_CMPLX_MAG_Q31(), is used to calculate the magnitude, and a custom arctan function is used to calculate the phase. The PCLK is set to 1 MHz, and the HCLK is set to 16 MHz. Although the supply current is higher with a 16 MHz HCLK, the time to execute the calculations is shorter, resulting in operation that is more efficient. Table 4 shows the supply current and time taken for a single iteration of the active core function. Both calculations are repeated indefinitely until a state change interrupt is received.
| HCLK Frequency (MHz) | Supply Current(mA) | Execution Time (ms) |
| 1 | 1.27 | 2.062 |
| 2 | 1.62 | 1.031 |
| 4 | 2.31 | 0.515 |
| 8 | 3.67 | 0.257 |
| 16 | 6.34 | 0.129 |
State 4: Active Display
The LCD controller on the ADuCM350 supports driving up to 128 segments. Its programmable frame rate and contrast can be used to minimize the current consumed by the display. The ADuCM350 GPIO test header board comes with a 14 segment, 8 character LCD (Varitronix VIM828). The active display state outputs the magnitude and phase values measured in State 2 and calculated in State 3 to the LCD. Both the HCLK and PCLK are set to 1 MHz. The LCD controller uses the low frequency (LF) clock source. When the RTC is enabled, the LF crystal (LFXTAL) is used as the LF clock source because the RTC requires a LFXTAL. Otherwise, the internal LF oscillator (LFOSC) is used. The contrast bias level is set to the minimum value. The frame rate, or refresh rate, is also set to its minimum value of 26.9 Hz. The two results and their associated labels (MAG and PHASE) are displayed for approximately 1.3 sec each in a continuous loop. The ADuCM350 enters CORE_SLEEP mode while the display is static. The display cycles result indefinitely until a change of state interrupt is received.


State 5: Static Display
The LCD controller is one of the few peripherals that is not automatically clock gated in SYS_SLEEP mode. It has the ability to (statically) retain the LCD while many of the ADuCM350 blocks go to sleep (see Figure 4) to save power. In the static display state, the setup is very similar to State 4, with PCLK and HCLK set to 1 MHz, and an LF clock source required. The last display state is retained (or redisplayed, if the preceding state was State 6) on the LCD. The ADuCM350 then enters SYS_SLEEP mode until a change of state is triggered by an external interrupt.
State 6: Hibernate
In most applications, the ADuCM350 spends the vast majority of its time in hibernate mode. This mode is the lowest power state that the device can enter. There are a number of different options for the hibernate state that have an impact on the supply current depending on the requirement of the application. The RTC can be retained in hibernate mode. A LFXTAL is required as the LF clock source for the RTC. When the RTC is not required but a LF clock source is, enable the internal LFOSC instead of the LFXTAL to save some power. The ADuCM350 also has the option of retaining the full 16 kB of SRAM0, or only the lower 8 kB. The amount of SRAM retained has an impact on the supply current. Once these options are configured, the ADuCM350 enters hibernate mode until a change of state is triggered by an external interrupt.
Supply Current Measurement
Each state in the example program contains an infinite loop (until a state change is requested) or a wait for interrupt (WFI), which is called by the SystemEnterLowPowerMode function. This infinite loop or WFI facilitates the measurement of the (average) supply current in each state. The current was measured using the ammeter feature of the Agilent 3458A, 8.5 digit digital multimeter. The current was measured across the A pins of J10 on the motherboard. The measurement results are shown in Table 5.
| State | HCLK Frequency (MHz) | RTC Enabled | SRAM0 Retained in Hibernate Mode | LFOSC Enabled | Average Supply Current |
| State 1 | 1 | Yes | Not applicable | No | 1.0576 mA |
| 2 | Yes | Not applicable | No | 1.182 mA | |
| 4 | Yes | Not applicable | No | 1.438 mA | |
| 8 | Yes | Not applicable | No | 1.9447 mA | |
| 16 | Yes | Not applicable | No | 2.9188 mA | |
| State 2 | 16 | Yes | Not applicable | No | 8.86 mA |
| State 3 | 1 | Yes | Not applicable | No | 1.274 mA |
| 2 | Yes | Not applicable | No | 1.6191 mA | |
| 4 | Yes | Not applicable | No | 2.3092 mA | |
| 8 | Yes | Not applicable | No | 3.672 mA | |
| 16 | Yes | Not applicable | No | 6.341 mA | |
| State 4 | 1 | Yes | Not applicable | No | 1.1 mA |
| State 5 | 1 | Yes | Not applicable | No | 0.939 mA |
| State 6 | Not applicable | No | No | No | 2.164 µA |
| Not applicable | Yes | No | No | 2.23 µA | |
| Not applicable | No | No | Yes | 1.567 µA | |
| Not applicable | Yes | Yes | No | 2.277 µA | |
| Not applicable | No | Yes | No | 2.214 µA | |
| Not applicable | No | Yes | Yes | 1.618 µA |
著者
