How to Measure the Power Supply Rejection Ratio for the MAX38902A/MAX38902B
Abstract
Noise on power supplies typically propagates to the output and is generally unwanted, especially in sensitive applications such as precision measurement and RF communication. Linear regulators (LDOs) reject AC noise based on their power-supply rejection ratio (PSRR). PSRR is a function of noise frequency and input-to-output voltage difference. Furthermore, PSRR values are not consistently presented in manufacturers' data sheets. This application note shows the detailed measurement steps for determining the PSRR of the MAX38902A/B using Bode 100 from OMICRON, thereby equipping readers to perform their own PSRR measurements under the appropriate conditions for their application.
Introduction
The power-supply rejection ratio (PSRR) describes the ability of an amplifier to maintain its output voltage as its DC power-supply voltage is varied. The ratio can be expressed as follows: PSRR = (change in VIN)/(change in VOUT). Figure 1 shows the concept of the PSRR formula, where VIN and VOUT represent the change in input and output, respectively.

Figure 1. MAX38902 PSRR block diagram.
In practice, noise on an input supply also propagates to the output. In op amps, positive and negative supplies result in PSRR+ and PSRR¬. In low-dropout regulators (LDOs), however, one PSRR value is the measure of how well the regulator rejects an AC signal riding on a nominal DC voltage. In general, PSRR is expressed in decibels and is defined over a wide frequency range (10Hz to 1MHz is common) with the following equation:
PSRR = -20Log (Ripple Input)/(Ripple Output)
where Ripple Input is the RMS value of the change in VIN (applied power supply) at input and Ripple Output is the RMS value of the change in the voltage at output.
Note that PSRR is a negative value, but for simplicity we sometimes drop the sign and mention the absolute value.
PSRR performance greatly depends on the difference in input-to-output voltage. As the input voltage falls and the LDO approaches dropout, PSRR performance degrades significantly. This happens because when input voltage is reduced, the power pMOS pass device approaches the boundary of saturation operation and requires a significant gate-voltage swing to maintain regulation. The specific input voltage where the PSRR degradation occurs depends on the LDO’s dropout specification.
As a general rule, LDOs have significant degradation in their ability to reject input power-supply ripple when input is within three times the dropout voltage specification. For example, the MAX38902A/B guarantee dropout voltage of 100mV and, therefore, should not be run with less than 300mV of drop if a reasonable PSRR (~40dB) performance is required. Increasing the input voltage can lead to PSRR improvement. At the same time, a higher input-to-output voltage increases the LDO’s power dissipation and adversely affects efficiency. This additional power loss is generally undesirable. An LDO with a better dropout performance potentially offers the best PSRR with the smallest input-to-output voltage, yielding greater efficiency.
Figure 2 shows the MAX38902A/B’s PSRR at two different VIN - VOUT values. The blue curve shows PSRR at VIN - VOUT = 100mV, where the PSRR drops between -50dB and -60dB; the green curve shows PSRR at VIN - VOUT = 400mV, where the PSRR reaches -80dB. LDOs usually exhibit poorer PSRR at higher frequencies. However, the MAX38902A/B have PSRR ˜-60dB at 5MHz and at 10kHz, PSRR is -80dB.
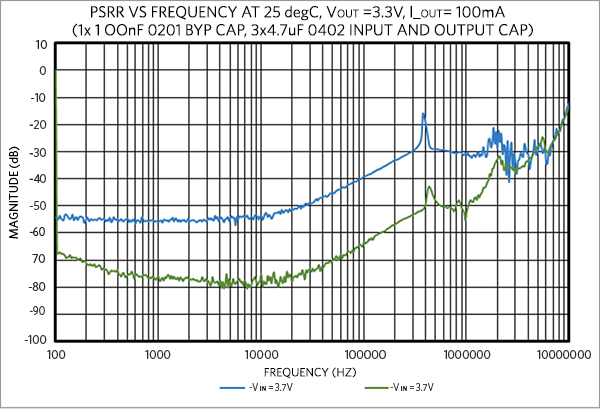
Figure 2. MAX38902A/B PSRR at VIN - VOUT = 400mV and VIN - VOUT = 100mV.
Because PSRR can be measured under various conditions, manufacturers do not include all the conditions in their product data sheets. In this application note, we show the detailed measurement steps for determining the PSRR of the MAX38902A/B using the Bode 100 from OMICRON®, allowing readers to perform their own PSRR measurements under the appropriate conditions for their application. Figure 3 shows the required setup for the measurements.

Figure 3. Required setup for PSRR measurement, using the Bode 100 with injection transformer and the MAX38902 LDO.
Measurement
Required Equipment
The following equipment is required to conduct measurements:
- MAX38902 EV Kit
- Amplifier capable of carrying 2A load
- OMICRON Lab Bode 100
- OMICRON Lab Wideband Injection Transformer
Setup
When measuring the PSRR using the Bode 100, ensure that the MAX3892 EV kit’s input and output connectors have direct connections to the Bode 100 channel, as shown in Figure 4. This reduces additional noise in the system. Figure 5 is a simplified block diagram of the entire measurement setup.

Figure 4. Direct connections between the MAX3892 EV kit and Bode 100.

Figure 5. Measurement setup block diagram.
MAX38902 EV Kit Setup
- Connect the BNC adapters with 5W load at both the VIN and VOUT of the MAX38902A/B.
- Connect the injection transformer to the input of the amplifier and from the output of the amplifier to the VIN of the MAX38902 EV kit.
- Apply the desired input voltage at VIN of the MAX389 0EV Kit.
- Set VOUT of the MAX38902A/B and apply a resistive load at which the measurement is desired.
Note: Do the PSRR measurement at VIN and VOUT of the MAX38902 EV kit one at a time. First, measure the PSRR of VIN and then measure the PSRR of VOUT; then, at the end, subtract the noise at VOUT and VIN to get the PSRR. Measure the VIN PSRR to ensure there is no signal at input and it should show a flat line when measuring the PSRR at VIN.
Bode 100 Setup
To ensure a proper connection of the Bode 100 to the MAX38902 EV kit:
- Open the Bode Analyzer Suite (BAS) (latest version available at www.omicron-lab.com).
- The Bode 100 is set up as follows (see Figure 6):
- Measurement Mode: Frequency Sweep Mode
- Start frequency: 100Hz
- Stop frequency: 10MHz
- Sweep: Logarithmic
- Number of points: 401 (or more)
- Receiver bandwidth: 30Hz
- Attenuator Receiver 1: 20dB
- Attenuator Receiver 2: 20dB
- Source level: -10dBm
Note: Adjust the source level accordingly by monitoring the output signal of the amplifier injected to the input of MAX38902EVKIT. Usually, a source level of 50mV to 100mV peak-to-peak is desirable. Monitor this with a scope probe on the oscilloscope.

Figure 6. Bode 100 setup.
- To configure the Hardware Setup, go to Home | Impedance/Reflection and only turn the switch of CH2 to the ON position; only use this channel for VIN and VOUT of the MAX38902A/B, one at a time. Note that either CH1 or CH2 can be used for this measurement, even though we use CH2 here (see Figure7).

Figure 7. Hardware setup in Bode 100.
- Now start the measurement by sweeping the frequency using the single-sweep mode. First sweep for VIN by connecting the MAX38902 BNC connector to the CH2 of the Bode 100. When done, save the result in a Microsoft® Excel® spreadsheet by going to Report | save as excel sheet. Repeat this step for VOUT and save the measurement. Note: When measuring VIN noise, the result should be flat at 0 level. At higher frequencies, the noise is not flat, due to the effect of the input capacitor.
Results
Open the measurements saved in Excel. Find the VIN and VOUT noise, which are in dB, then subtract VOUT - VIN and find out the PSRR versus frequency. The result can be plotted similar to Figure 2.
Related to this Article
Product Categories
Latest Media 21